
Sell Liferay and Services Through Digital Sales Rooms
- What You’ll Build
- Ingredients
- Steps
- Step 1: Activate Digital Sales Room on 2026.Q4
- Step 2: Publish the partner site and its collateral
- Step 3: Add the prospects and the seller team
- Step 4: Build a room template for each deal type
- Step 5: Set up each new room automatically with an Object Action
- Step 6: Create the rooms
- Step 7: Work the deal inside the room
- Step 8: Follow buyer engagement
- Step 9: Let prospects save an estimate from the public site into a room
- Step 10: Make it work in Japanese
- Step 11: Show the Salesforce opportunity in every room, and write back
- Step 12 (optional): Let AI assistants work with the deal through MCP
- Result
What You’ll Build
Northwind Digital is a fictional Liferay partner. It sells Liferay DXP subscriptions and its own professional services, and it runs every deal through a Digital Sales Room (DSR). A DSR is a private, branded workspace in Liferay that the seller and the buyer’s team share. You start from a plain, running Liferay DXP 2026.Q4 and add:
| Piece | What it does | Liferay feature |
|---|---|---|
| Partner website and collateral | Public site, and the briefs, services catalogue and case studies behind it | Sites, new CMS |
| A pipeline of rooms | One room per prospect: new logo, upgrade, RFP, public tender, renewal, reignited and lost deals, each with a trend from Cold to Closed Won | Digital Sales Room, Accounts |
| Room templates per deal type | New logo evaluation, RFP and security review, Renewal and expansion, Self-service estimate, Customer onboarding | Site Templates |
| Automatic room setup | A new room gets its template’s pages and a welcome addressed to the buyer by name | Object Action on the DSR Room object, and a small microservice |
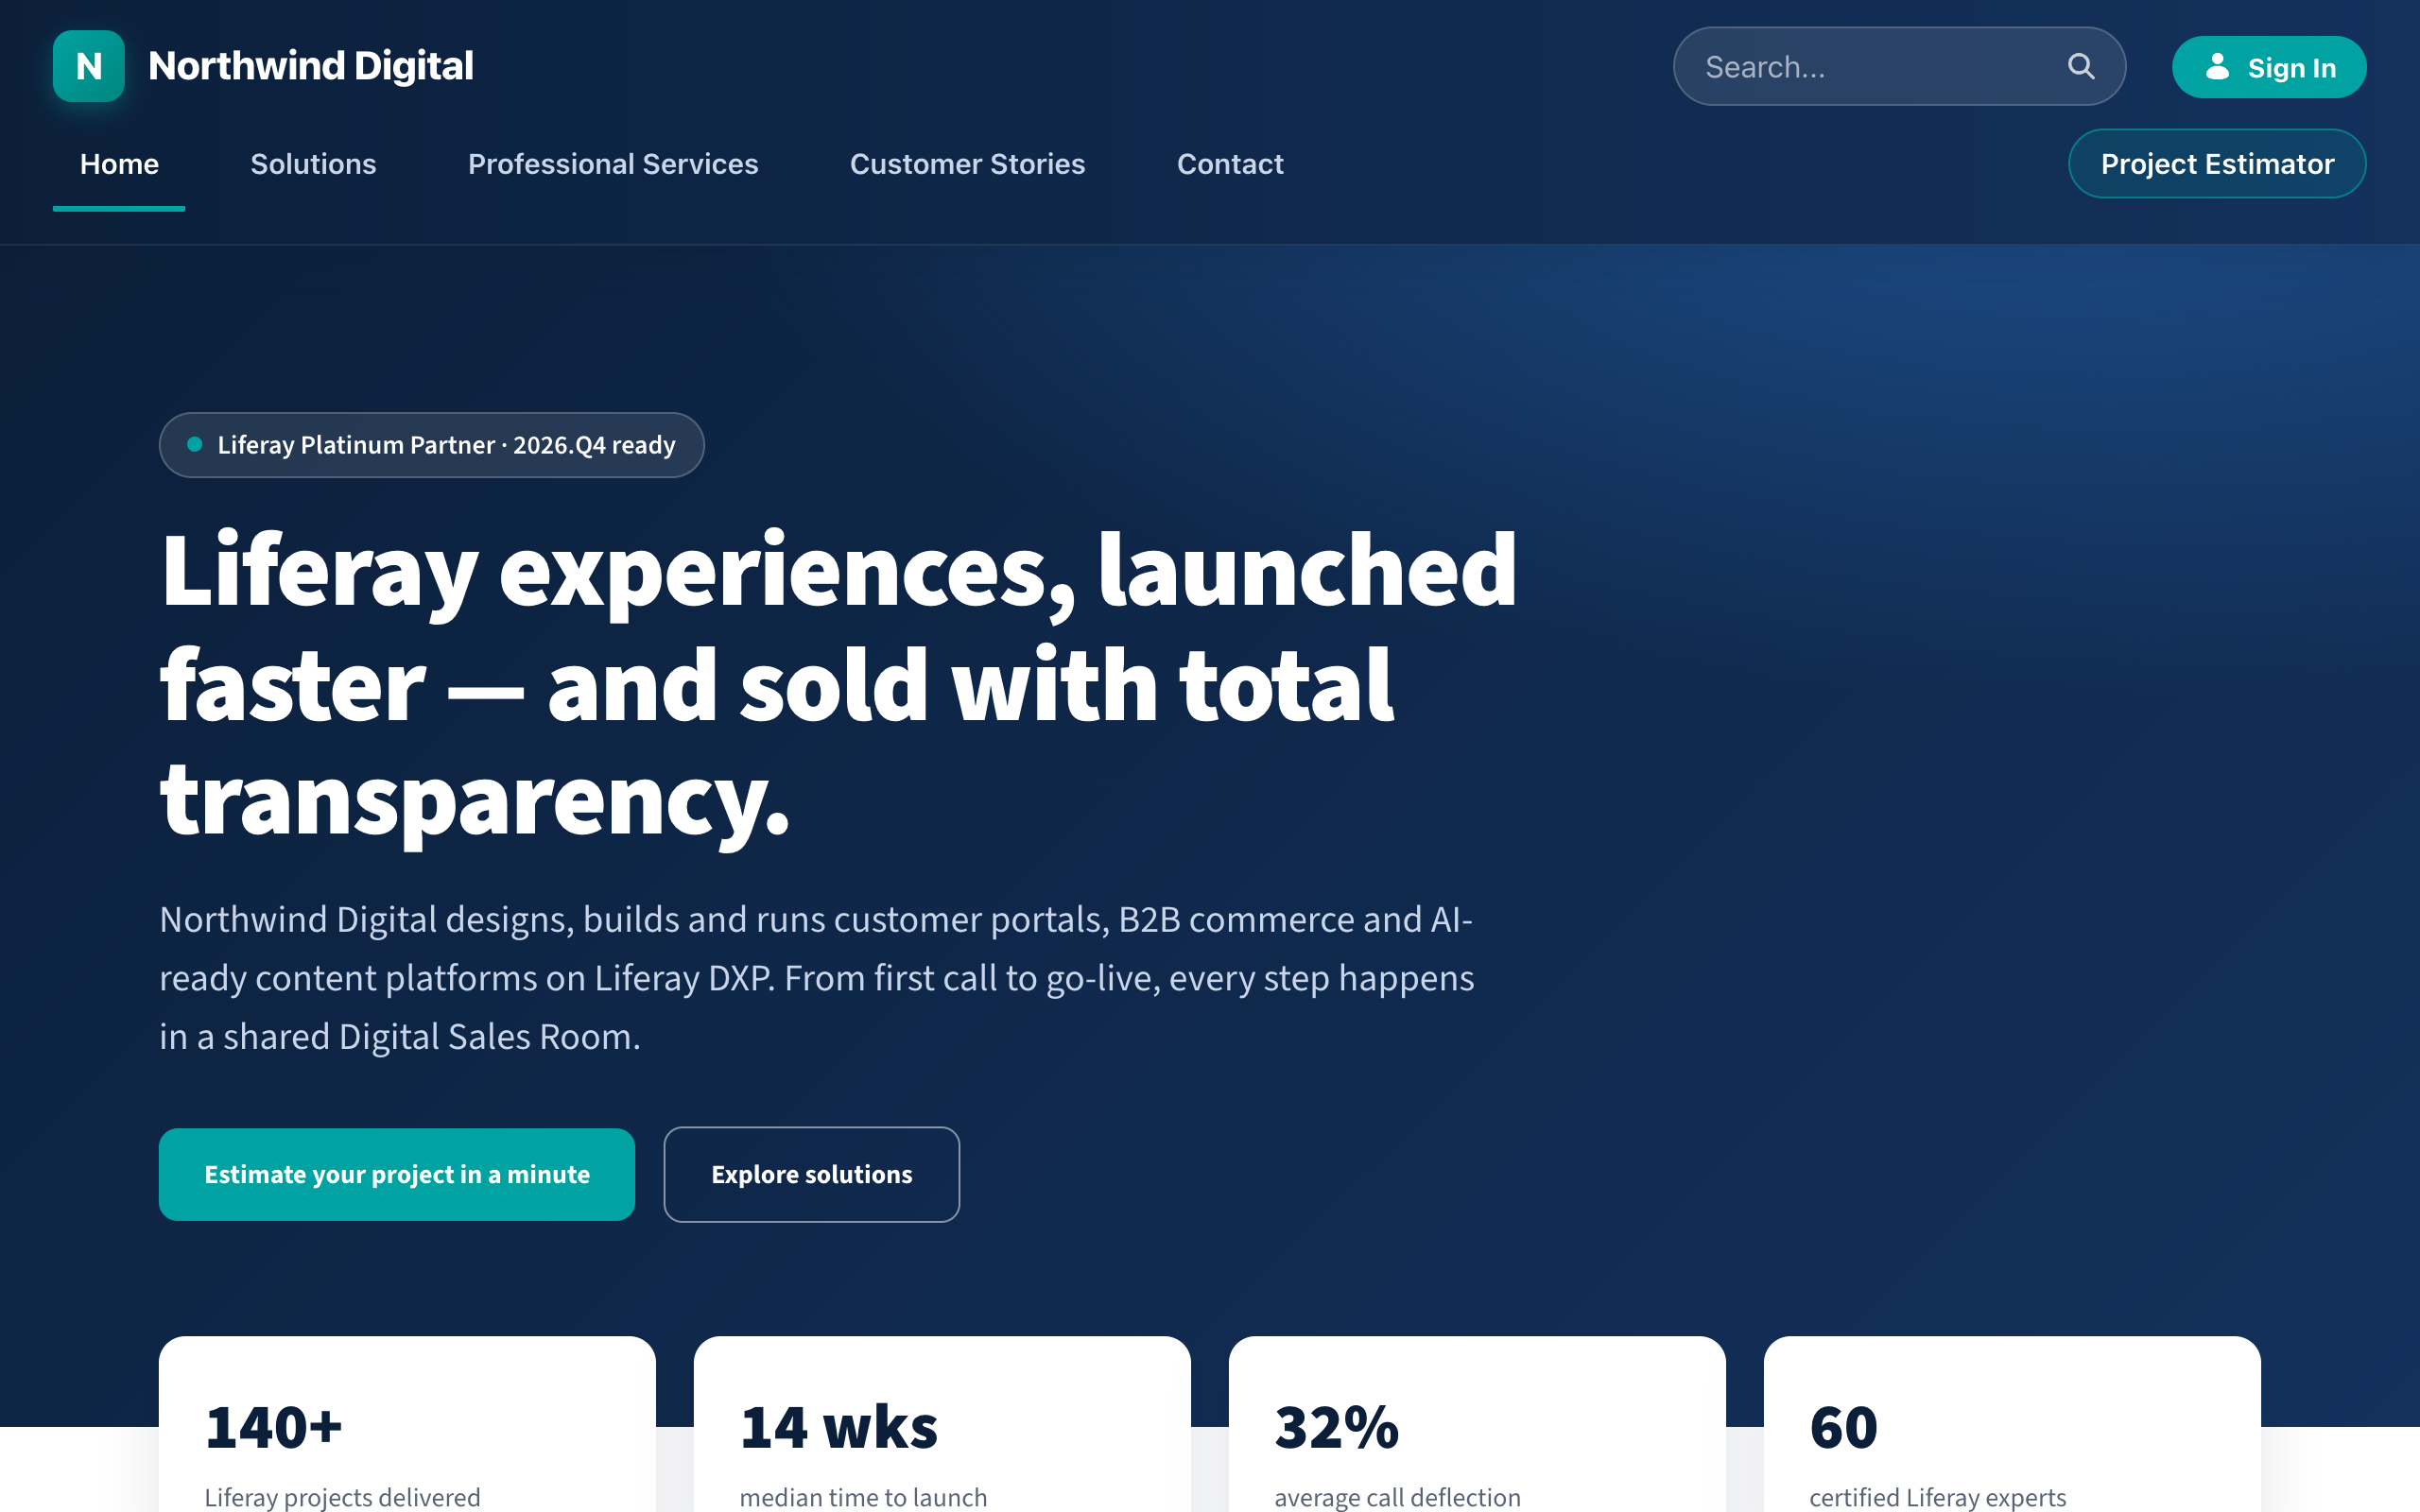
| Public project estimator | A prospect sizes a project on the website. When signed in, they save it into their own room | Content page, the same microservice |
| English and Japanese | Site, templates, rooms and estimate PDFs in both languages, and a user who signs in to a Japanese UI | Localization |
| Salesforce opportunity panel | Shows the linked opportunity in every room and writes room trend changes back | Custom element client extension, Object Action |
| Buyer engagement analytics | Who opened which document, how often, and when | DSR analytics on Liferay Data Platform |
| AI access (optional) | An AI assistant can ask about a deal or draft content in the CMS | MCP server |
Ingredients
| Ingredient | Type | Guide |
|---|---|---|
| Liferay DXP 2026.Q4, running (bundle or Docker) | Platform | Starting with a Docker Image |
Digital Sales Room app for 2026.Q4 (.lpkg) and its activation key (.xml) |
Marketplace app | Activating Digital Sales Room |
| Accounts, Site Templates, Objects | Built-in | Accounts |
| Client extensions (custom element) | Built-in | Client Extensions |
| A small automation service (any language; the demo uses about 300 lines of Python) | Microservice | This recipe, steps 5, 9 and 11 |
| Liferay Data Platform (Analytics Cloud) connection | Analytics | Engagement Metrics Dashboard |
| An AI assistant that speaks MCP (optional) | AI | Model Context Protocol |
Before you start, you need:
- Liferay DXP 2026.Q4, running, and an administrator who can sign in.
- The DSR
.lpkgbuilt for 2026.Q4 and its activation key. DSR is a separate Marketplace purchase. Ask your Liferay account manager, or open the Products Catalog in One Liferay. - Somewhere to run the automation service that Liferay can reach, for example a container next to Liferay or a client-extension microservice on Liferay SaaS.
Everything on this page was built and captured on Liferay DXP 2026.Q4 in Docker. All companies, people and prices are fictional. The analytics come from a mock Liferay Data Platform that serves sample engagement data, and the Salesforce panel reads a mock API.
Use the DSR build that matches your DXP release. On 2026.Q4, the 2026.Q3 Marketplace build fails with Only allowed bundles can add system object fields. You then get an empty DSR site and no Room object.
Steps
Step 1: Activate Digital Sales Room on 2026.Q4
- Copy the DSR activation key (
.xml) and the DSR.lpkgfiles to[Liferay Home]/deploy. In Docker, that is/opt/liferay/deploy. - Wait until the DSR modules report
STARTED. On a brand-new database, the DSR bundles can check their license before the key is processed and then stop, so restart Liferay once after the first start. - Wait for
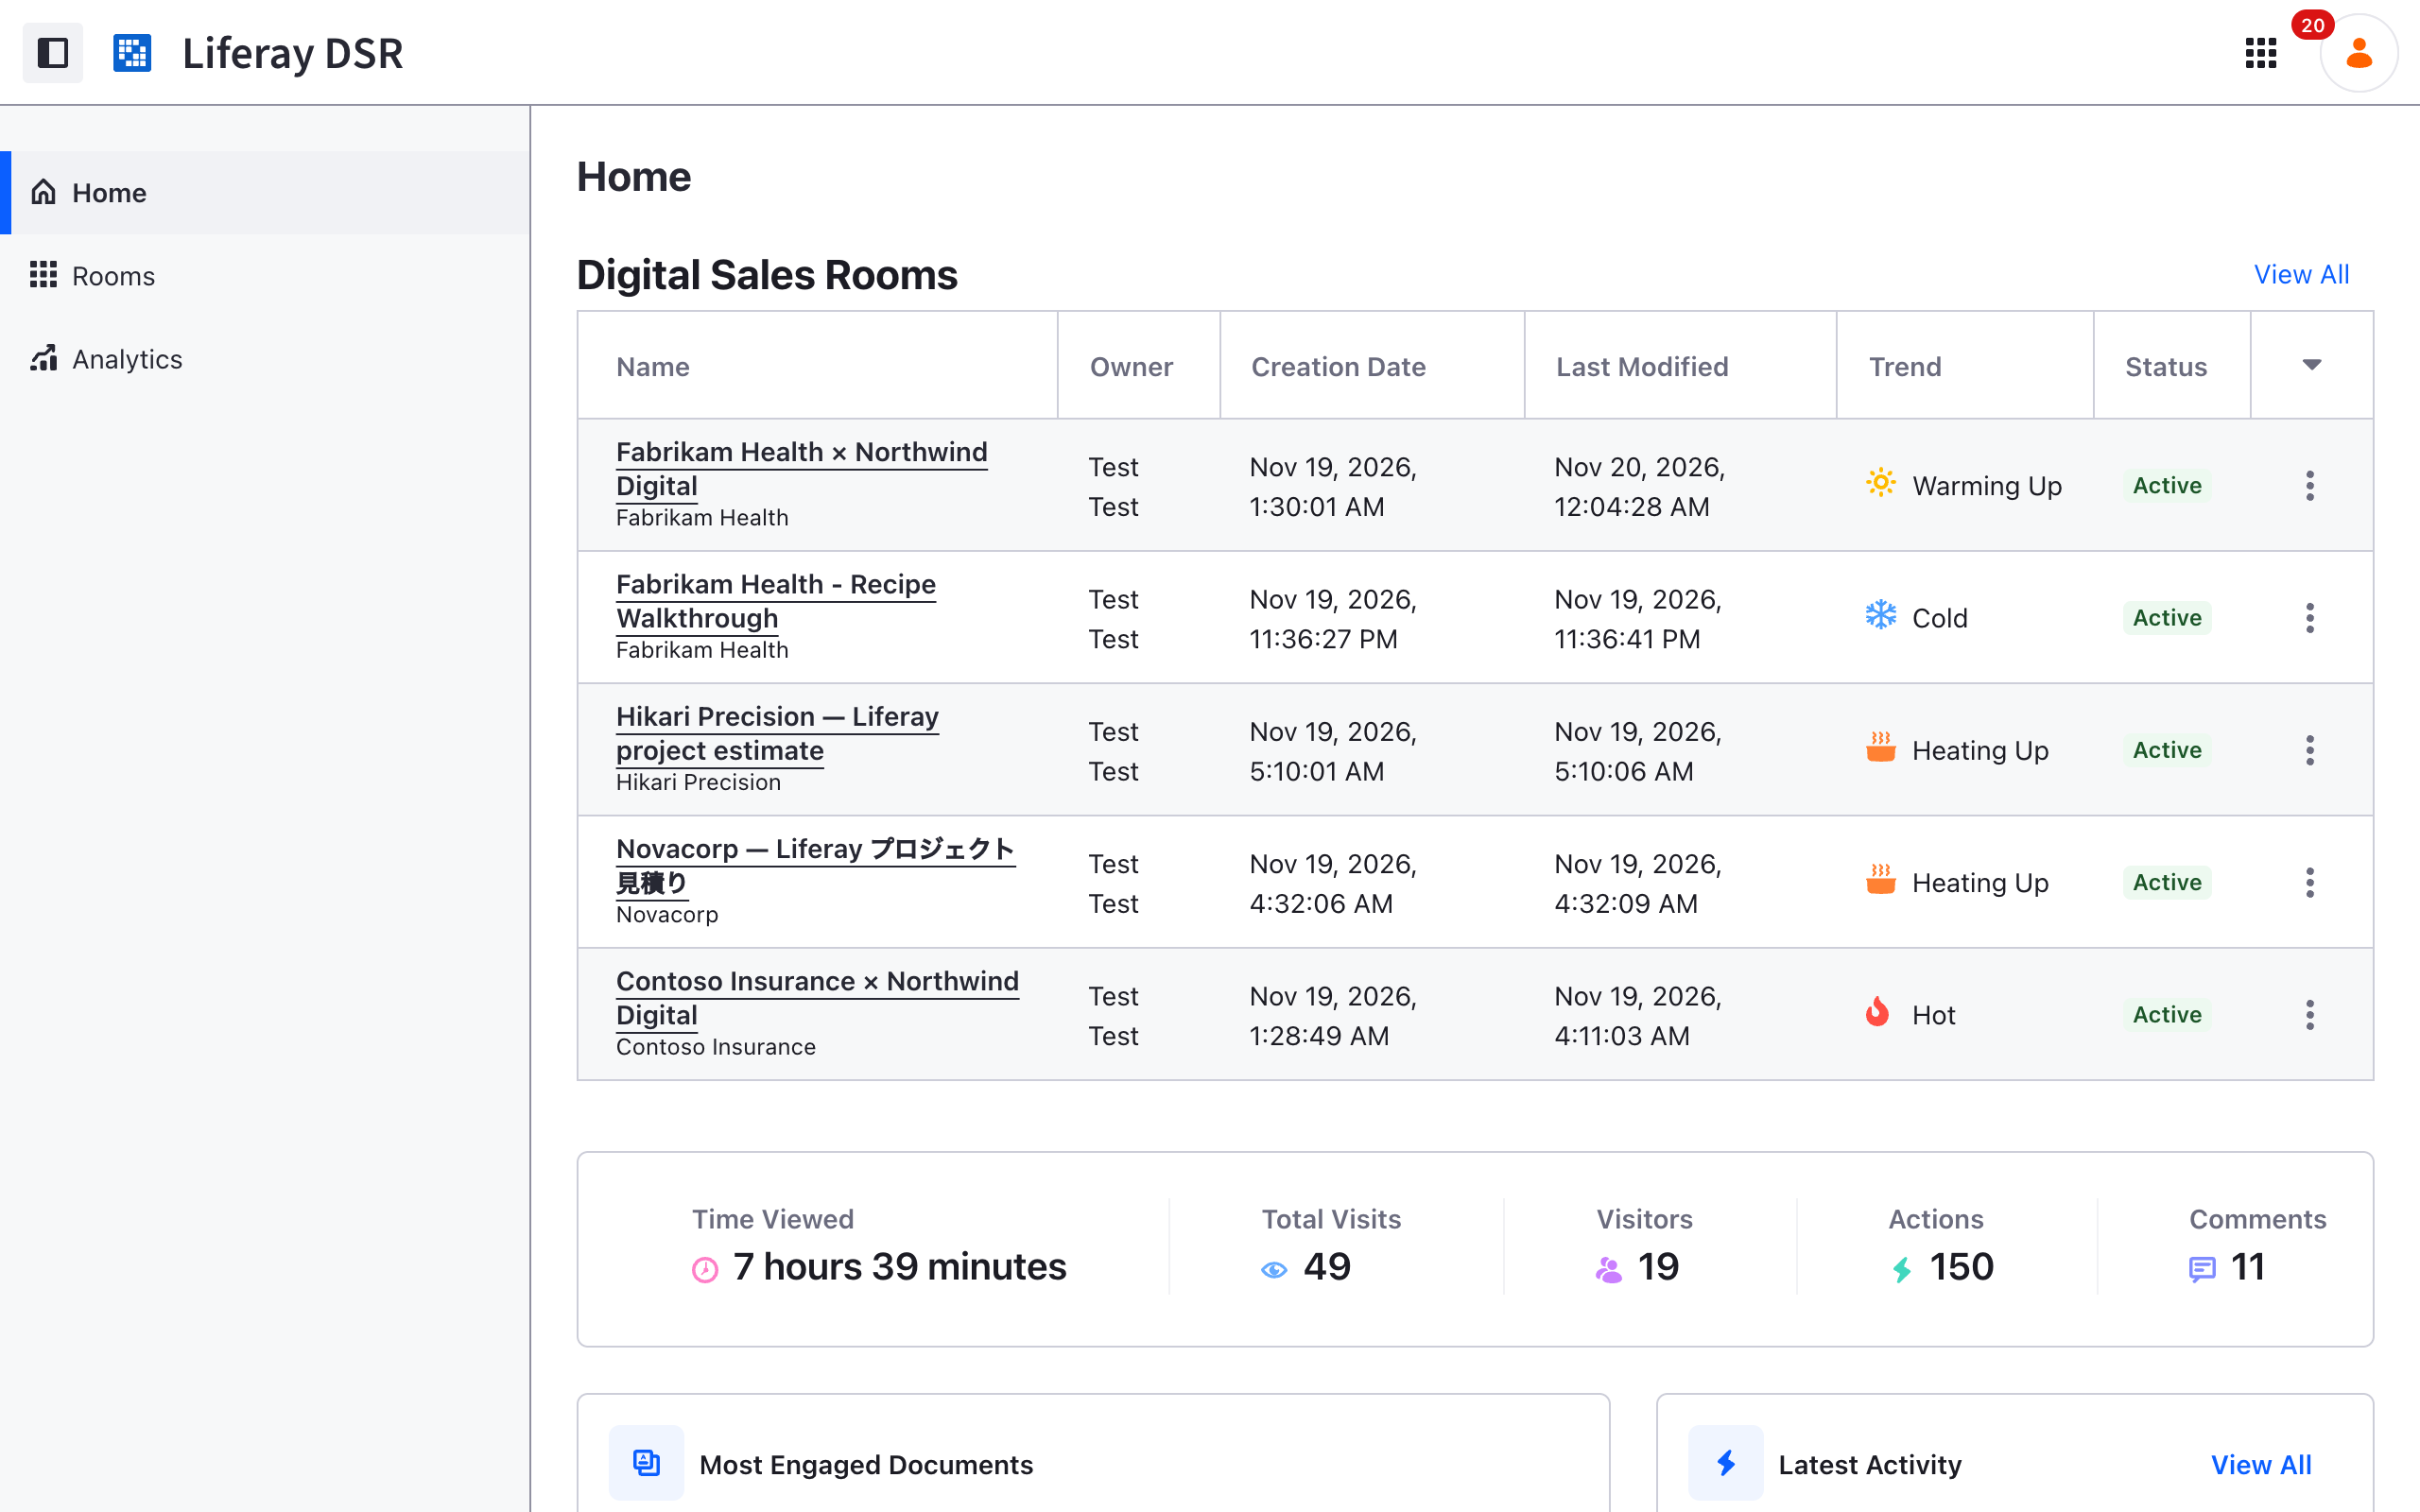
Server startup inin the log before you open any page. Liferay creates the DSR site (and the CMS site) on the first HTTP request. A request that arrives during startup creates them empty. - Open the Global Menu → Commerce → Digital Sales Room Management. The launchpad has Home, Rooms and Analytics.
Add the switches the later steps need to portal-ext.properties, then restart:
# Step 10: English and Japanese
locales.enabled=en_US,ja_JP

# Step 12 (optional): MCP server admin UI
feature.flag.LPD-63311=true

# Self-hosted only, when your analytics endpoint is not a Liferay host
# analytics.cloud.domain.allowed=*
Step 2: Publish the partner site and its collateral
The new CMS ships with 2026.Q4, with no flag needed.
- Open the Global Menu → CMS and create a Space, for example Sales Enablement. Connect it to your public site.
- Add the material your sellers reuse in every deal: solution briefs, a professional services catalogue and case studies. Add them in English and Japanese.
- Build the public site from fragments: Home, Solutions, Professional Services, Customer Stories, Contact, plus a Project Estimator page for step 9.
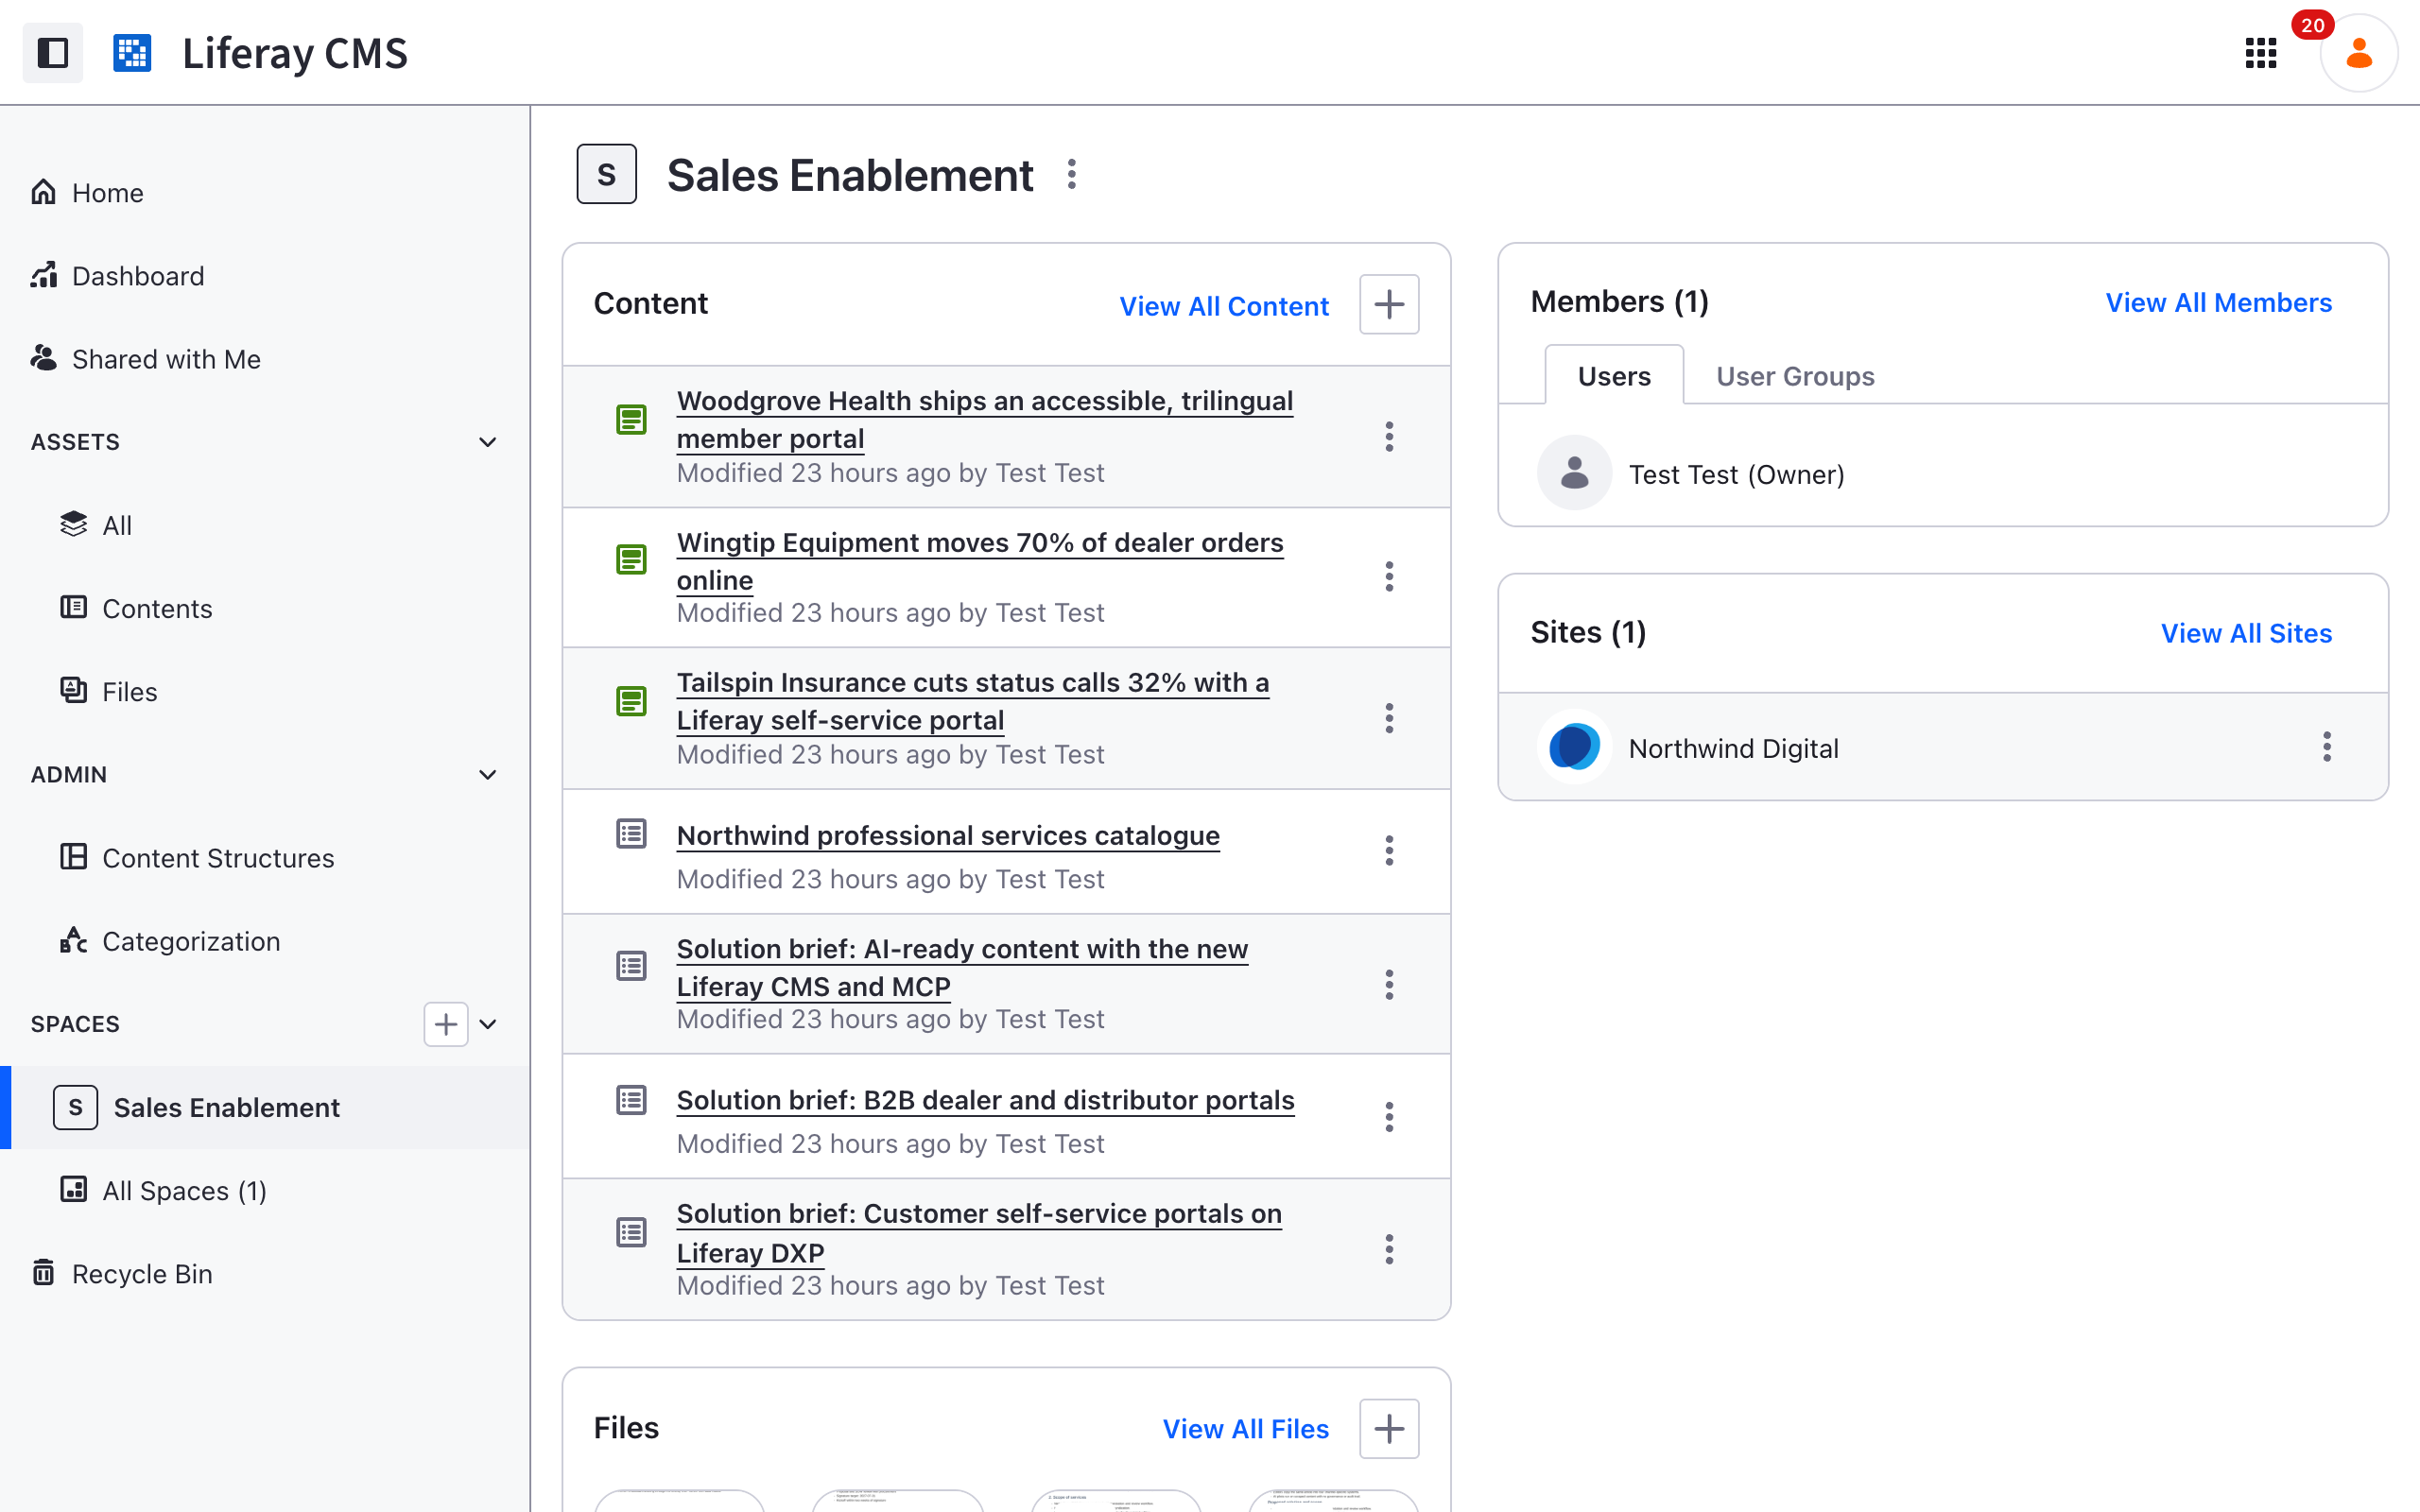
One source then feeds the website, the rooms and, through MCP, AI assistants.
Step 3: Add the prospects and the seller team
A room belongs to an account, and the account sets who you can invite.
- Under Global Menu → Applications → Accounts, add one Business account per prospect, such as Contoso Insurance, Globex Manufacturing, Fabrikam Health and Woodgrove Bank. Add each buyer contact (sponsor, IT lead, procurement) to its account.
- Add the seller team as users: an account executive, a solutions architect, a delivery lead and a sales director. Give them the DSR Seller role, which the DSR app creates.
Step 4: Build a room template for each deal type
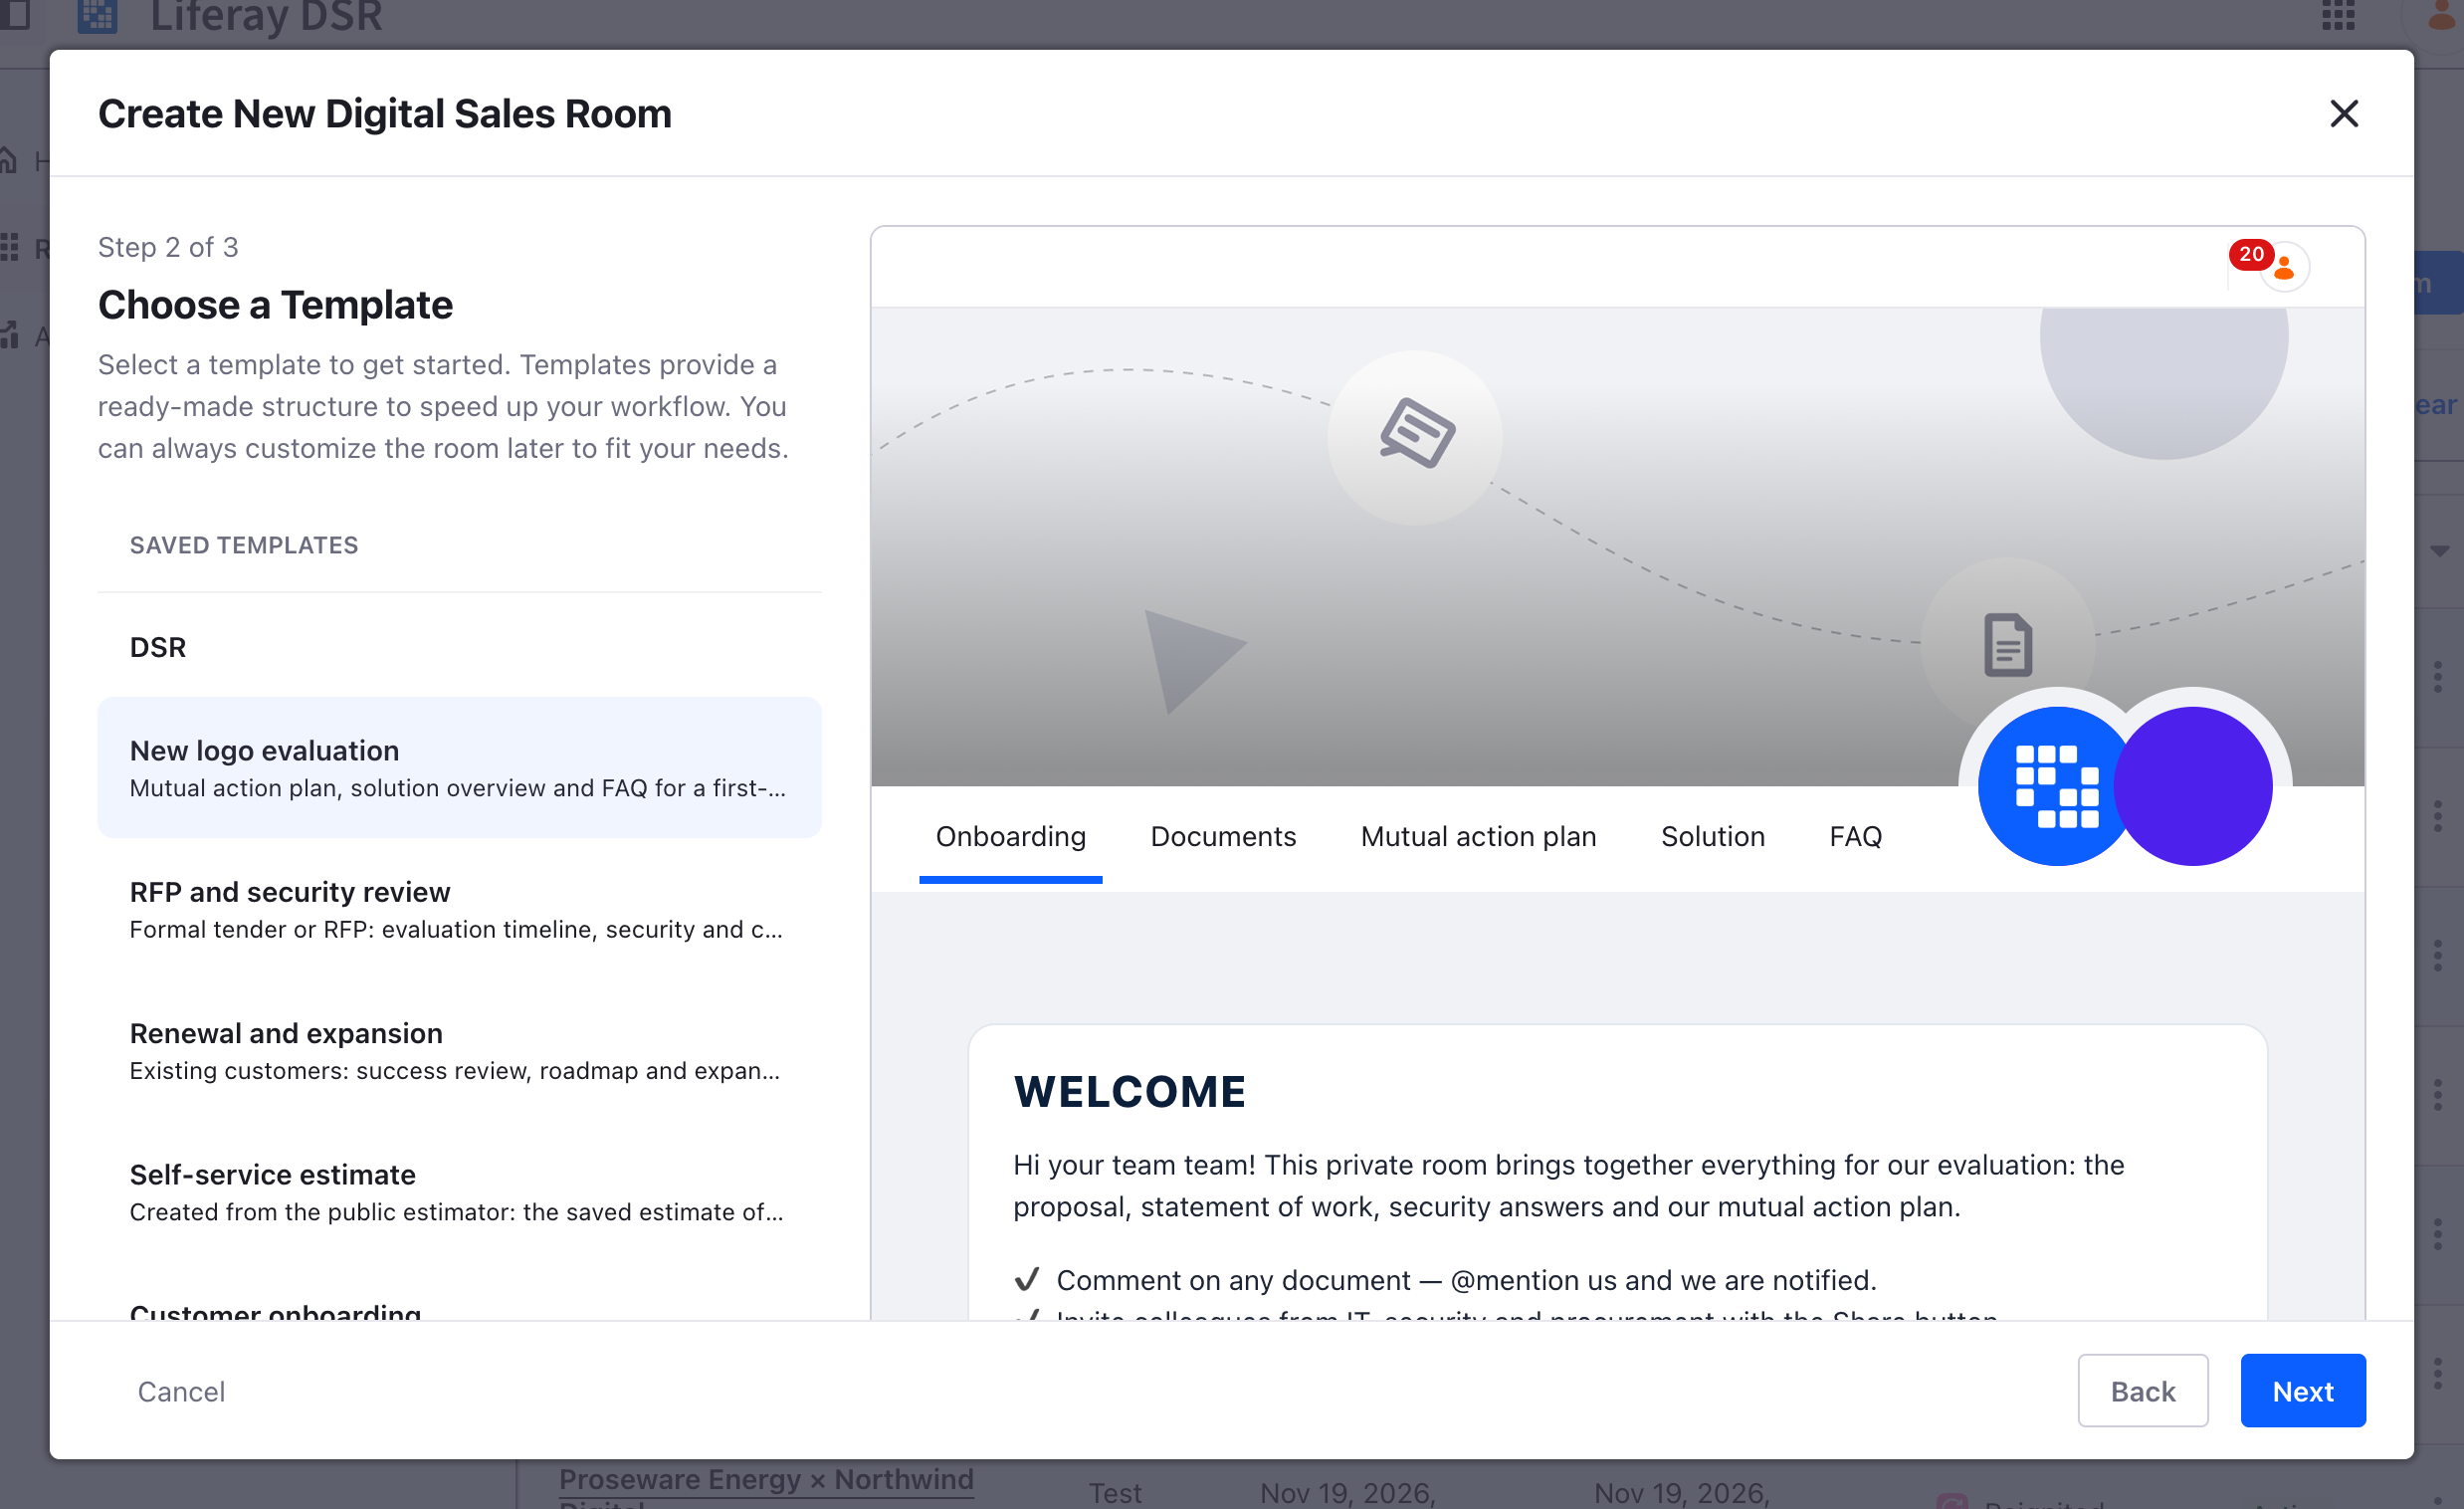
The Create New Digital Sales Room wizard lists every Site Template in the instance, next to the default DSR template. So each kind of deal can start from its own template:
| Template (EN / JA) | Pages it adds |
|---|---|
| New logo evaluation / 新規導入の評価 | Mutual action plan, Solution, FAQ |
| RFP and security review / RFP・セキュリティ審査 | Evaluation timeline, Security and compliance, Q&A log |
| Renewal and expansion / 契約更新・拡張 | Success review, Roadmap, Expansion options |
| Self-service estimate / セルフサービス見積り | Estimate (filled by the estimator in step 9) |
| Customer onboarding / 導入オンボーディング | Project plan, Project team, Onboarding FAQ |
To make one, go to Control Panel → Sites → Site Templates. Start from a copy of the DSR template (export it and import it into the new template), so you keep its fragments, theme and DSR master page. Give the template and its pages names in both languages.
2026.Q4.0 traps found while building this:
(1) A template without the digital-sales-room-master master page produces rooms that render empty.
(2) DSR copies a template into a new room from an export taken as the Guest user, so a template page without Guest VIEW is silently left out. Step 5 removes that Guest VIEW again inside each room.
(3) Avoid & and ' in template names and descriptions, because the wizard shows them escaped (&).
Step 5: Set up each new room automatically with an Object Action
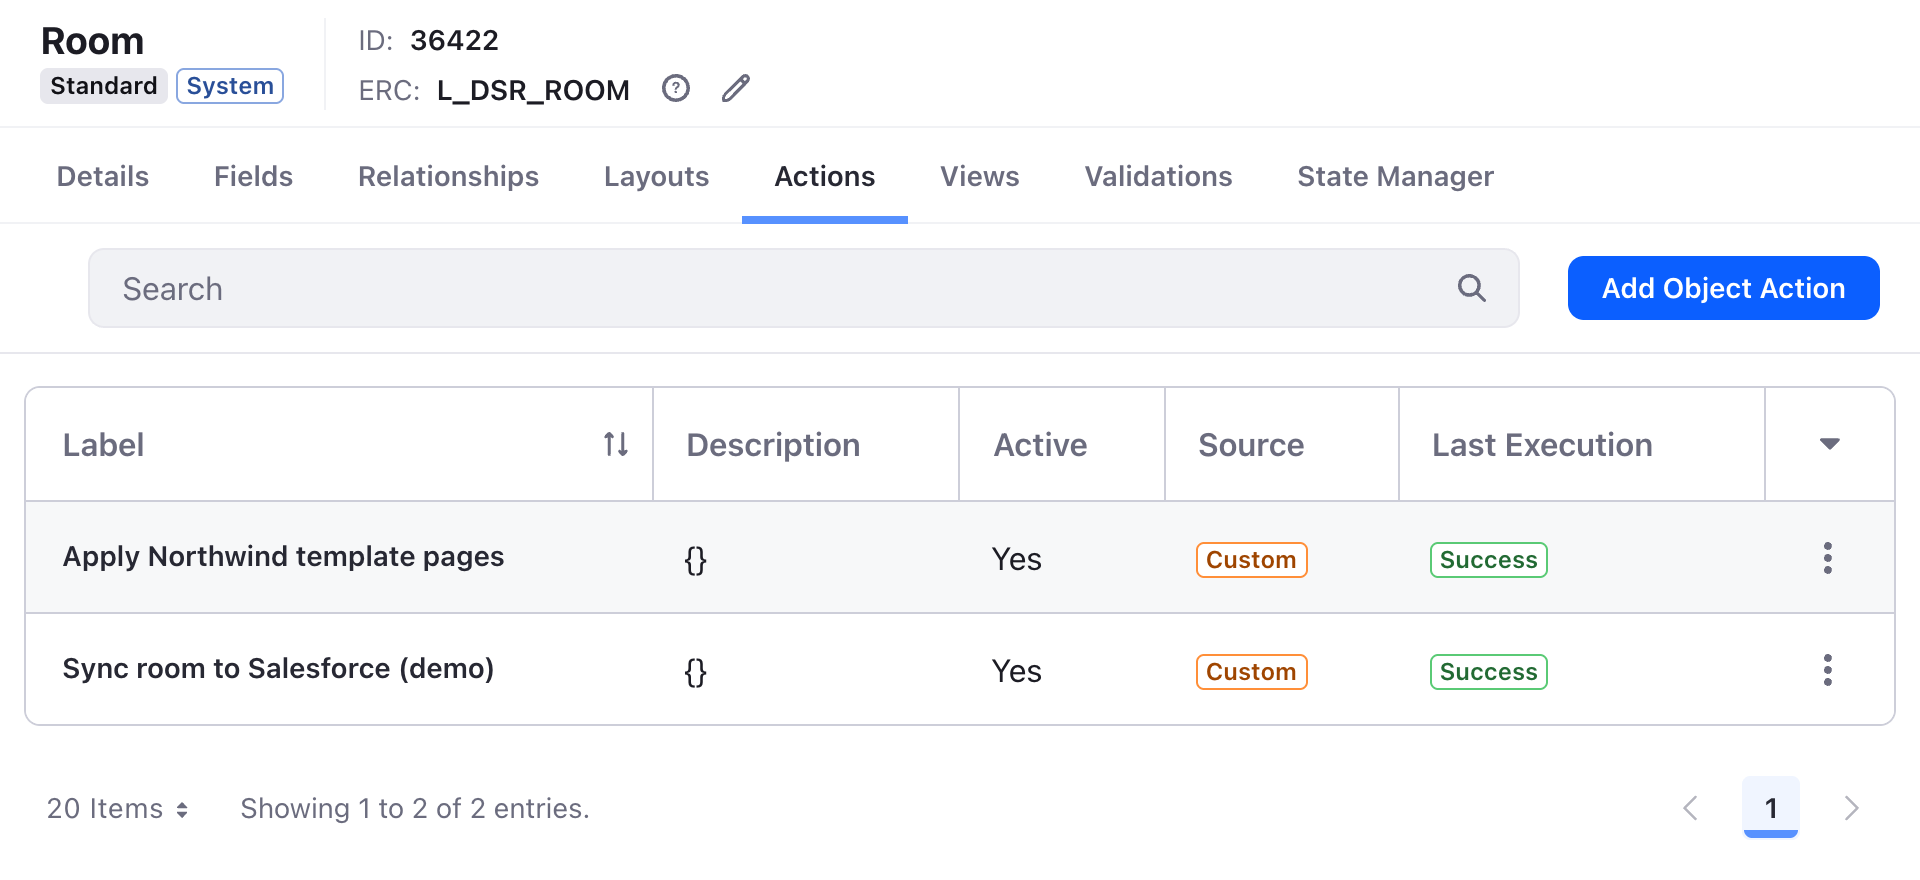
DSR rooms are records of the Room object (L_DSR_ROOM). An Object Action on that object runs whenever a room is created, whether from the wizard, the API or the estimator.
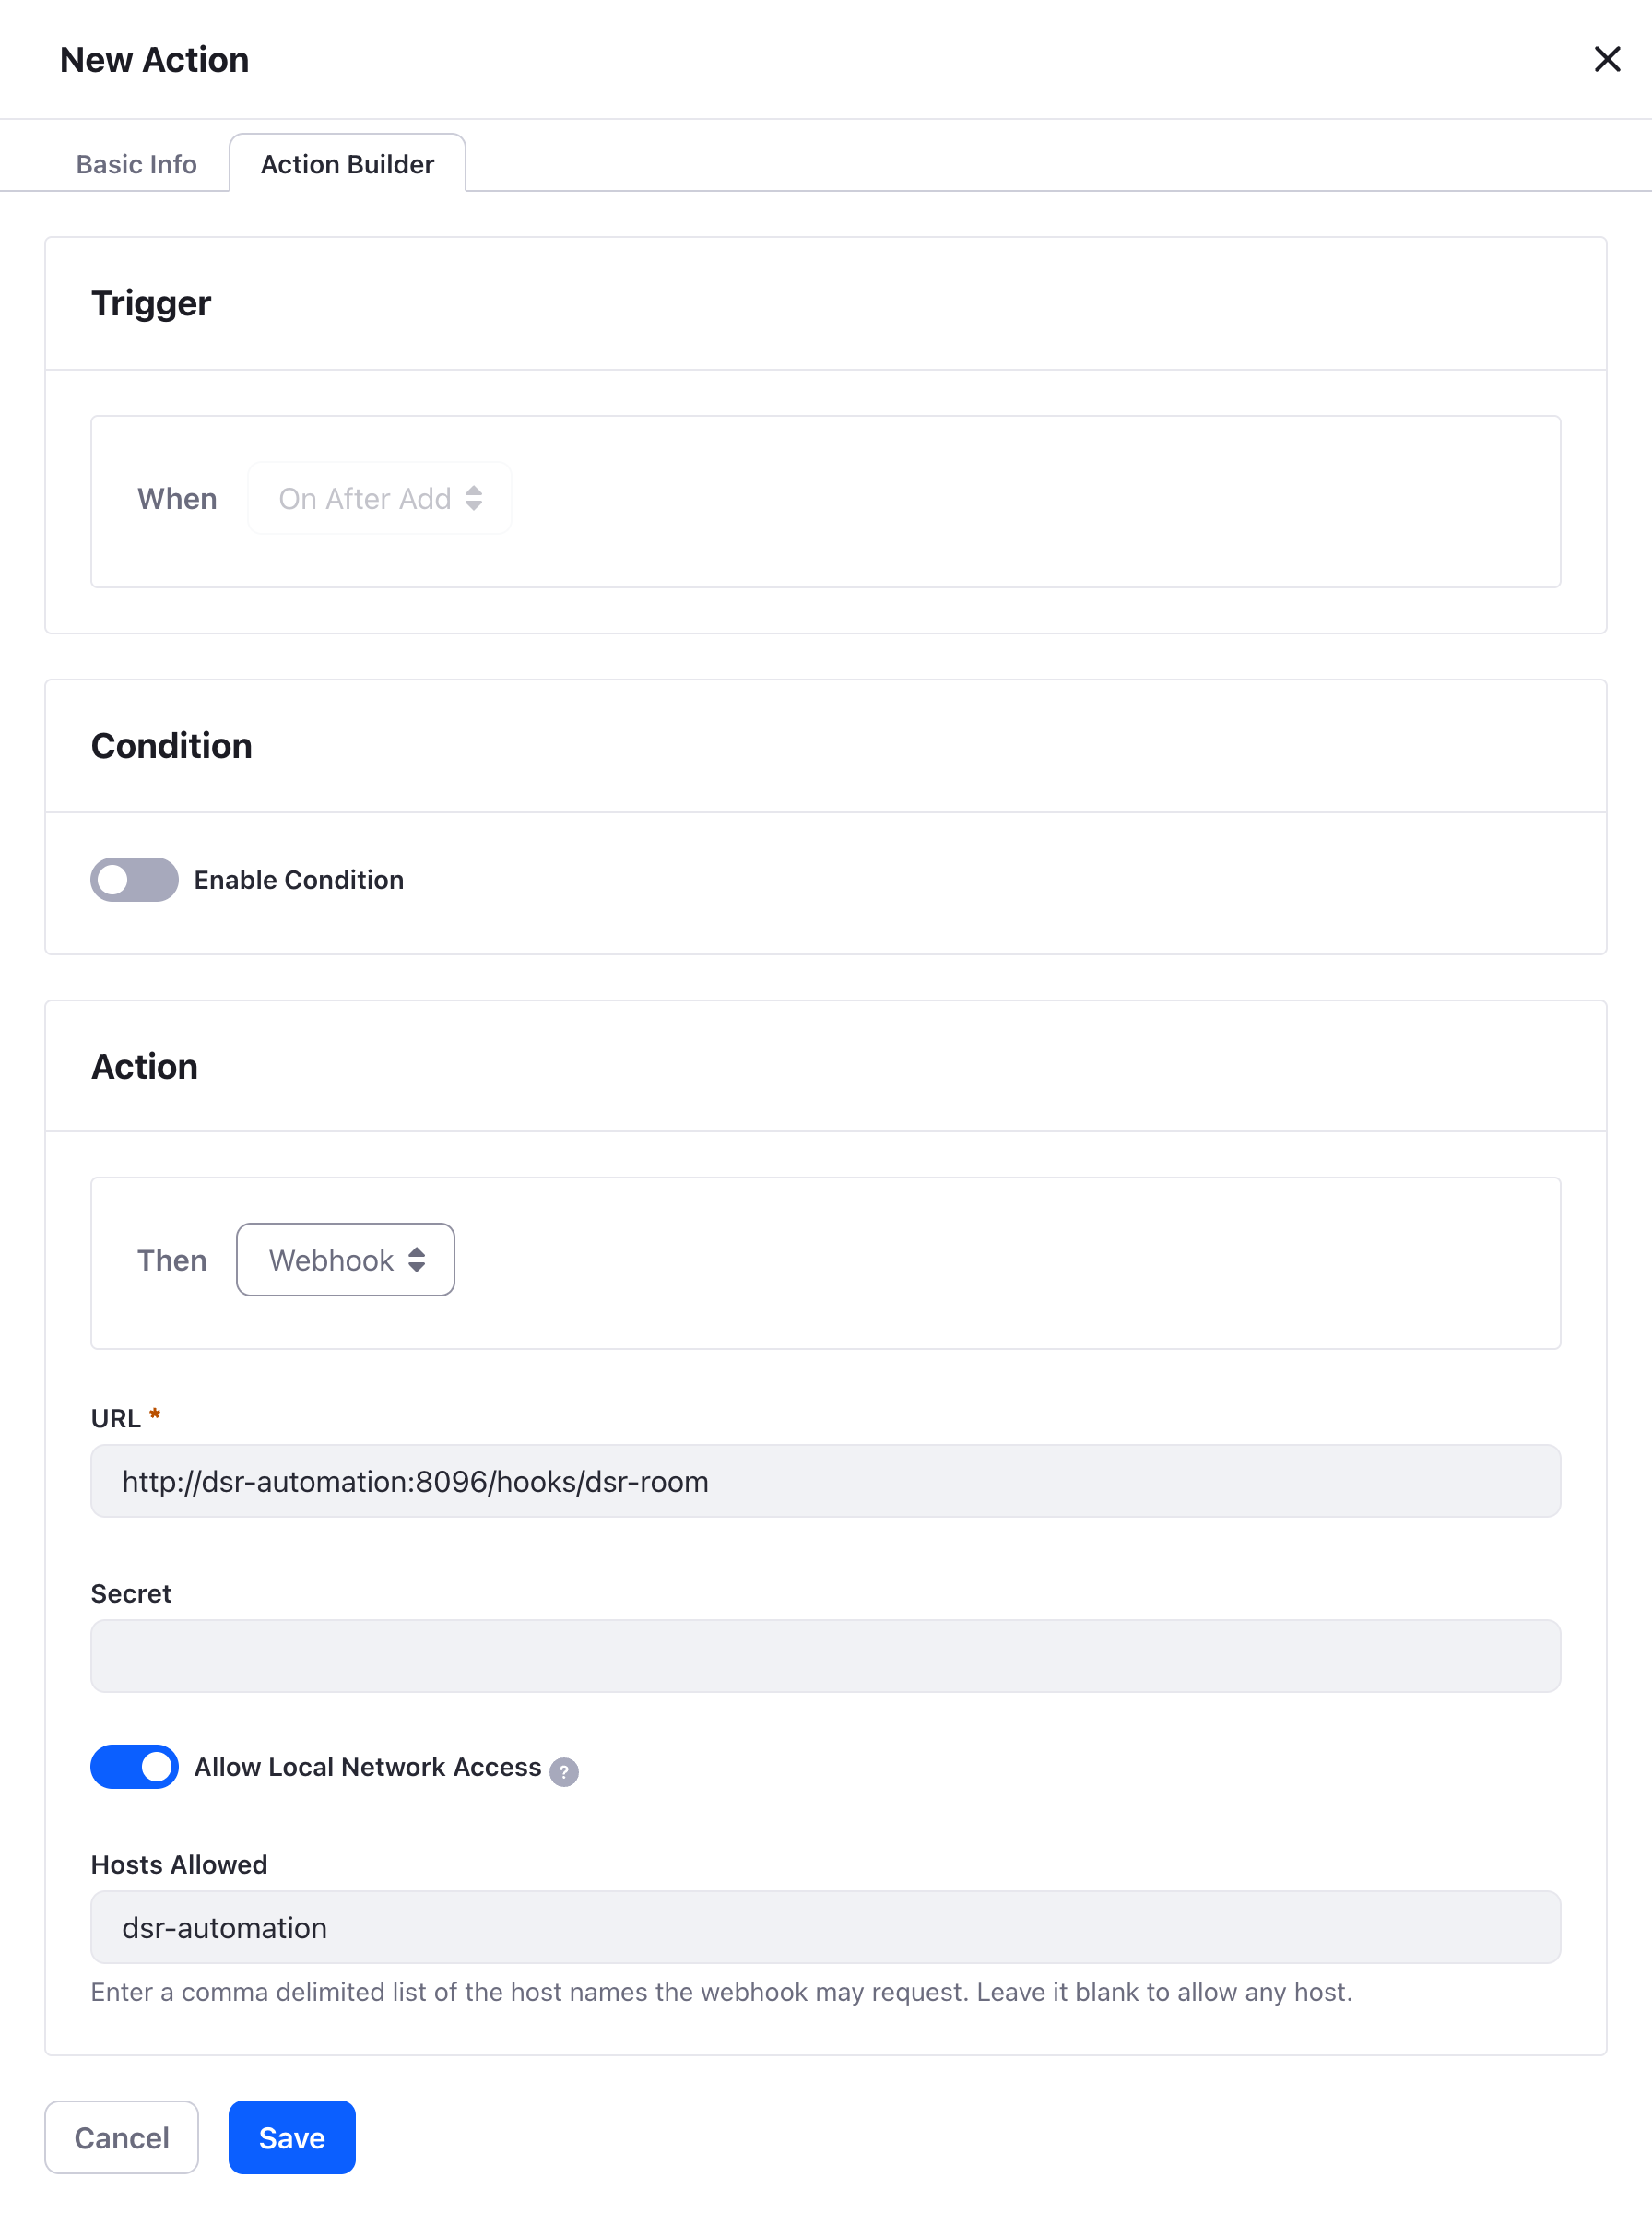
- Go to Control Panel → Objects → Room → Actions and click Add Object Action.
- Basic Info: name it Apply Northwind template pages.
- Action Builder: choose When On After Add and Then Webhook. Set the URL of your automation service. For a service on your local network, turn on Allow Local Network Access and list its host under Hosts Allowed.
When it receives the webhook, the service does the following:
- It waits until the room reports
initialized(GET /o/digital-sales-room/rooms/by-external-reference-code/{erc}). - It adds the template’s pages to the room site with
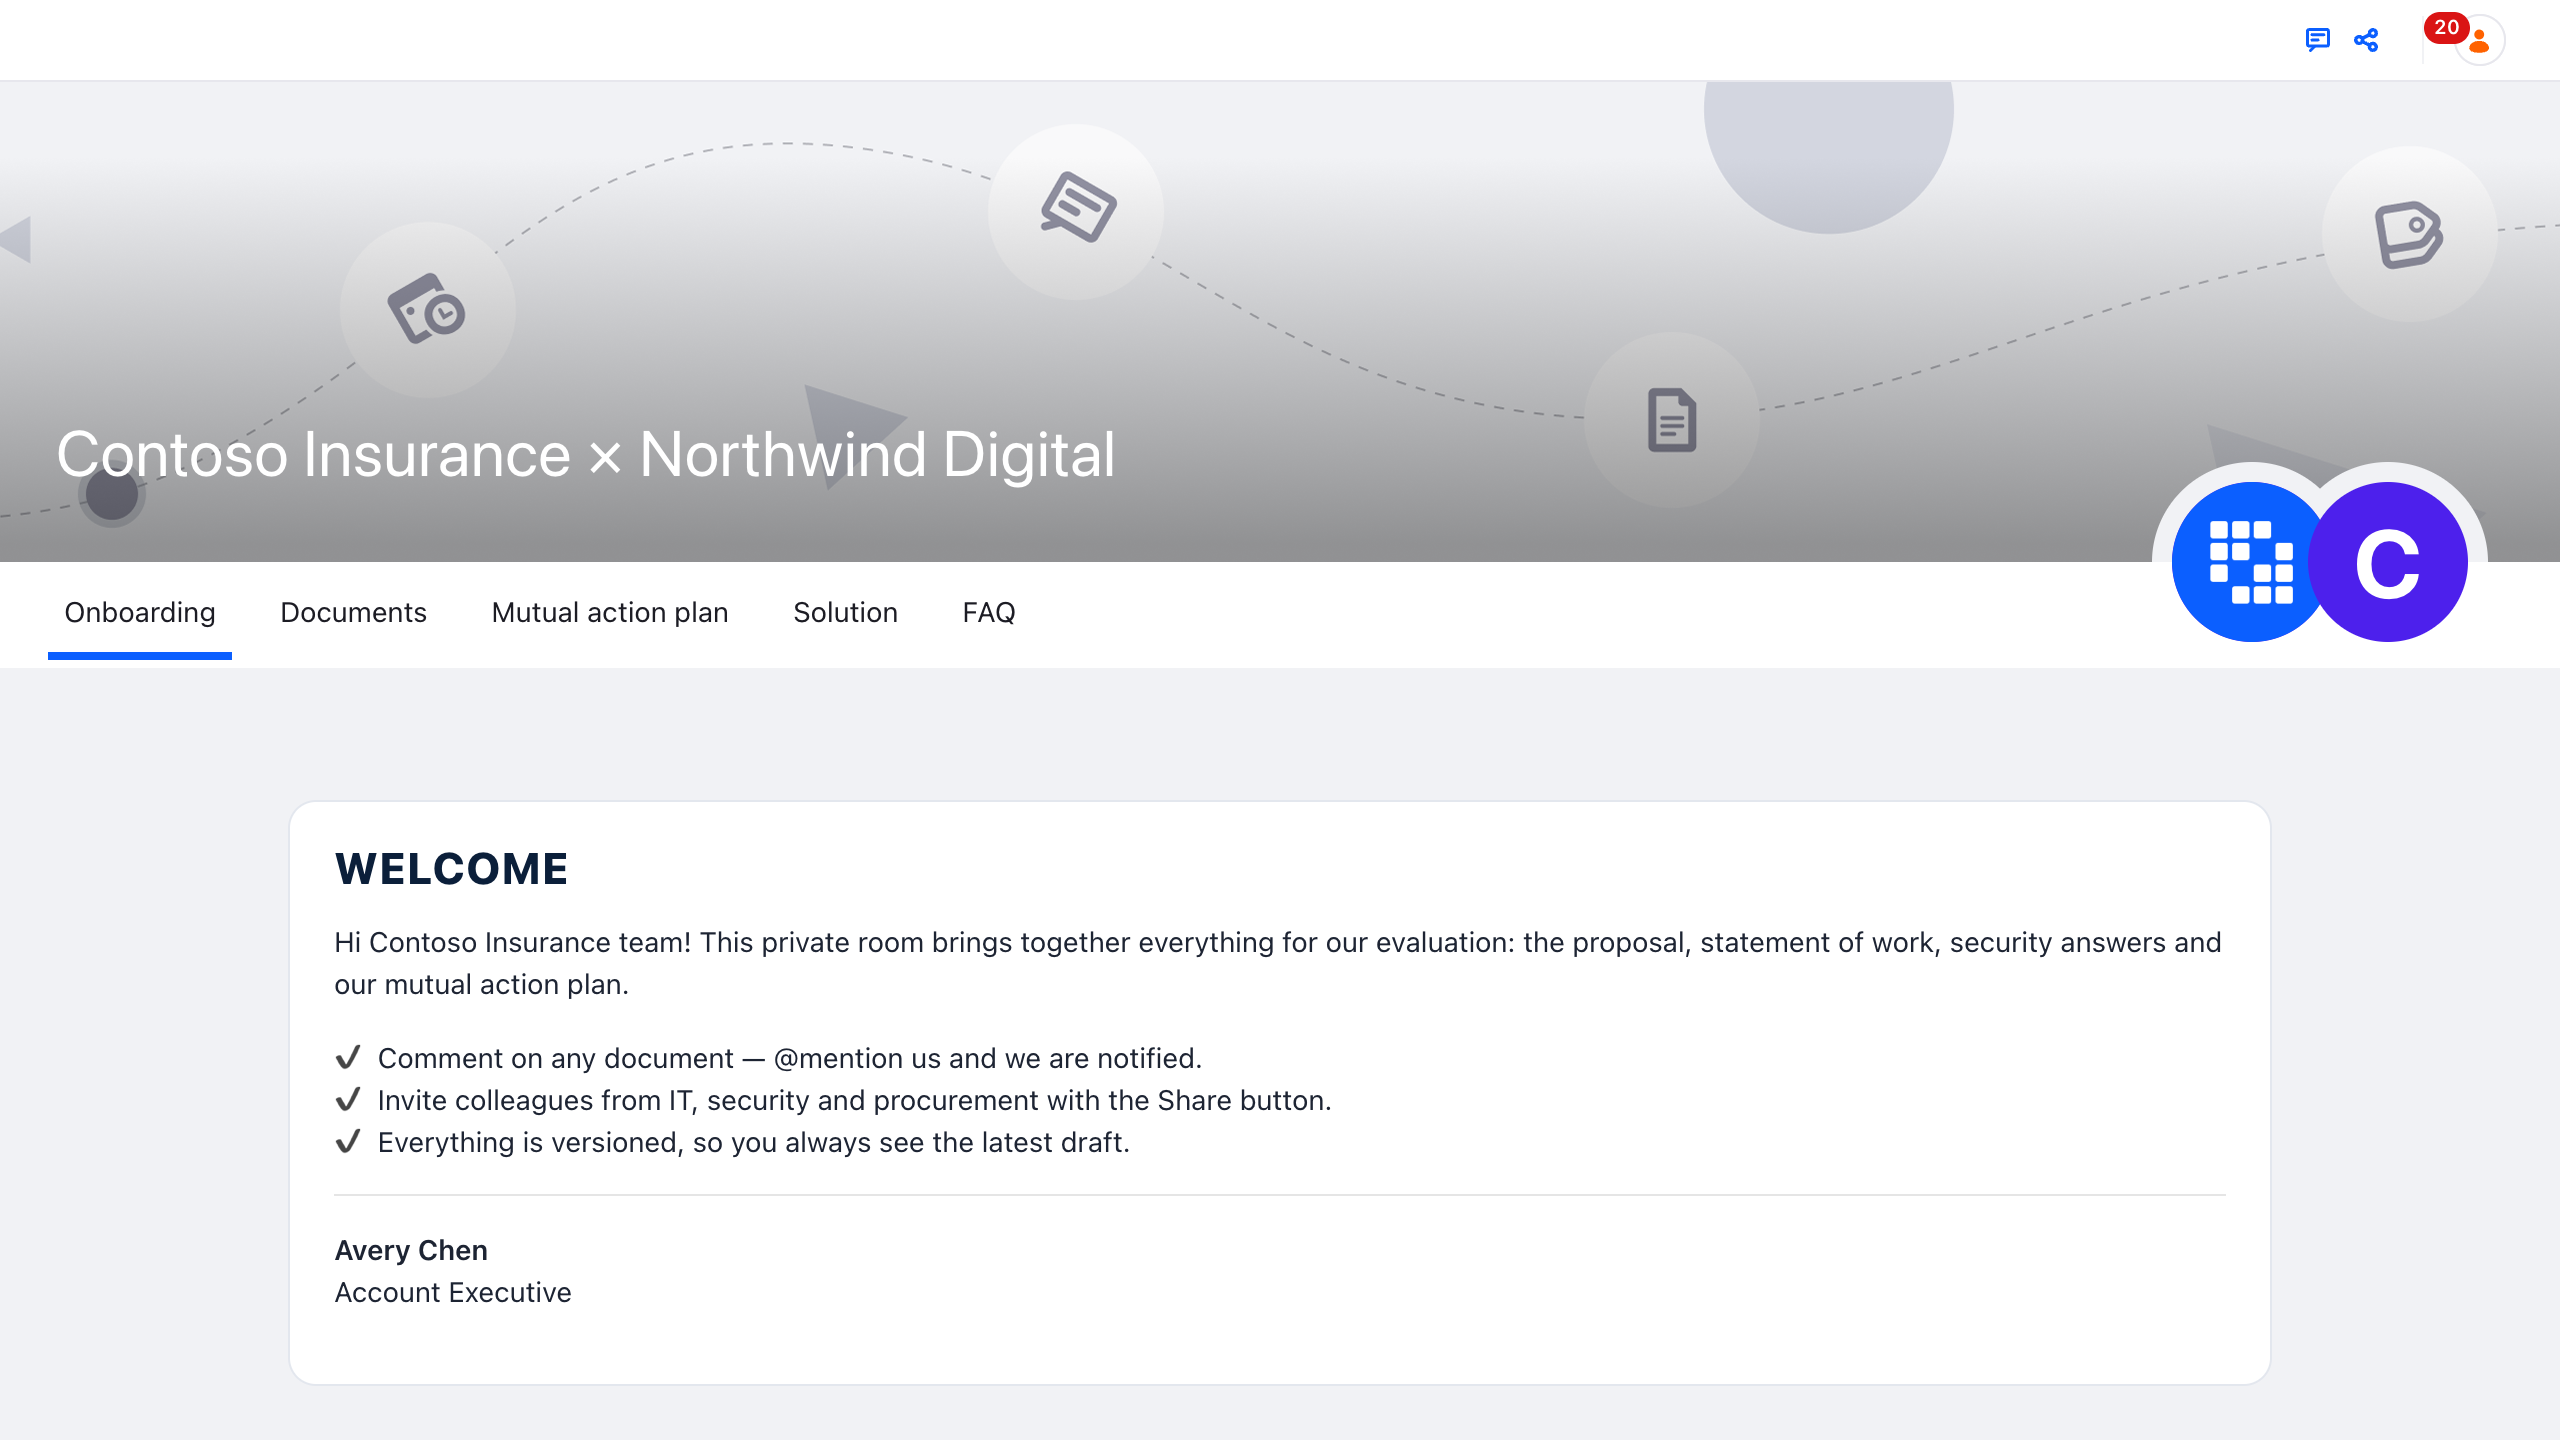
headless-admin-site(/o/headless-admin-site/v1.0/sites/{site}/site-pages). - It replaces the placeholder welcome card with one addressed to the account, signed by the account executive.
- It gives every room page except Login the Onboarding page’s permissions, without Guest. Skip this and guests can read pages such as the mutual action plan through the room URL, because of trap 2 in step 4.
In 2026.Q4.0, DSR blocks placed through headless-admin-site save but do not render. Basic HTML fragments do, so the demo renders its template pages as HTML styled like the DSR blocks. They take value_i18n, which makes them bilingual.
Step 6: Create the rooms
- In the launchpad, open Rooms → New Digital Sales Room.
-
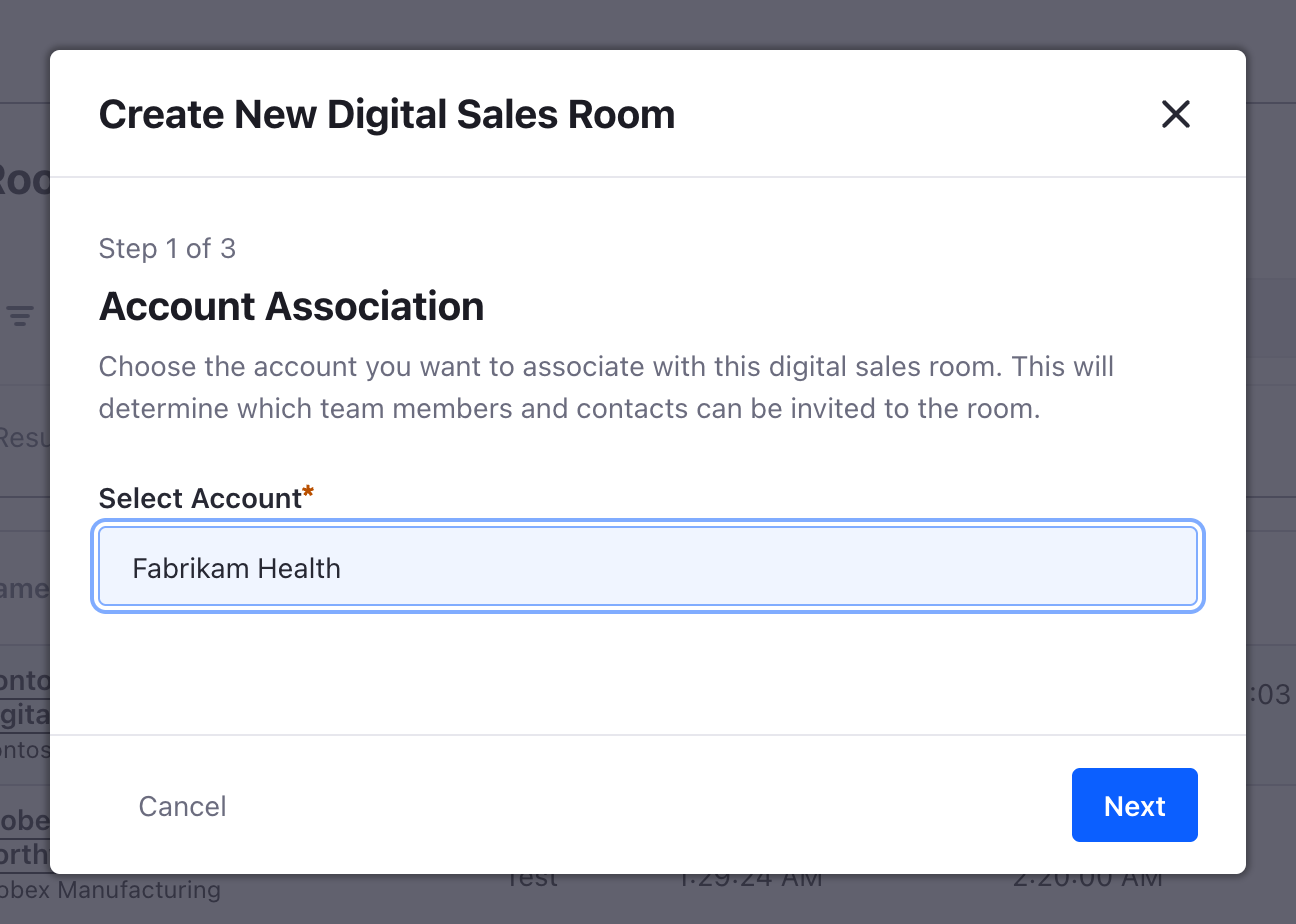
Account Association: pick the prospect’s account.
-
Choose a Template: pick the deal type. The preview shows the pages the room starts with.
-
Name Your Room: give it a name the buyer recognizes and set a short Friendly URL. If you skip it, the URL comes from the account name and can clash with the account’s own site, ending up as something like
/contoso-insurance-1.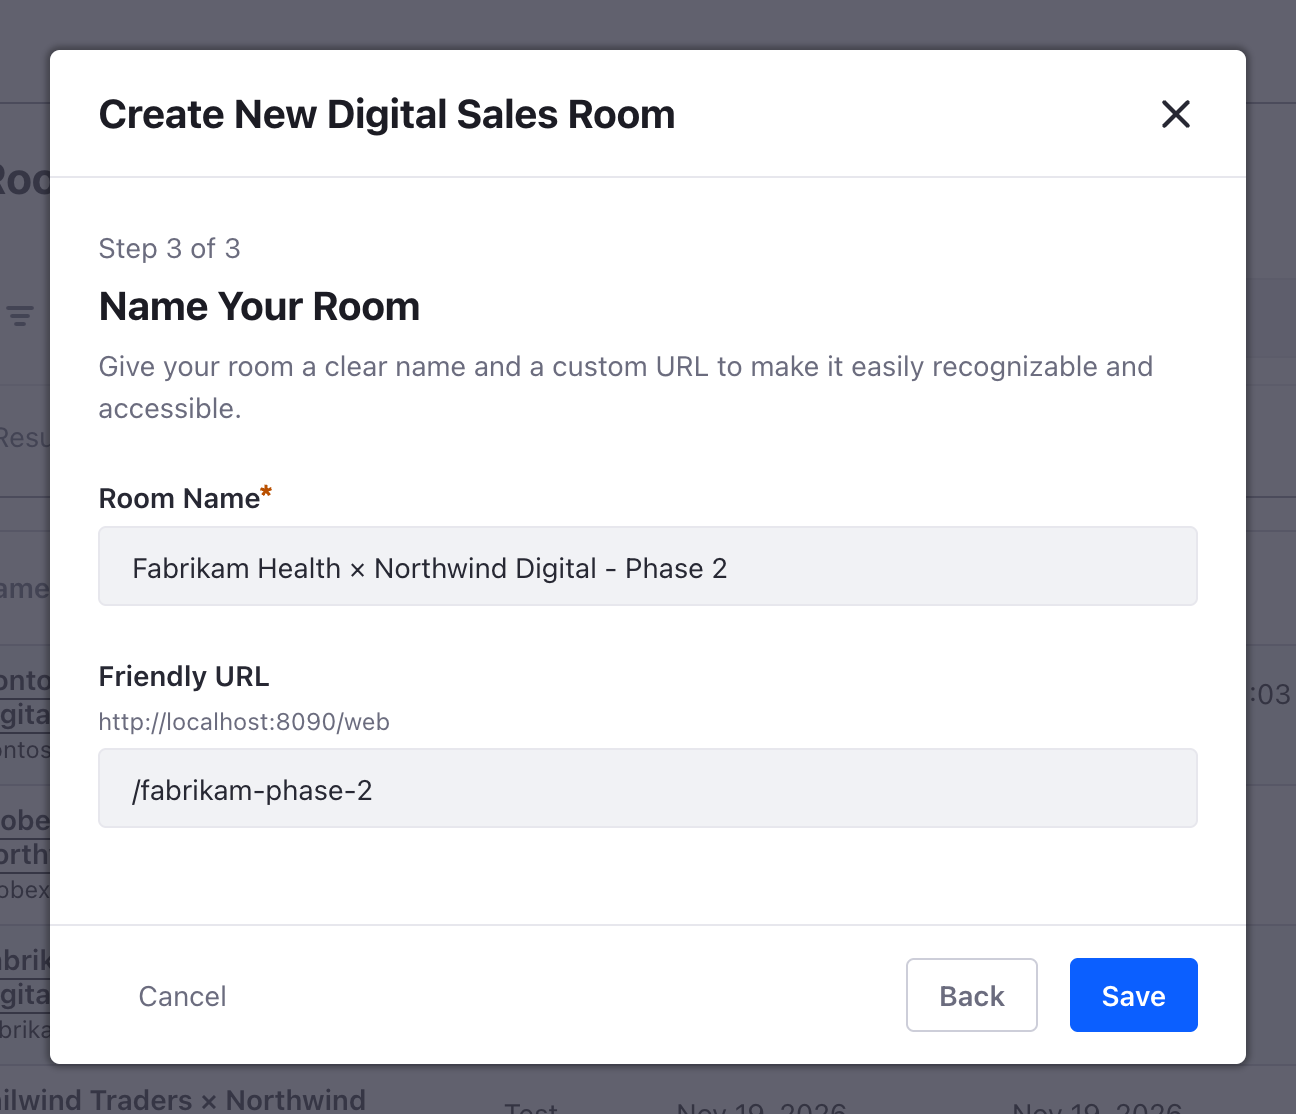
-
Click Save. The room opens in the page editor, where you can tailor it before you invite anyone.
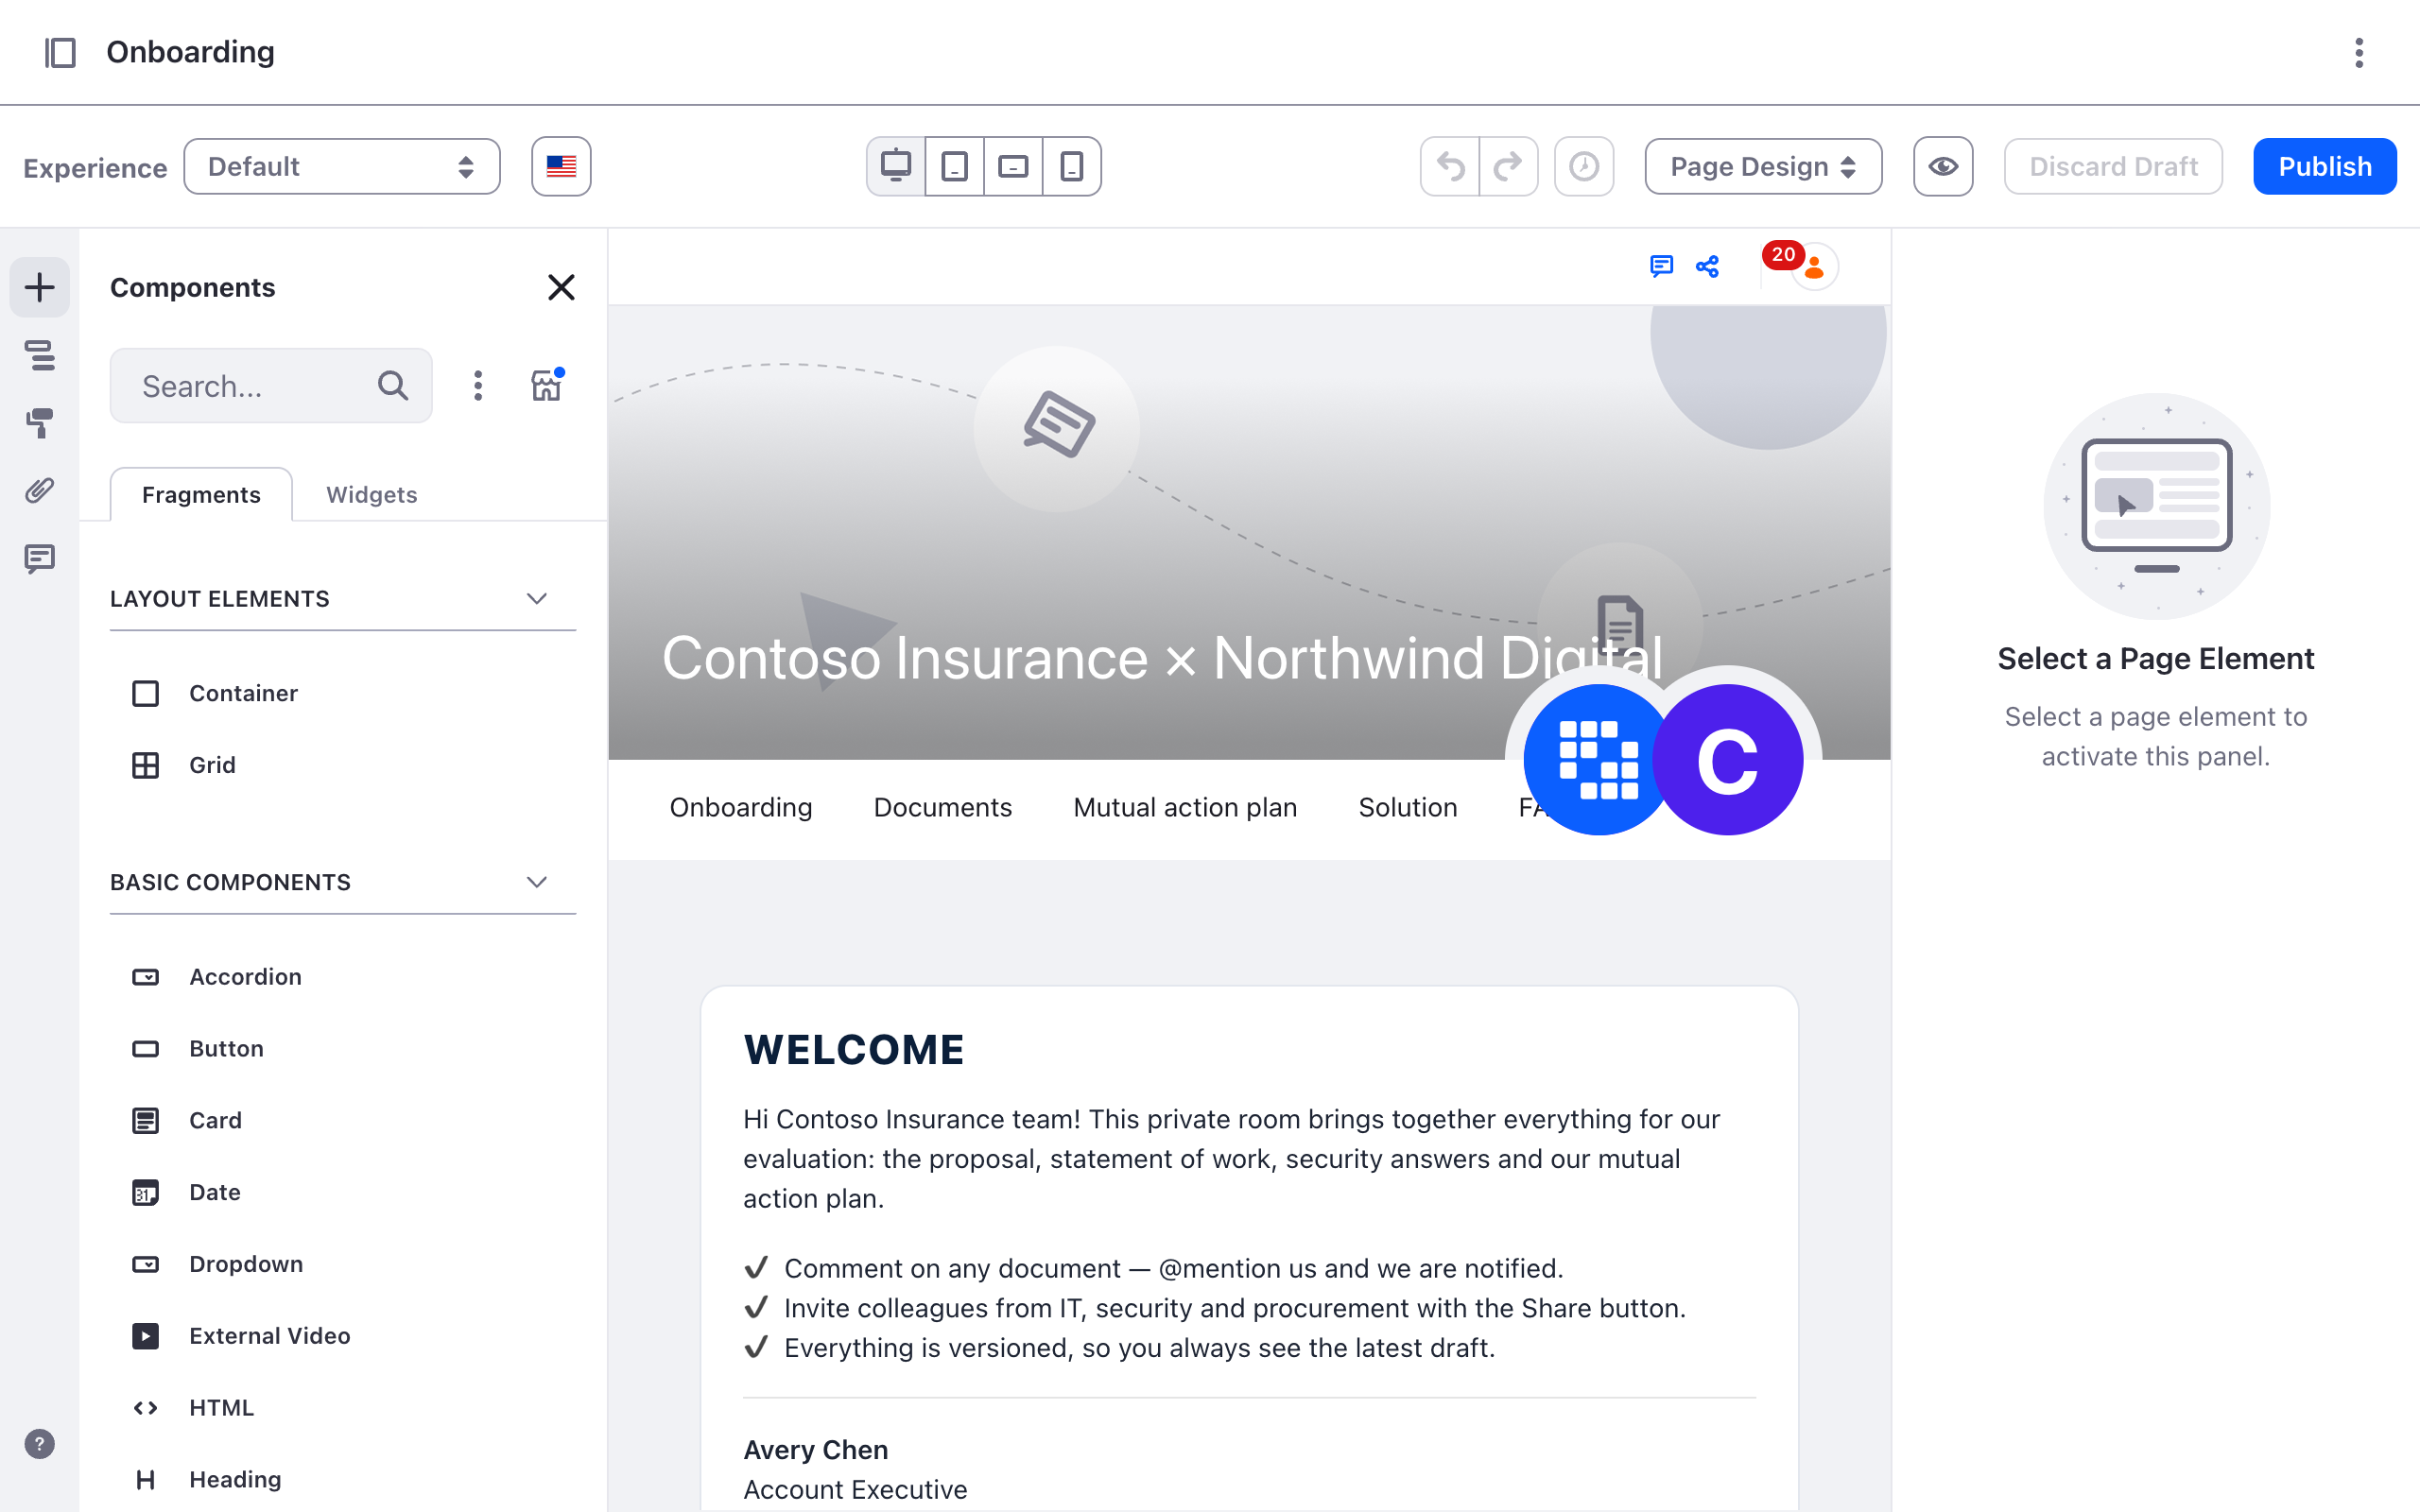




Seconds later, the object action has added the template pages and the personal welcome:
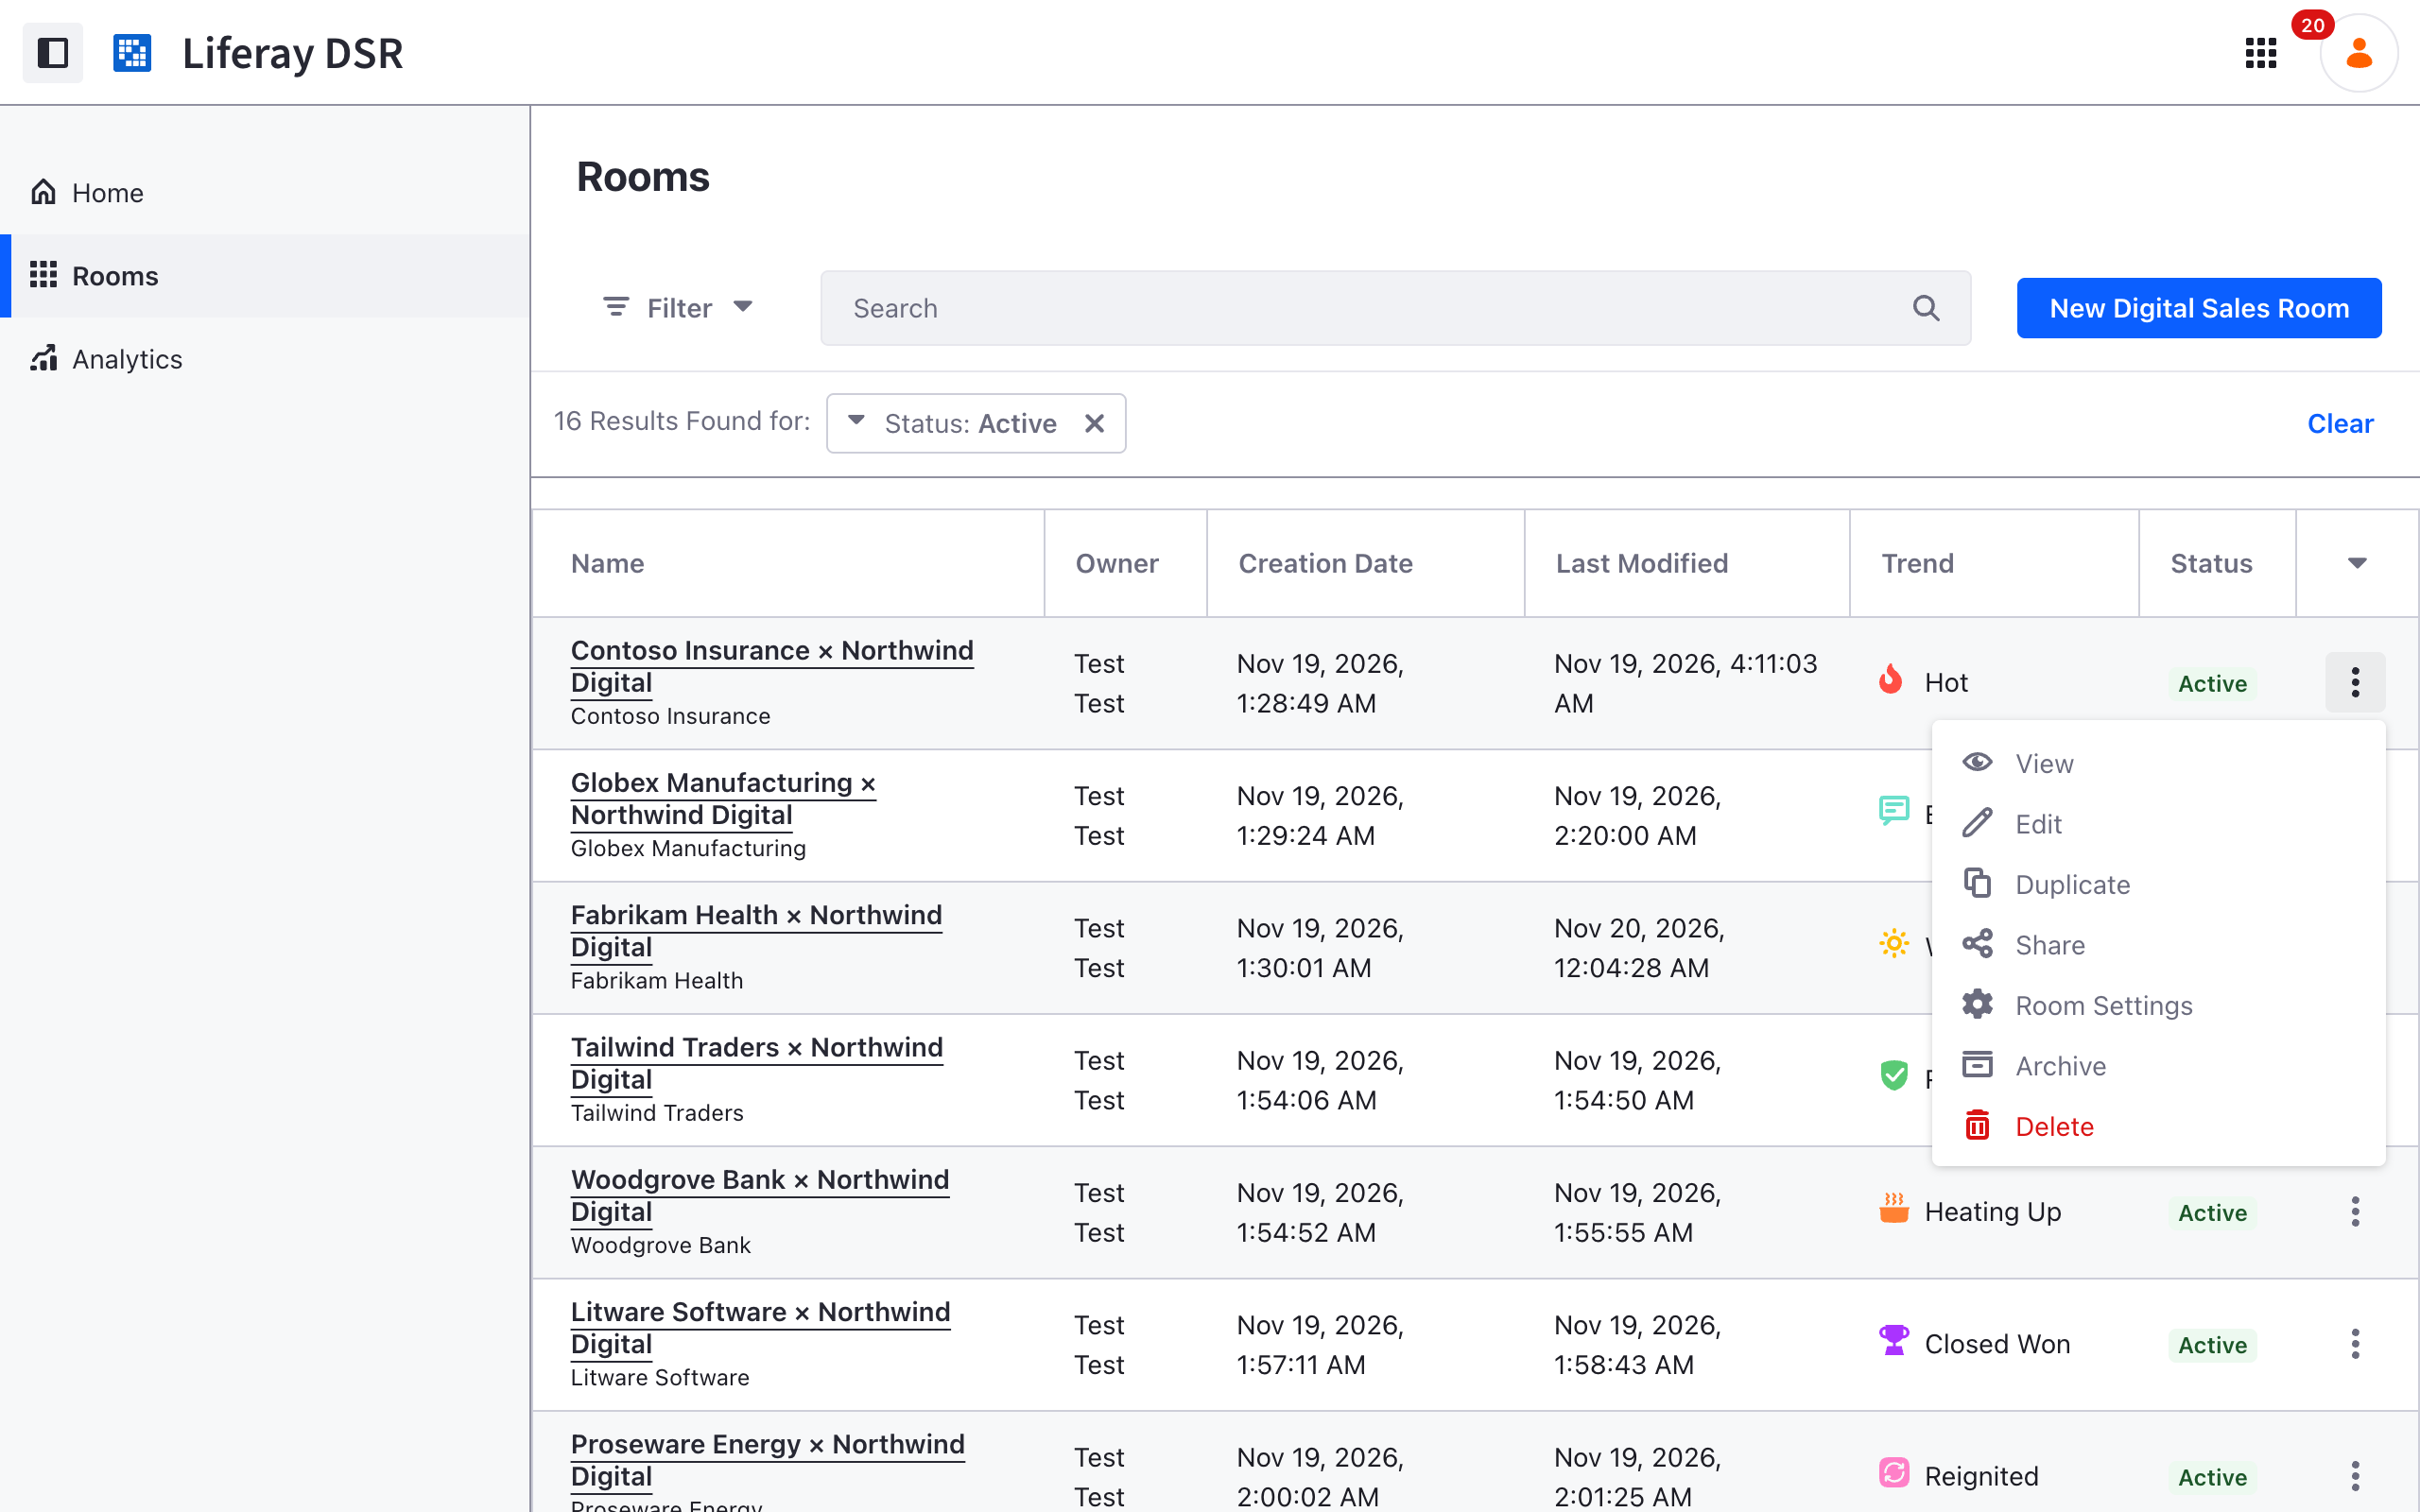
The demo uses one room for each kind of story a partner meets:
| Room | Use case | Trend |
|---|---|---|
| Contoso Insurance | New logo: customer portal | Hot |
| Globex Manufacturing | New logo: B2B commerce | Engaged |
| Fabrikam Health | New logo: early discovery | Warming Up |
| Tailwind Traders | Existing customer: upgrade to 2026.Q4, plus commerce | Ready to Close |
| Woodgrove Bank | Regulated industry: RFP response with compliance matrix | Heating Up |
| City of Lakeside | Public sector: tender with accessibility conformance report | Engaged |
| Litware Software | Renewal plus managed services upsell | Closed Won |
| Adventure Works University | Lost deal: archived room with loss review | Closed Lost |
| Proseware Energy | Reignited opportunity: ROI model and reference architecture | Reignited |
| Lucerne Publishing | AI-ready content: new CMS and MCP | Cold |
Step 7: Work the deal inside the room
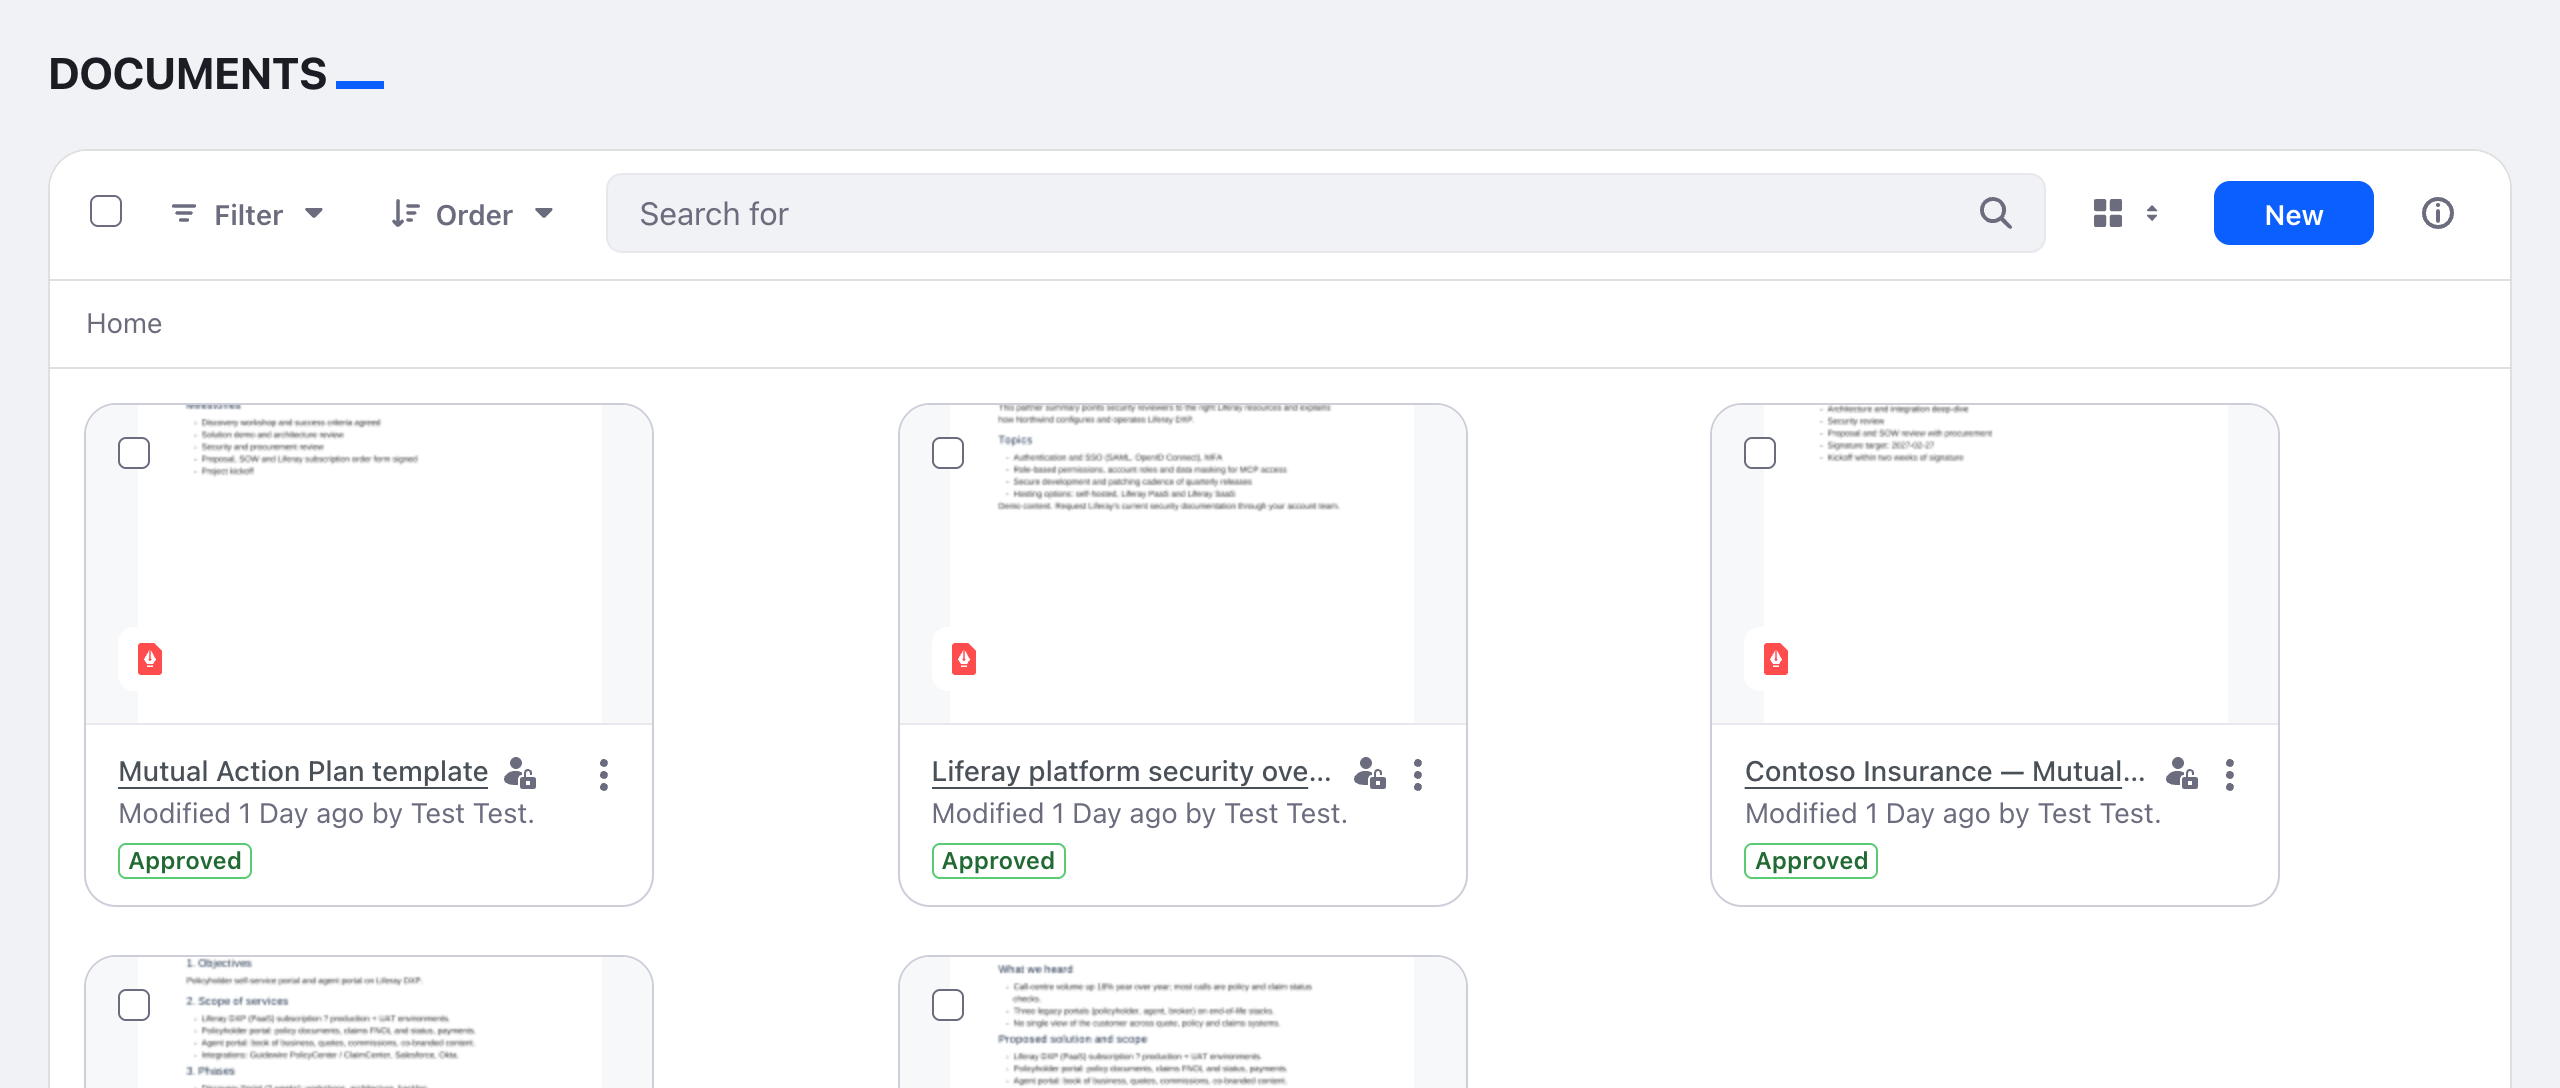
Documents. Upload the deal’s proposal, draft SOW and mutual action plan, plus shared collateral such as the security overview, under Documents. Each document stays inside its room, and every preview and download counts in the analytics. (Managing Room Documents)
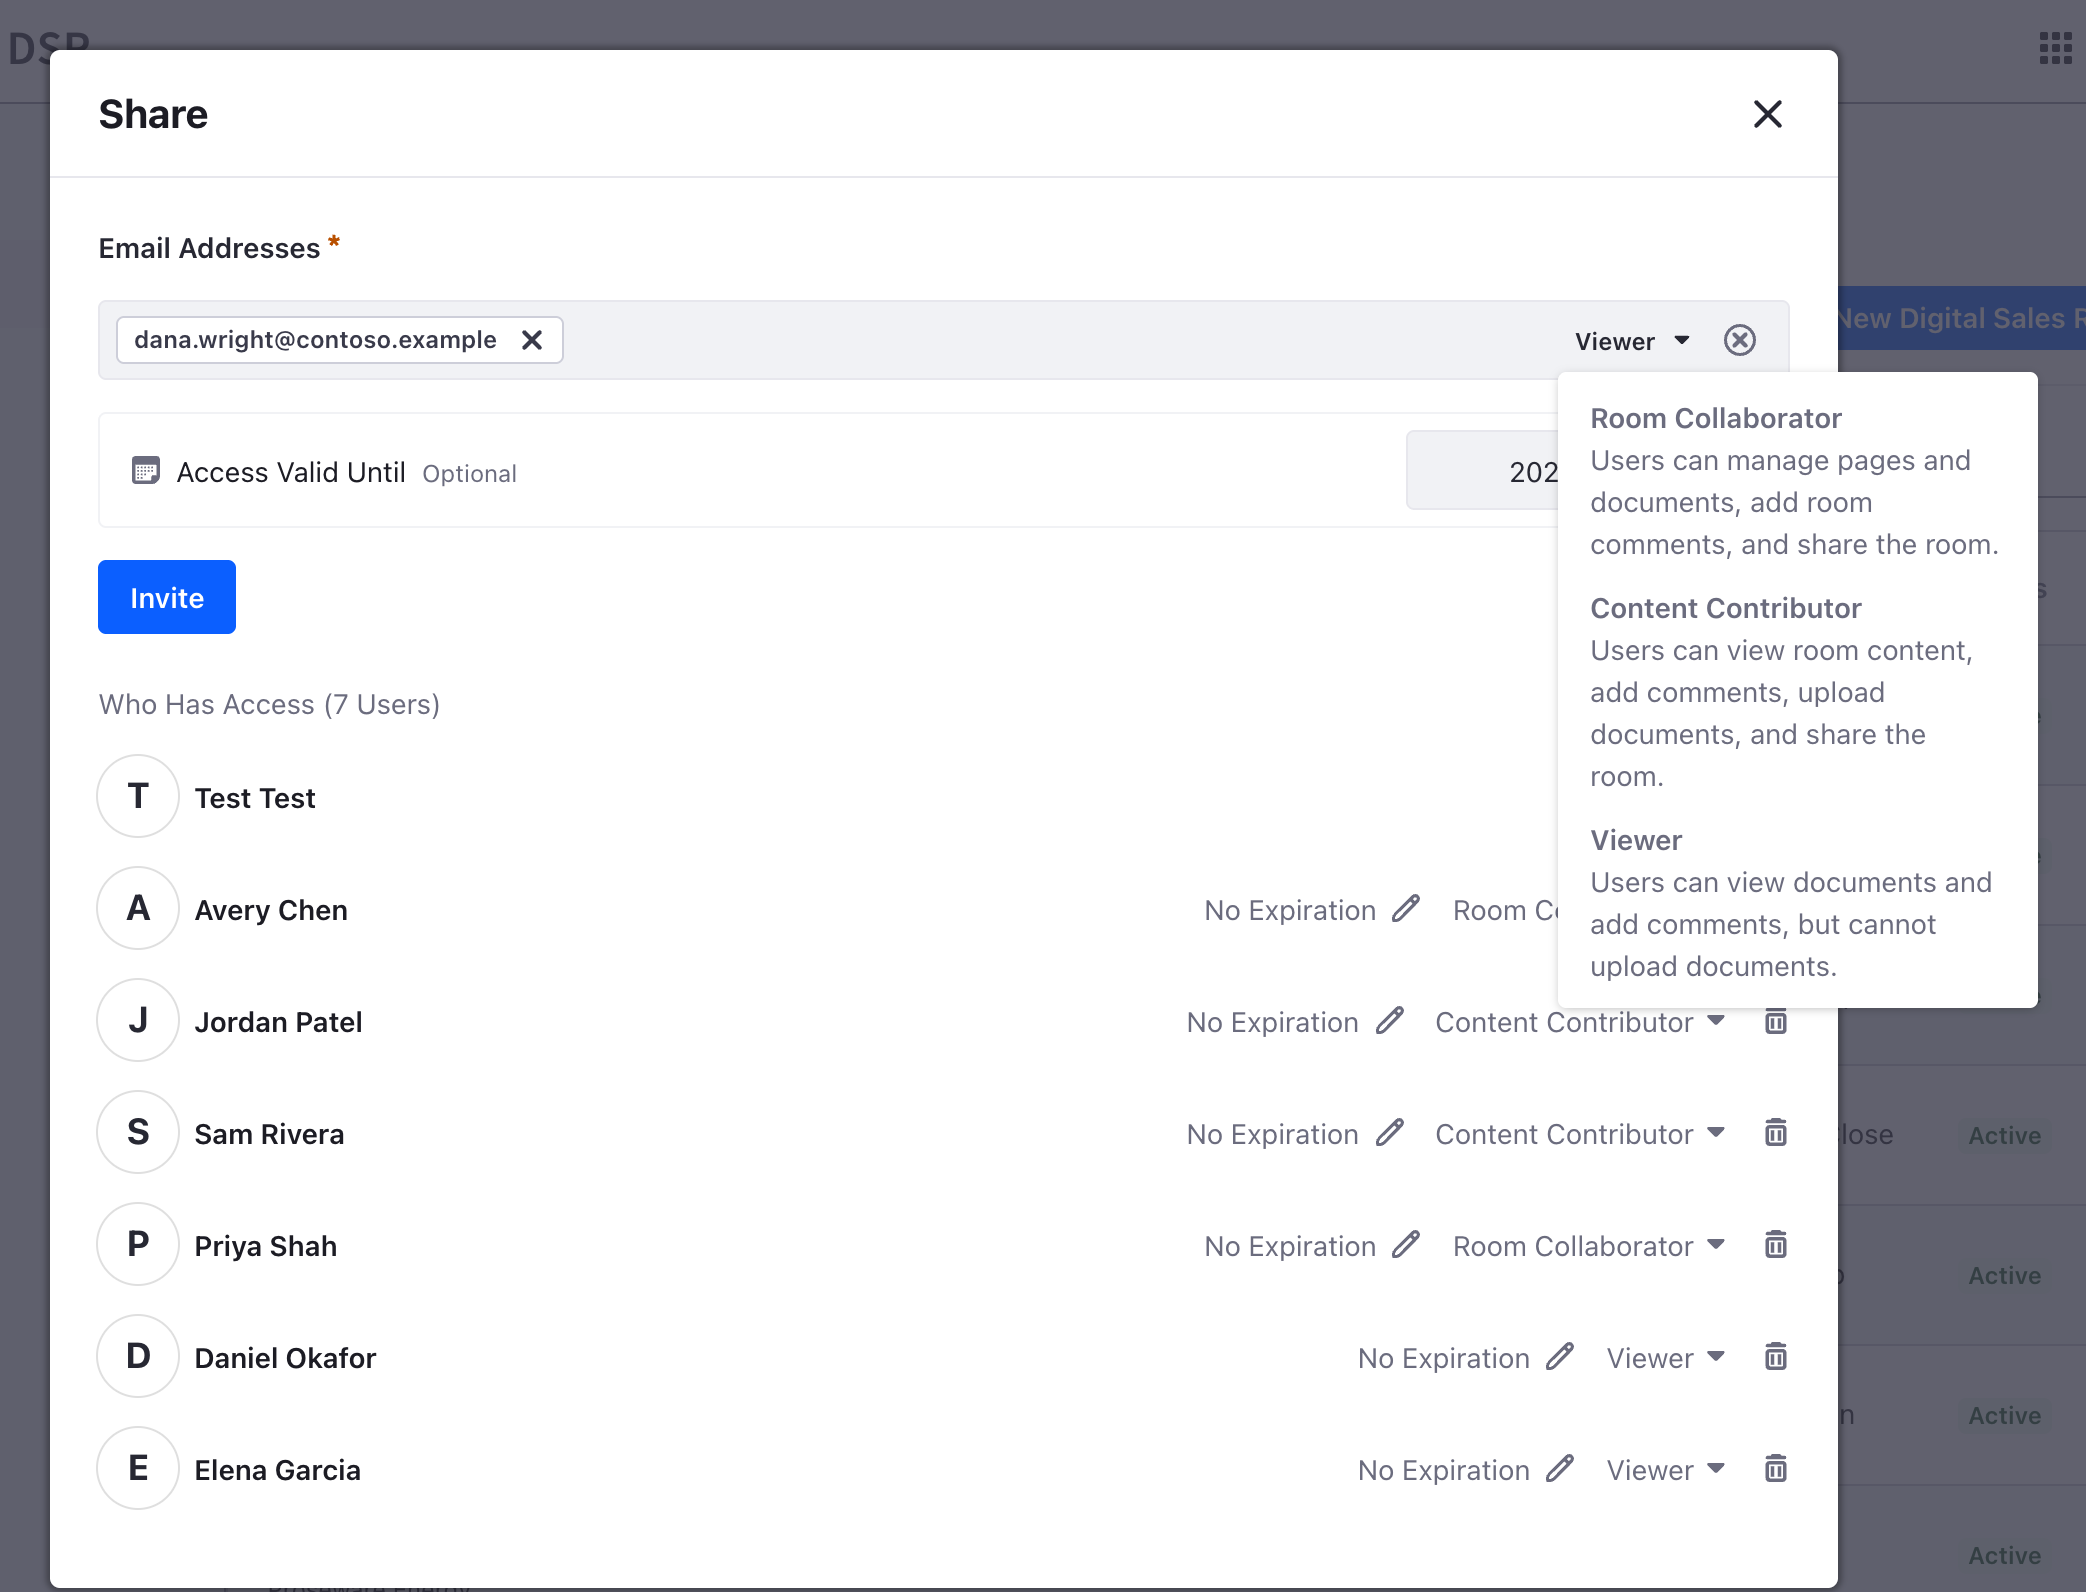
Invite by role, with an end date. Click Share, enter emails, pick a role and optionally set Access Valid Until. Access then ends at the end of that day (UTC). Invitations are valid for 48 hours.
| Who | Role |
|---|---|
| Deal owner, buyer champion, economic buyer | Room Collaborator: manage pages and documents, comment, share |
| Solutions architect, delivery lead | Content Contributor: view, comment, upload, share |
| Other buyers, outside advisors | Viewer: view and comment |
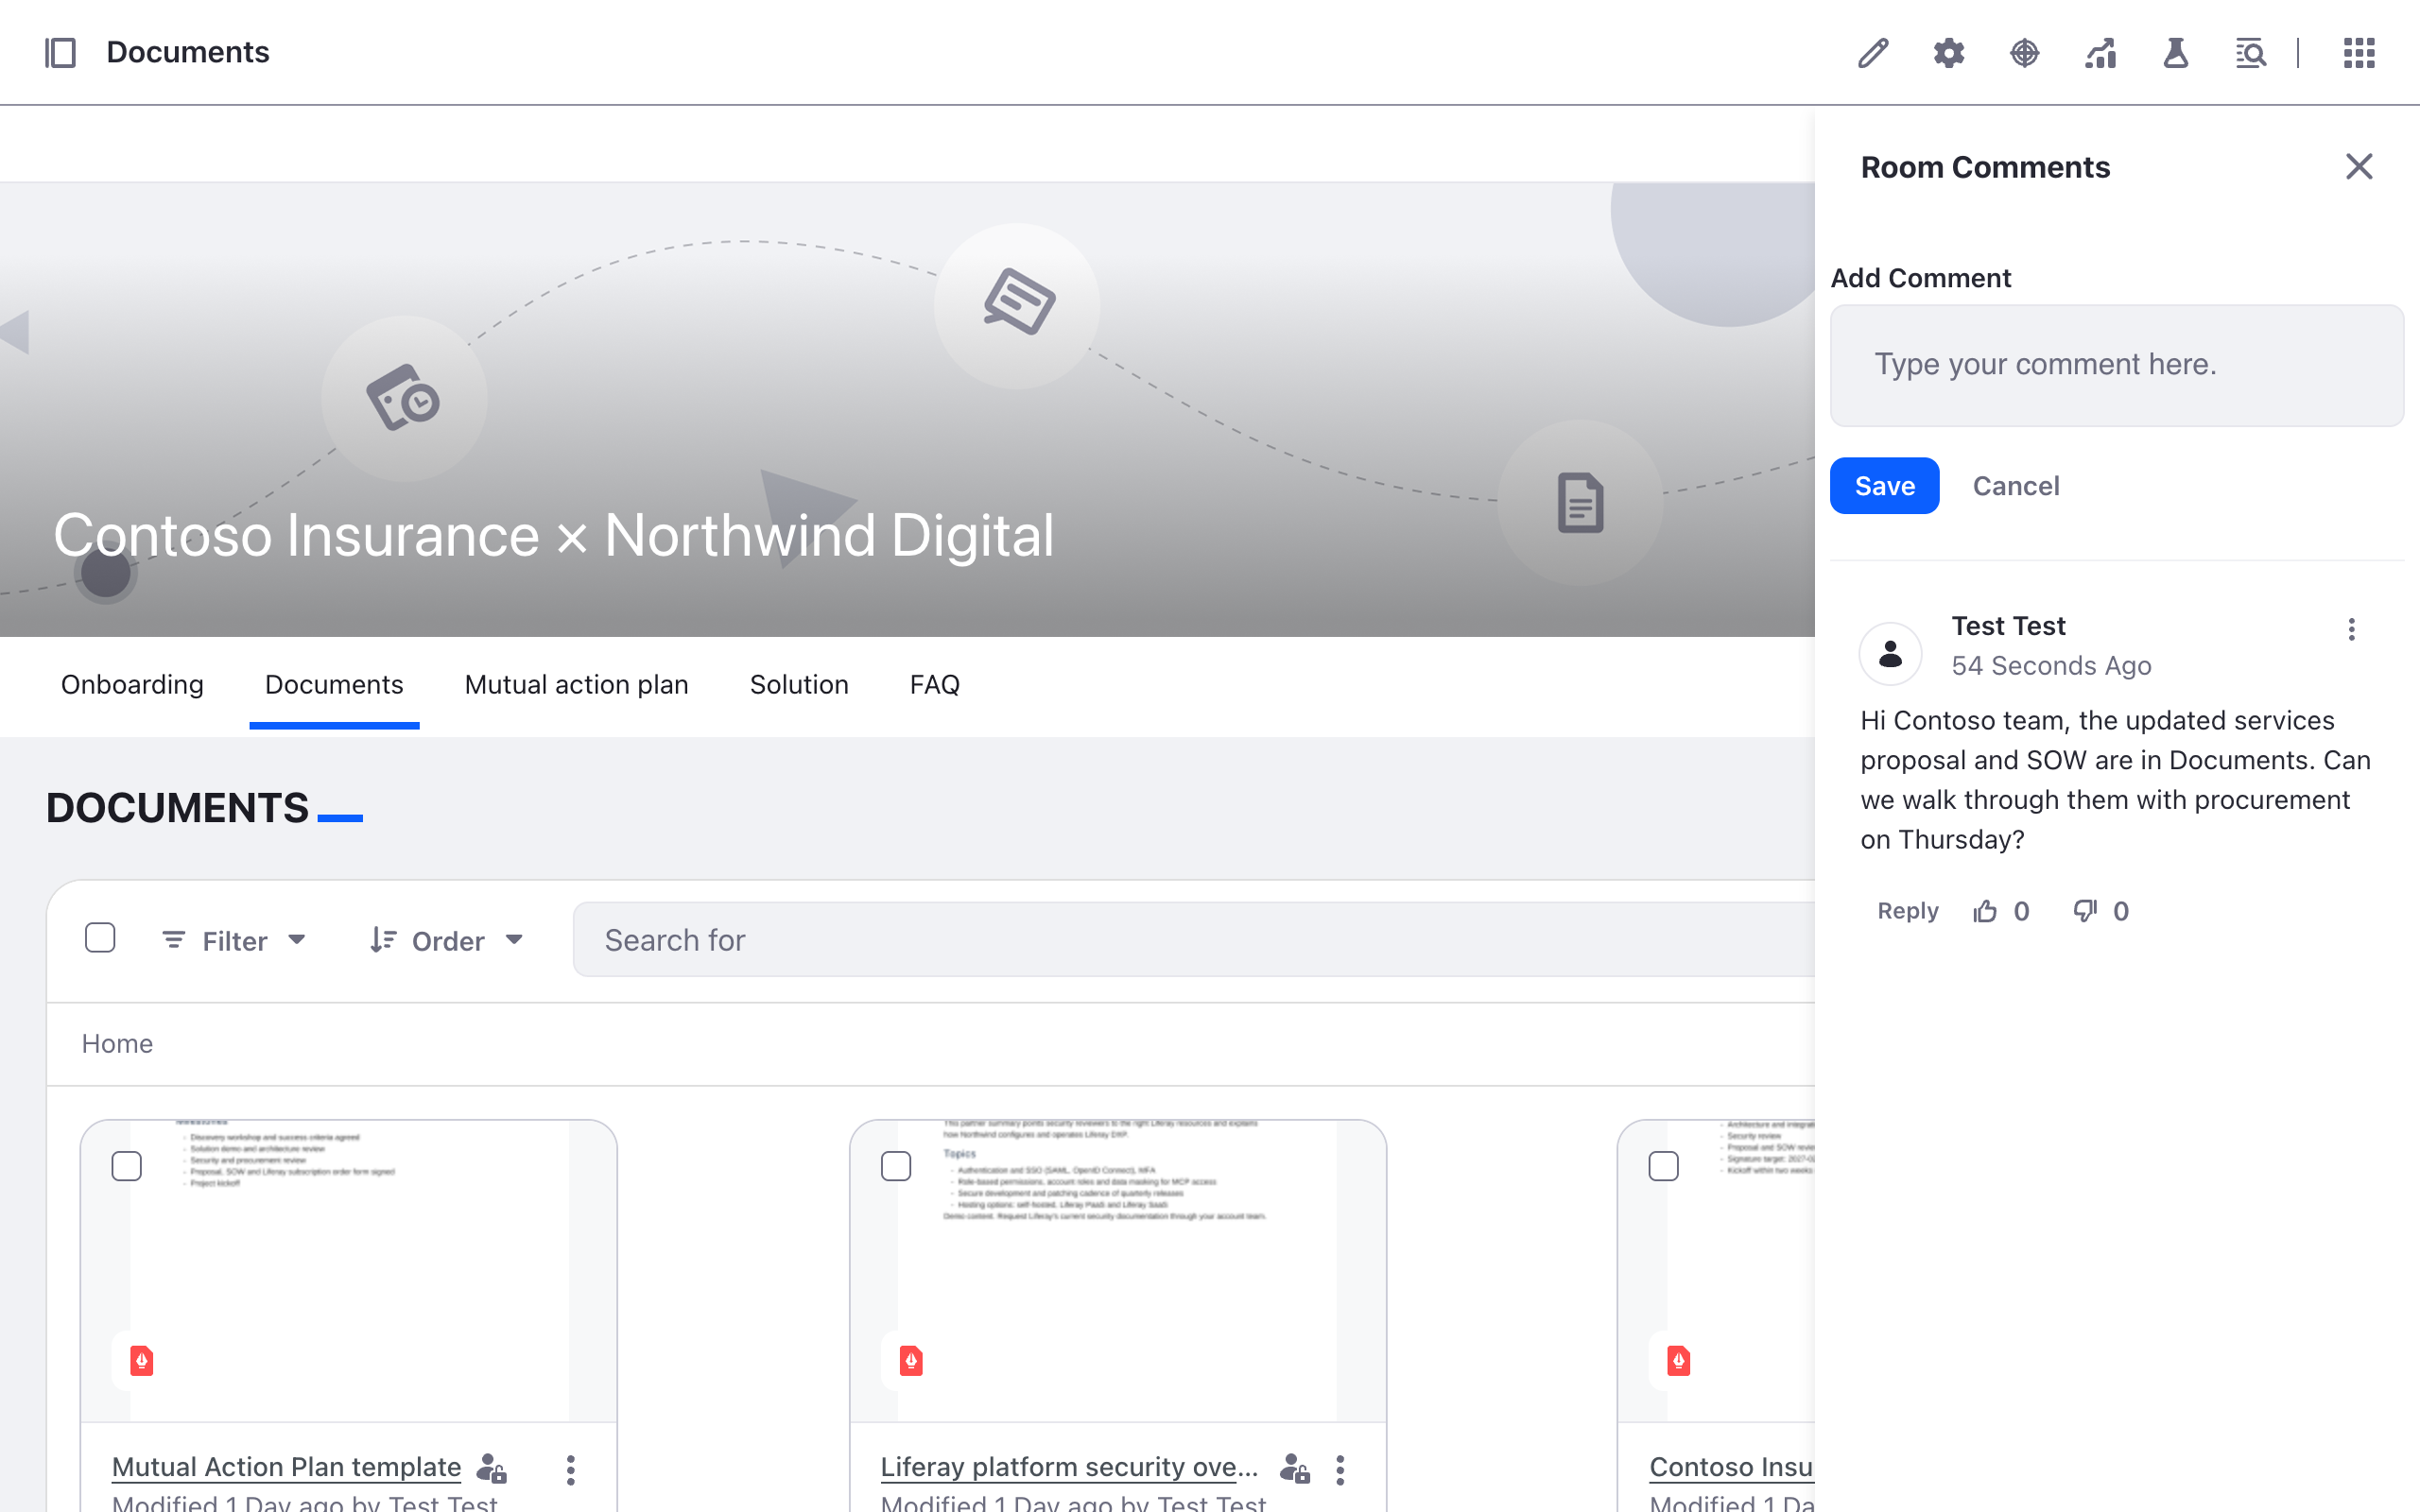
Comments. Use the speech-bubble icon in the room header for questions and answers, with @mentions, so they stay out of email. (Room Comments)
Close it out. When a deal is lost, set the trend to Closed Lost and Archive the room. Archiving can be undone. It makes the room read-only for buyers and keeps the history for the loss review. Duplicate copies the pages and the documents you choose into a new room, without comments or members.
Step 8: Follow buyer engagement
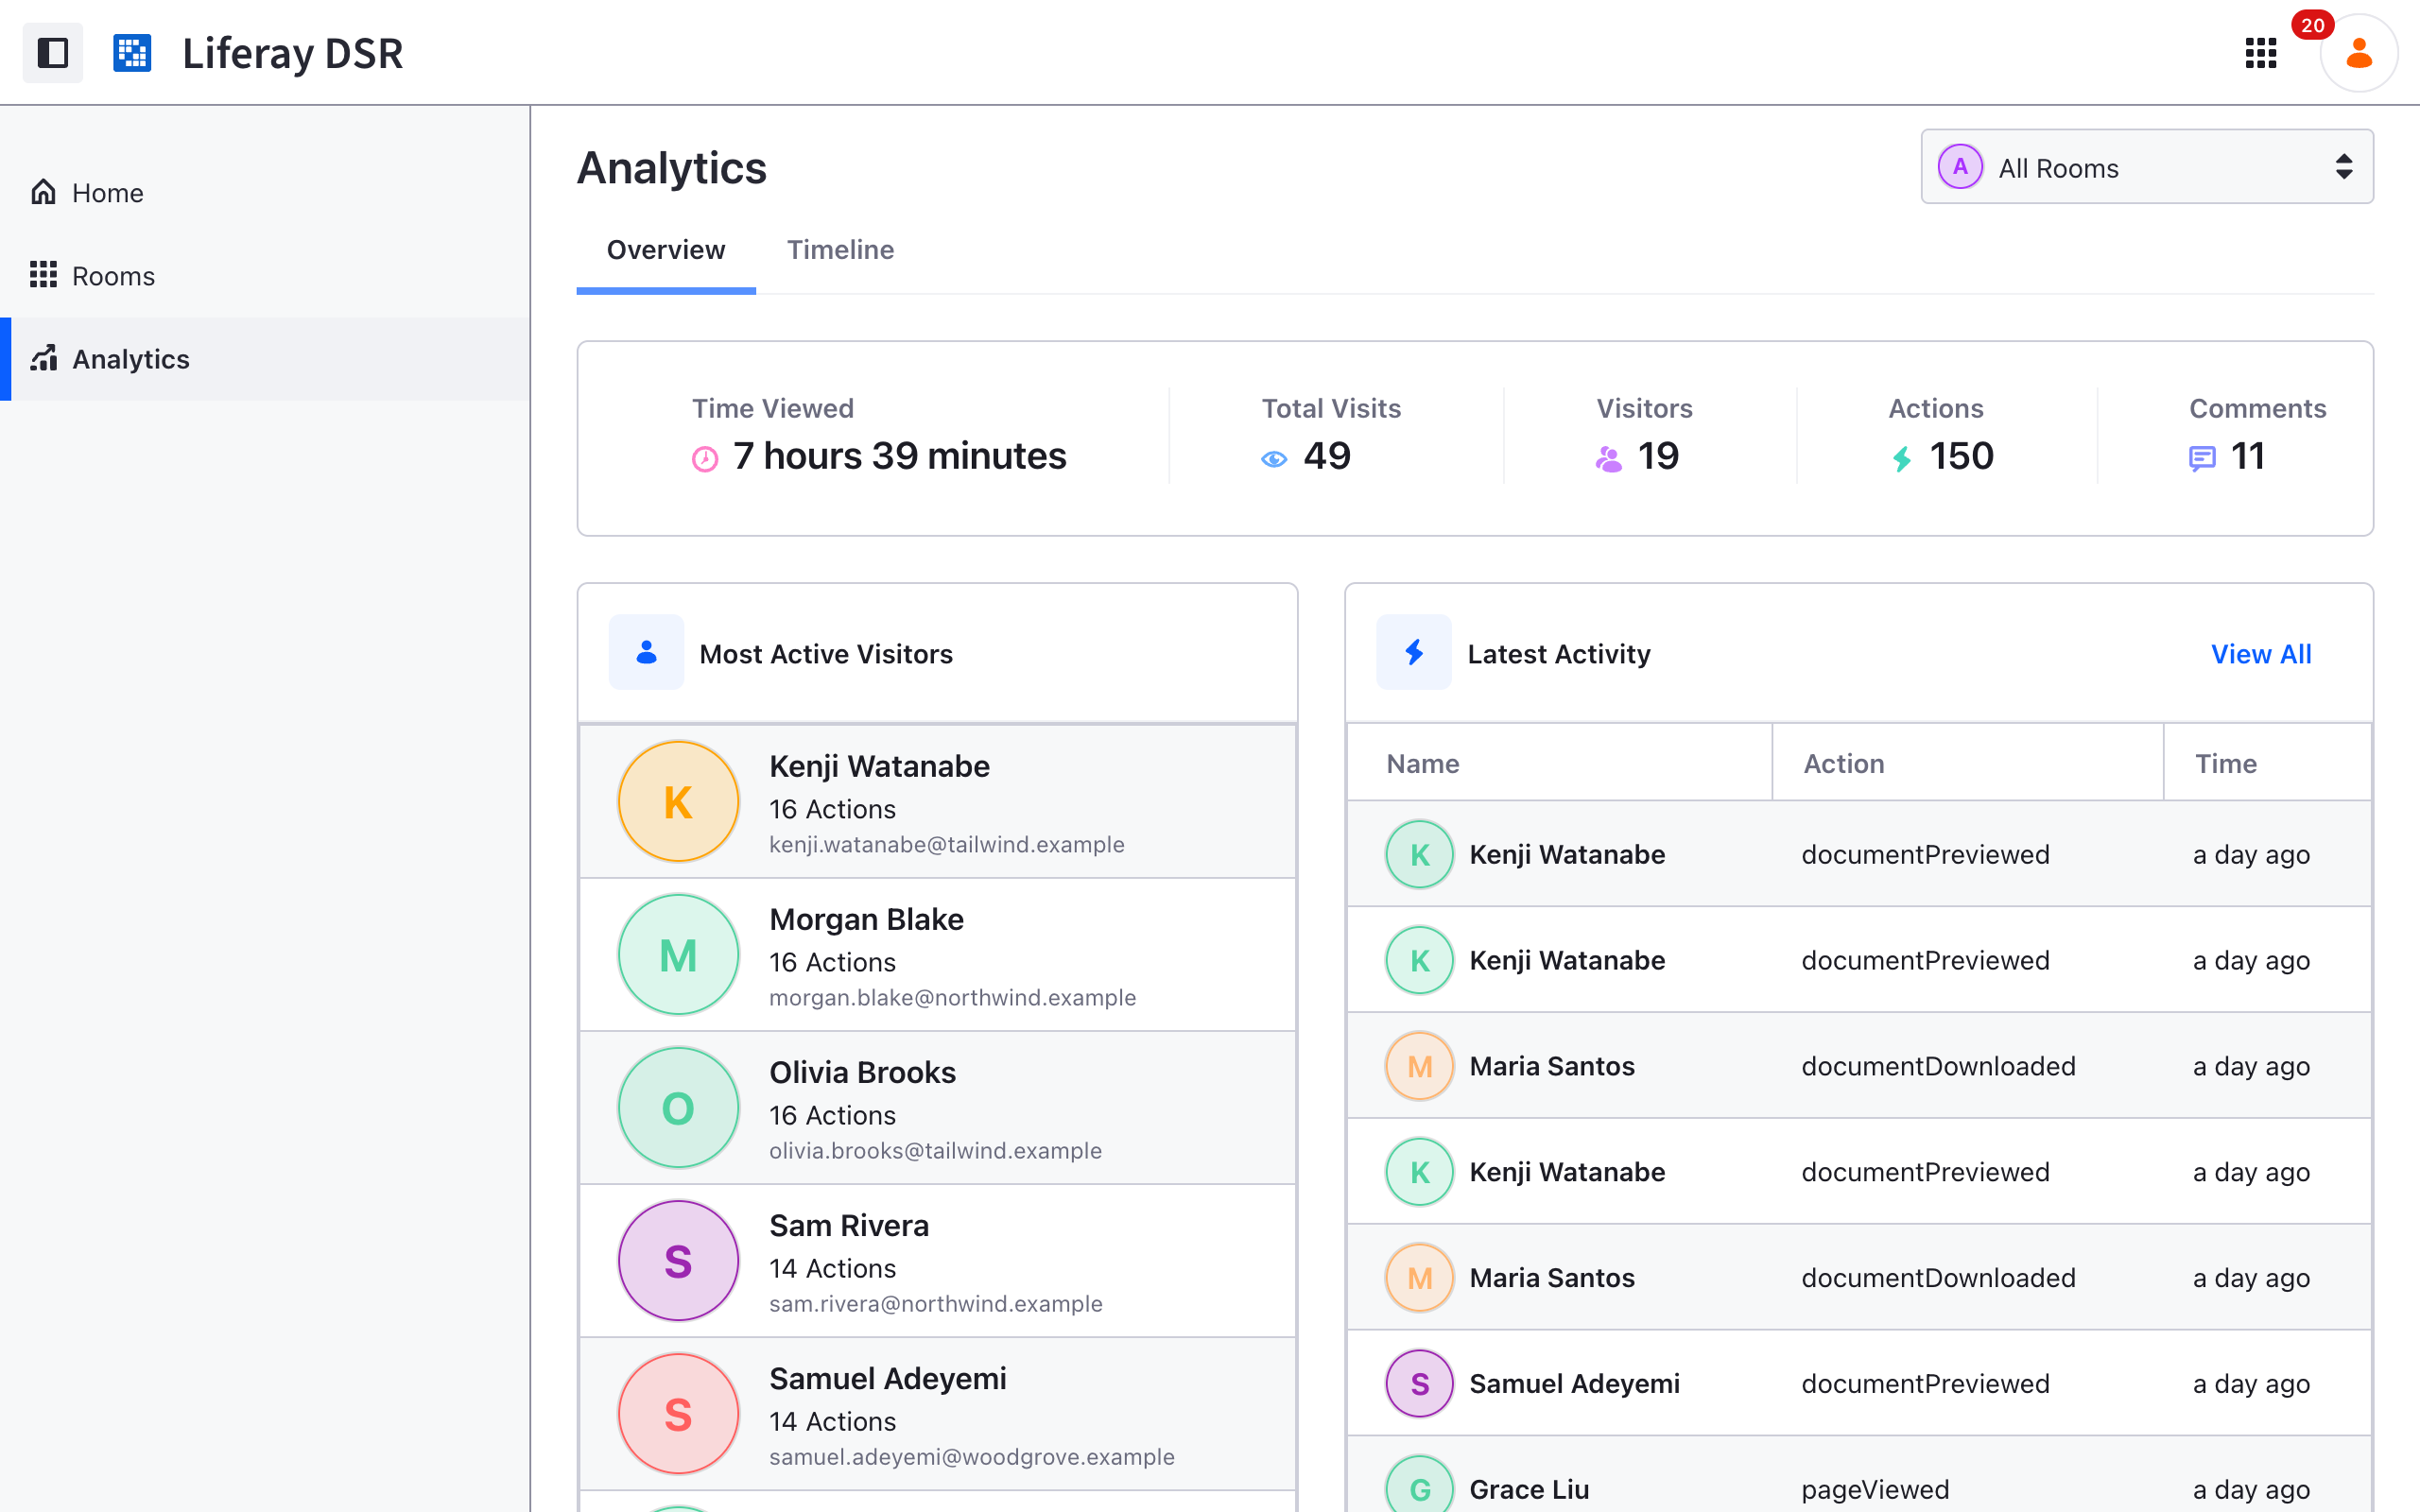
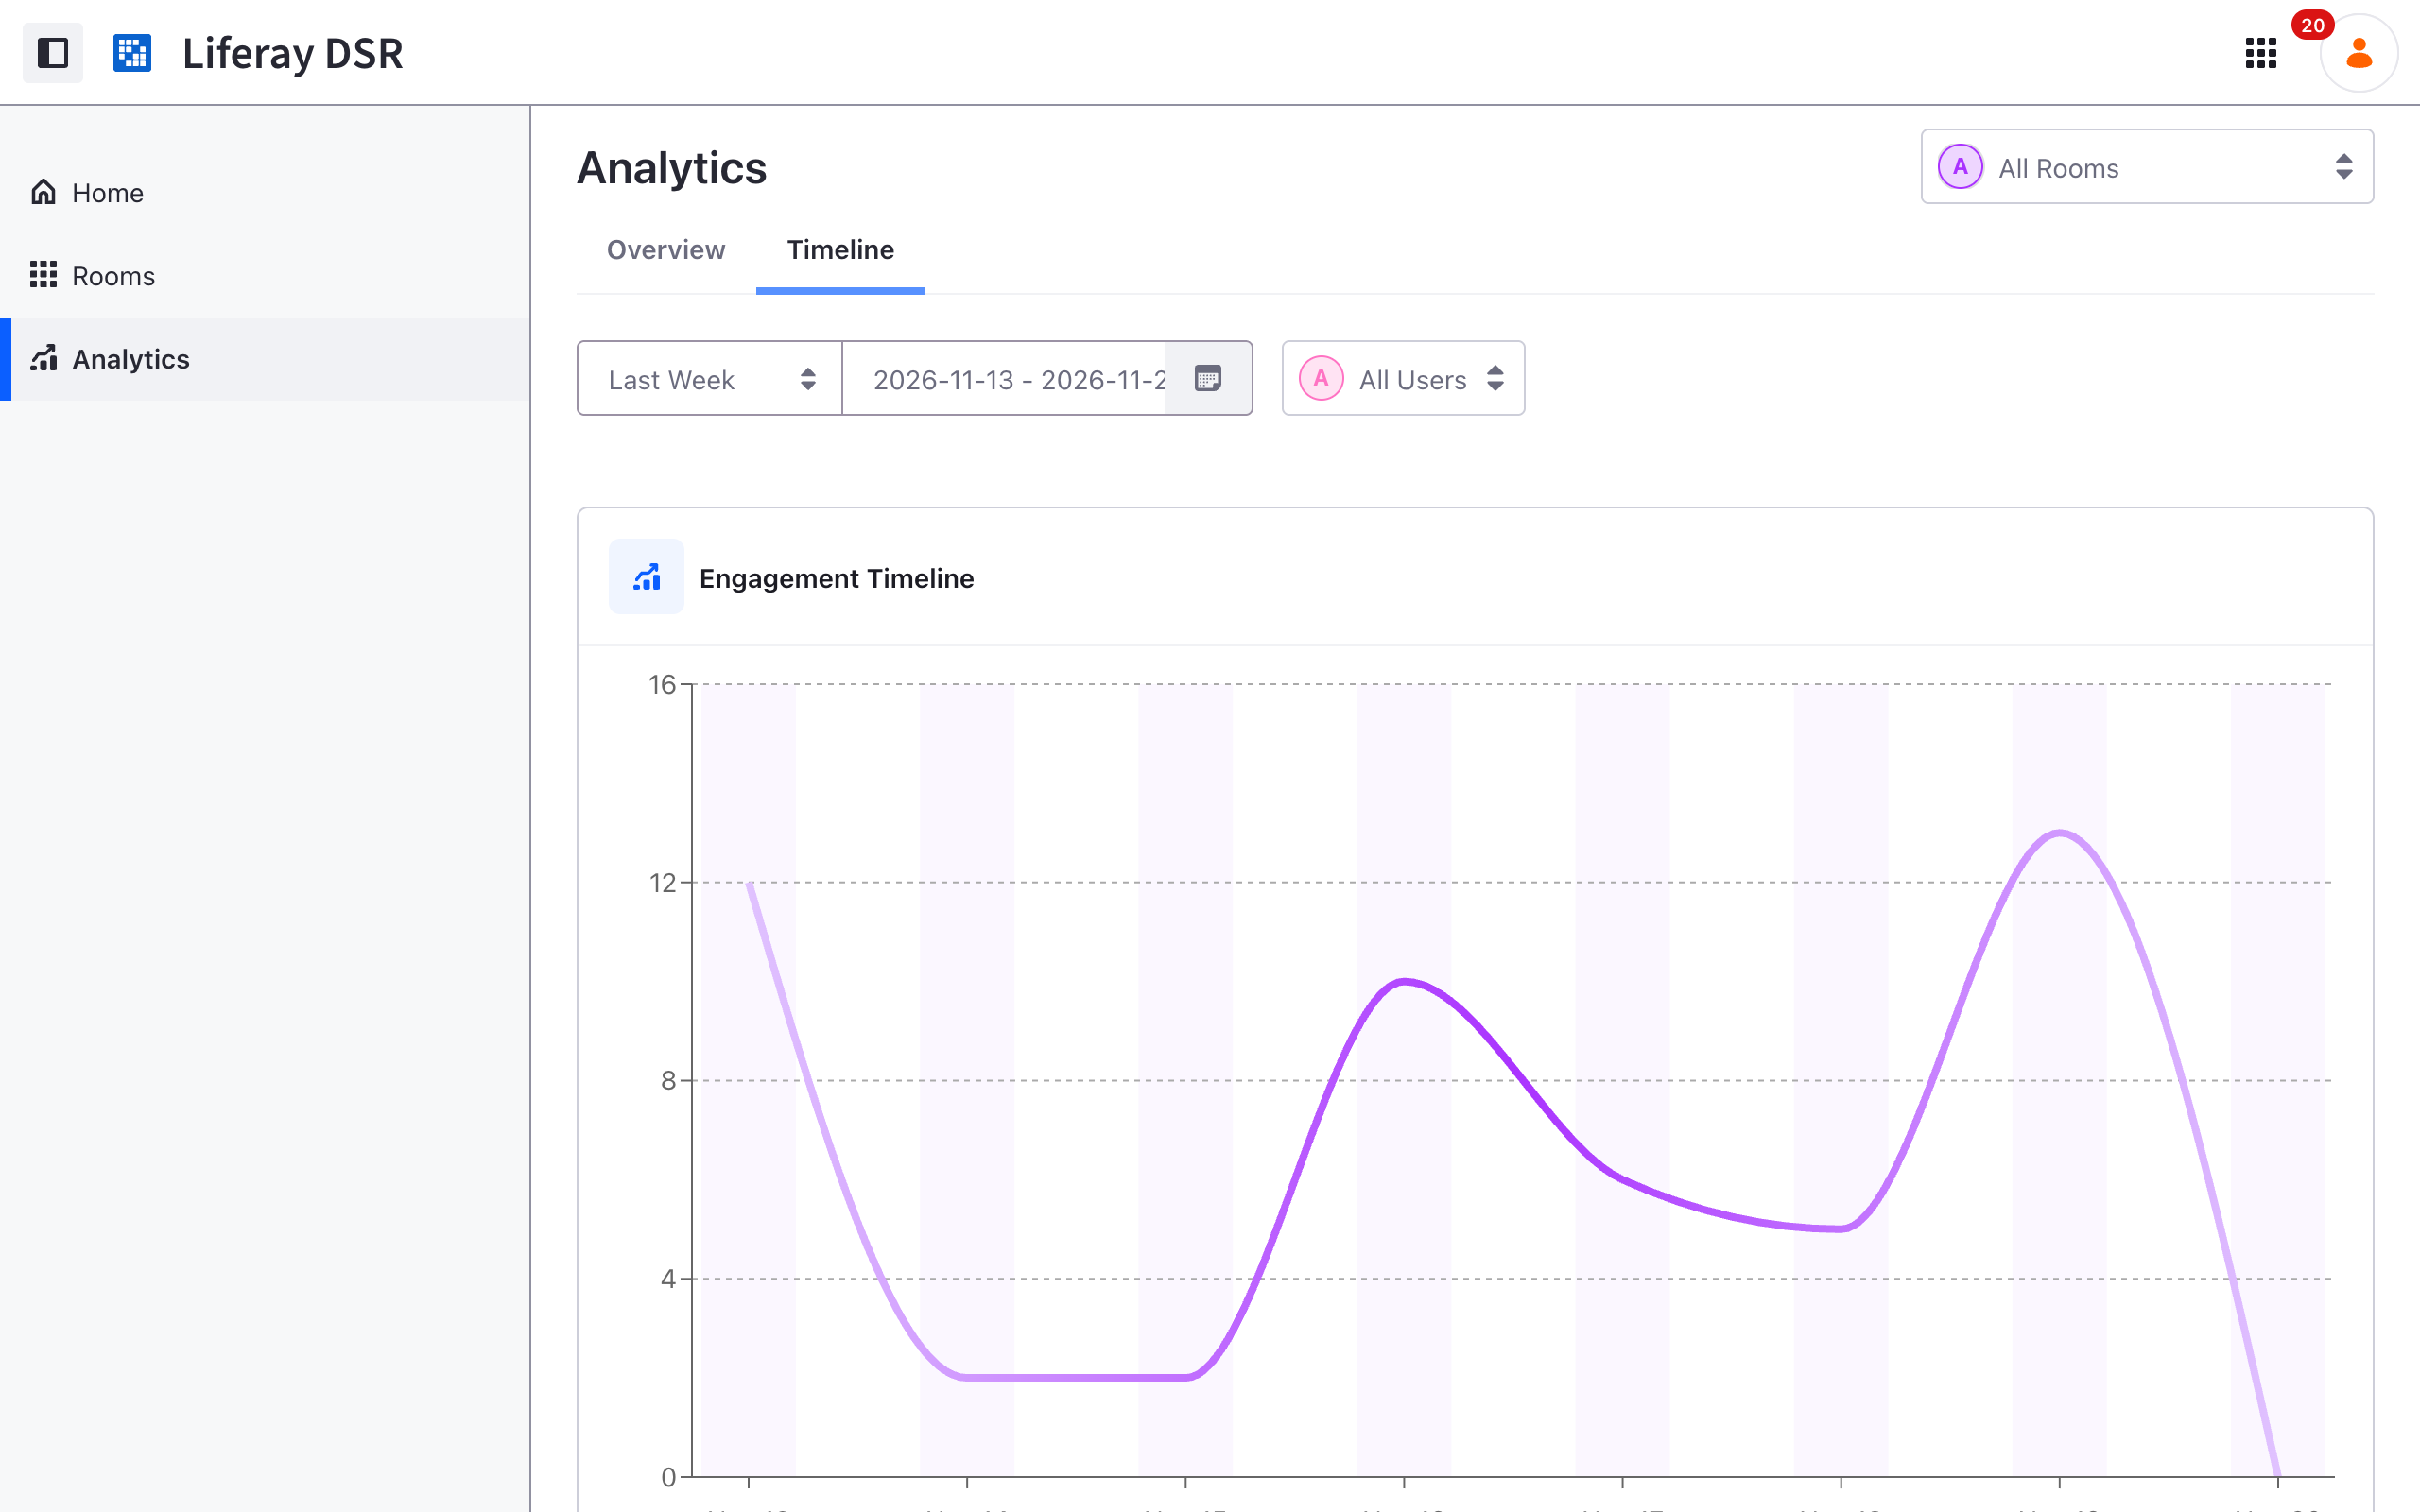
Connect the instance to Liferay Data Platform: Instance Settings → Analytics Cloud, paste the token. The DSR Analytics page then shows time viewed, visits, visitors, actions and comments, the most active visitors and the latest activity. You can see them across all rooms or for one room.
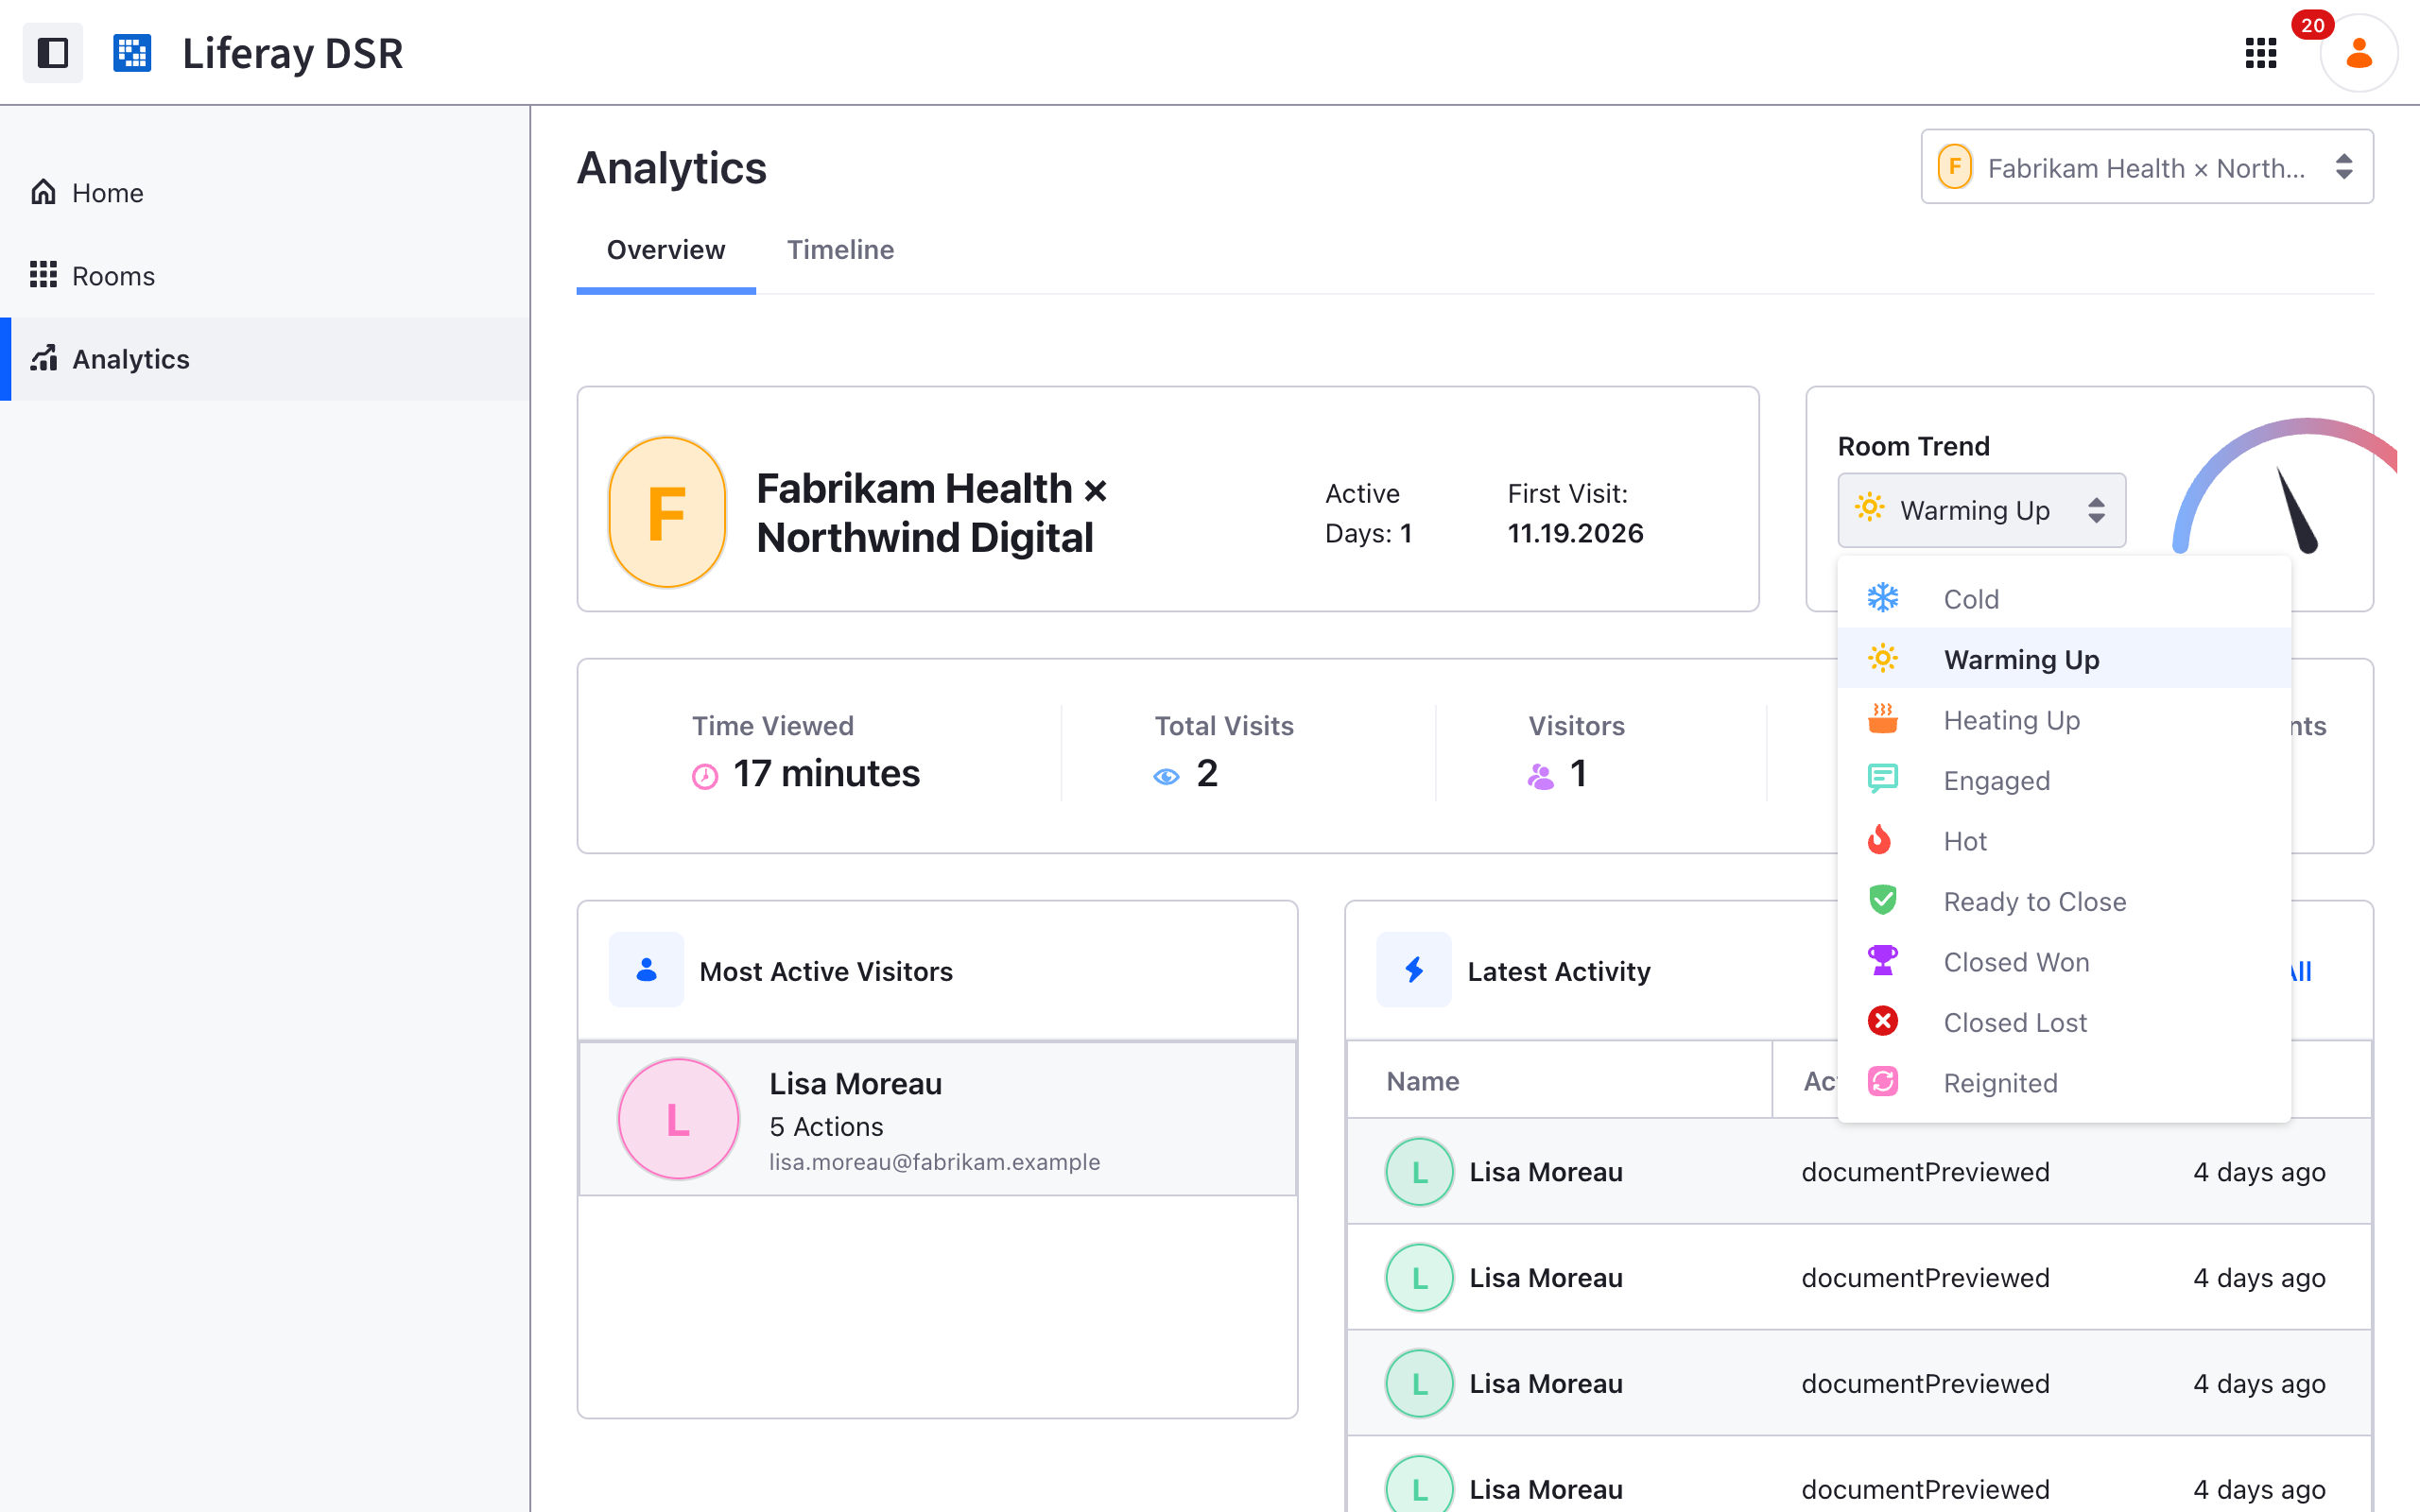
Select a room to see its own numbers, and set its Room Trend as the deal moves. The trend has nine values, from Cold through Heating Up, Hot and Ready to Close to Closed Won, Closed Lost or Reignited.
The Timeline tab charts engagement over time and can be filtered by date and user. Use it to spot when a quiet deal comes back to life. (Engagement Metrics Dashboard)
Step 9: Let prospects save an estimate from the public site into a room
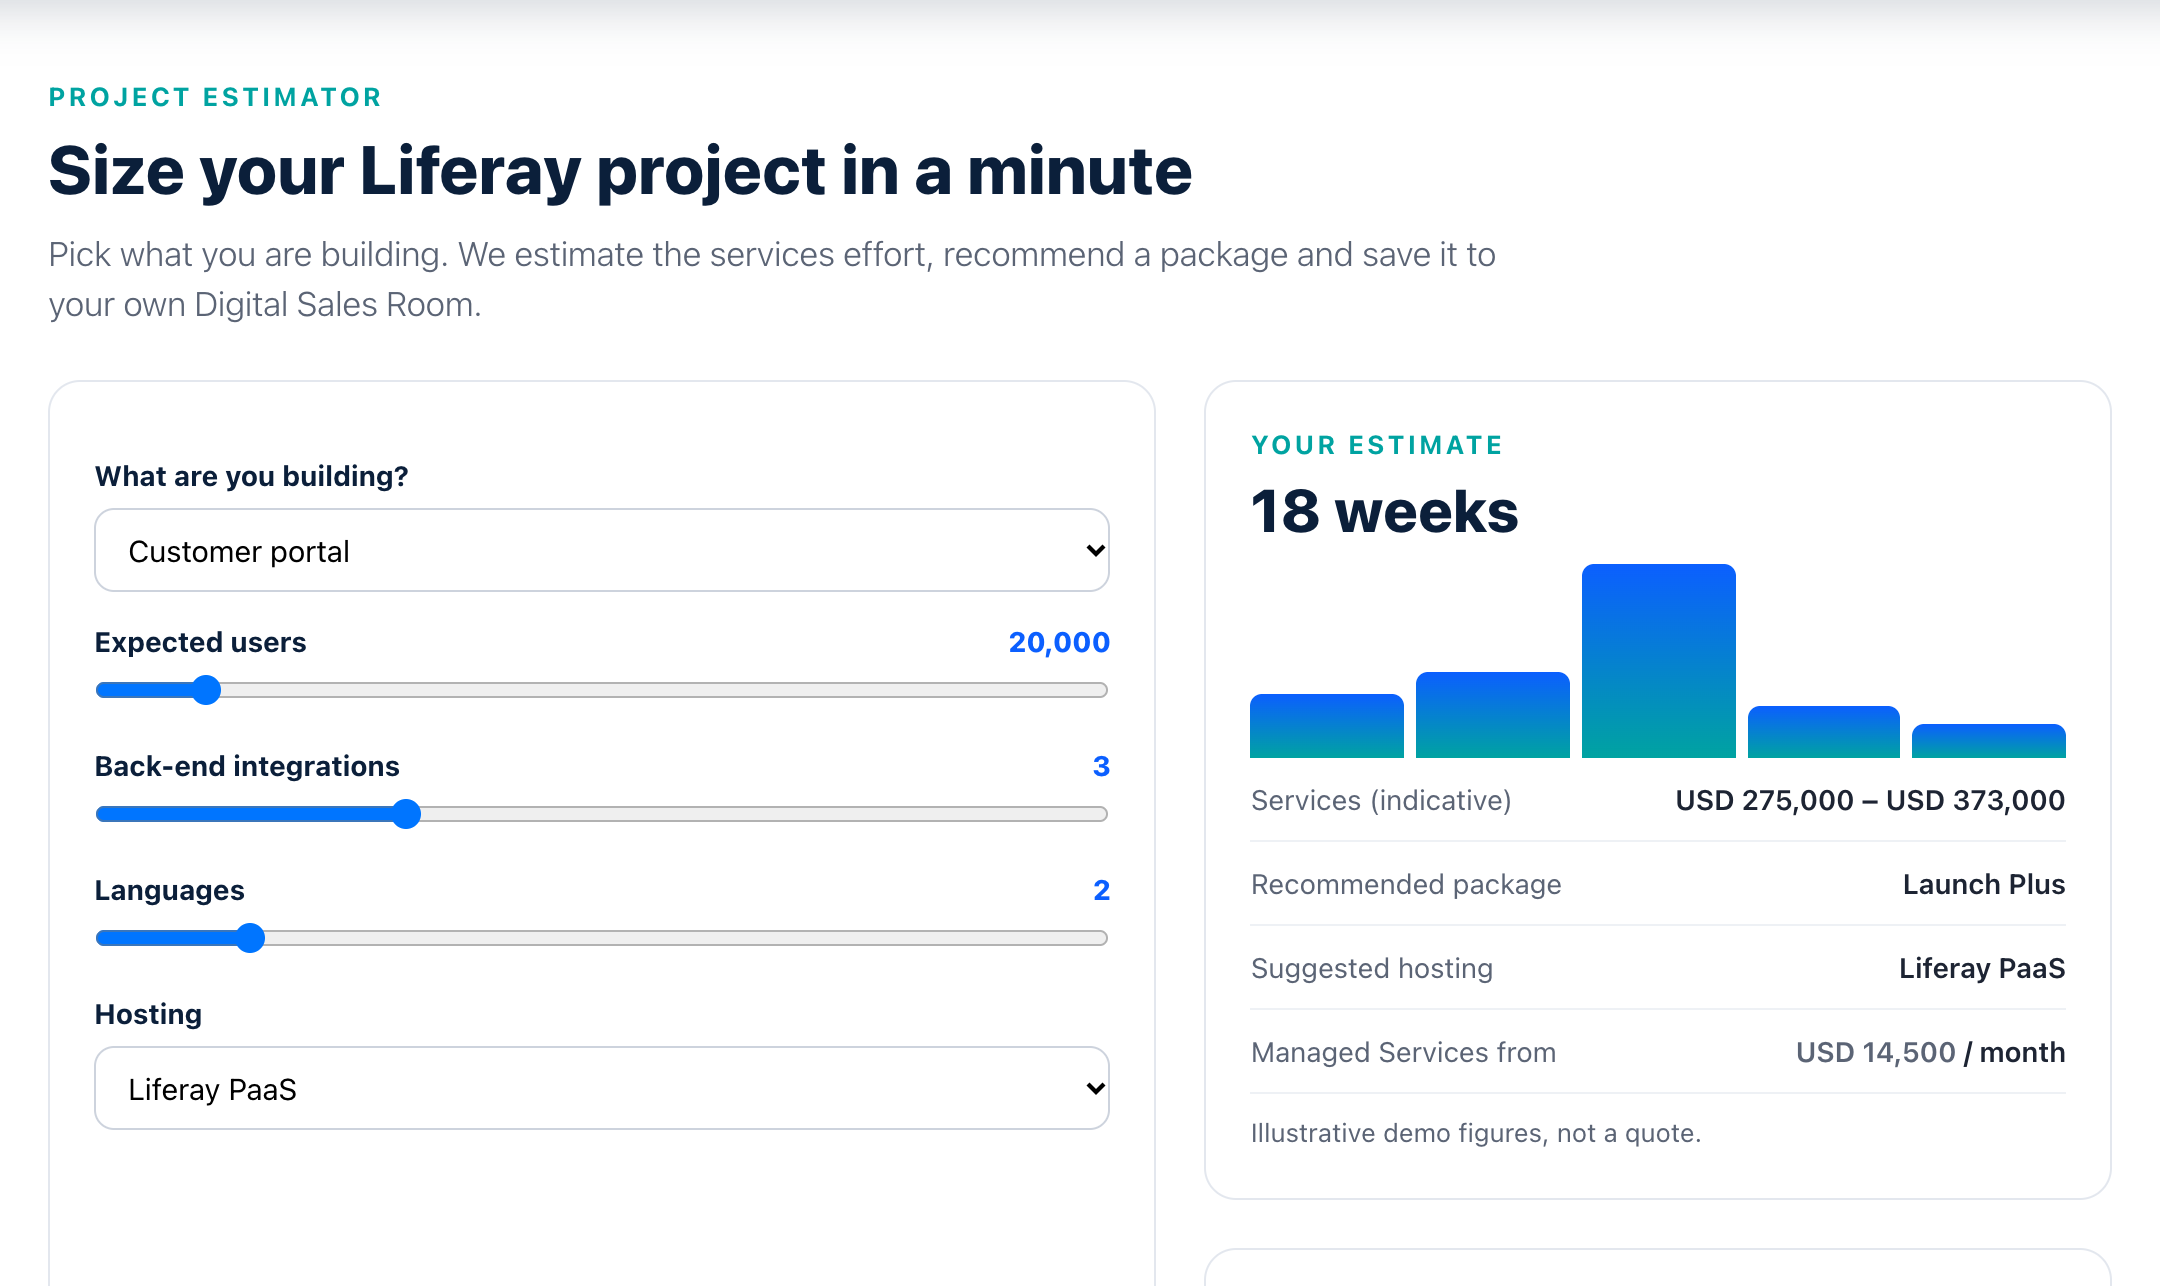
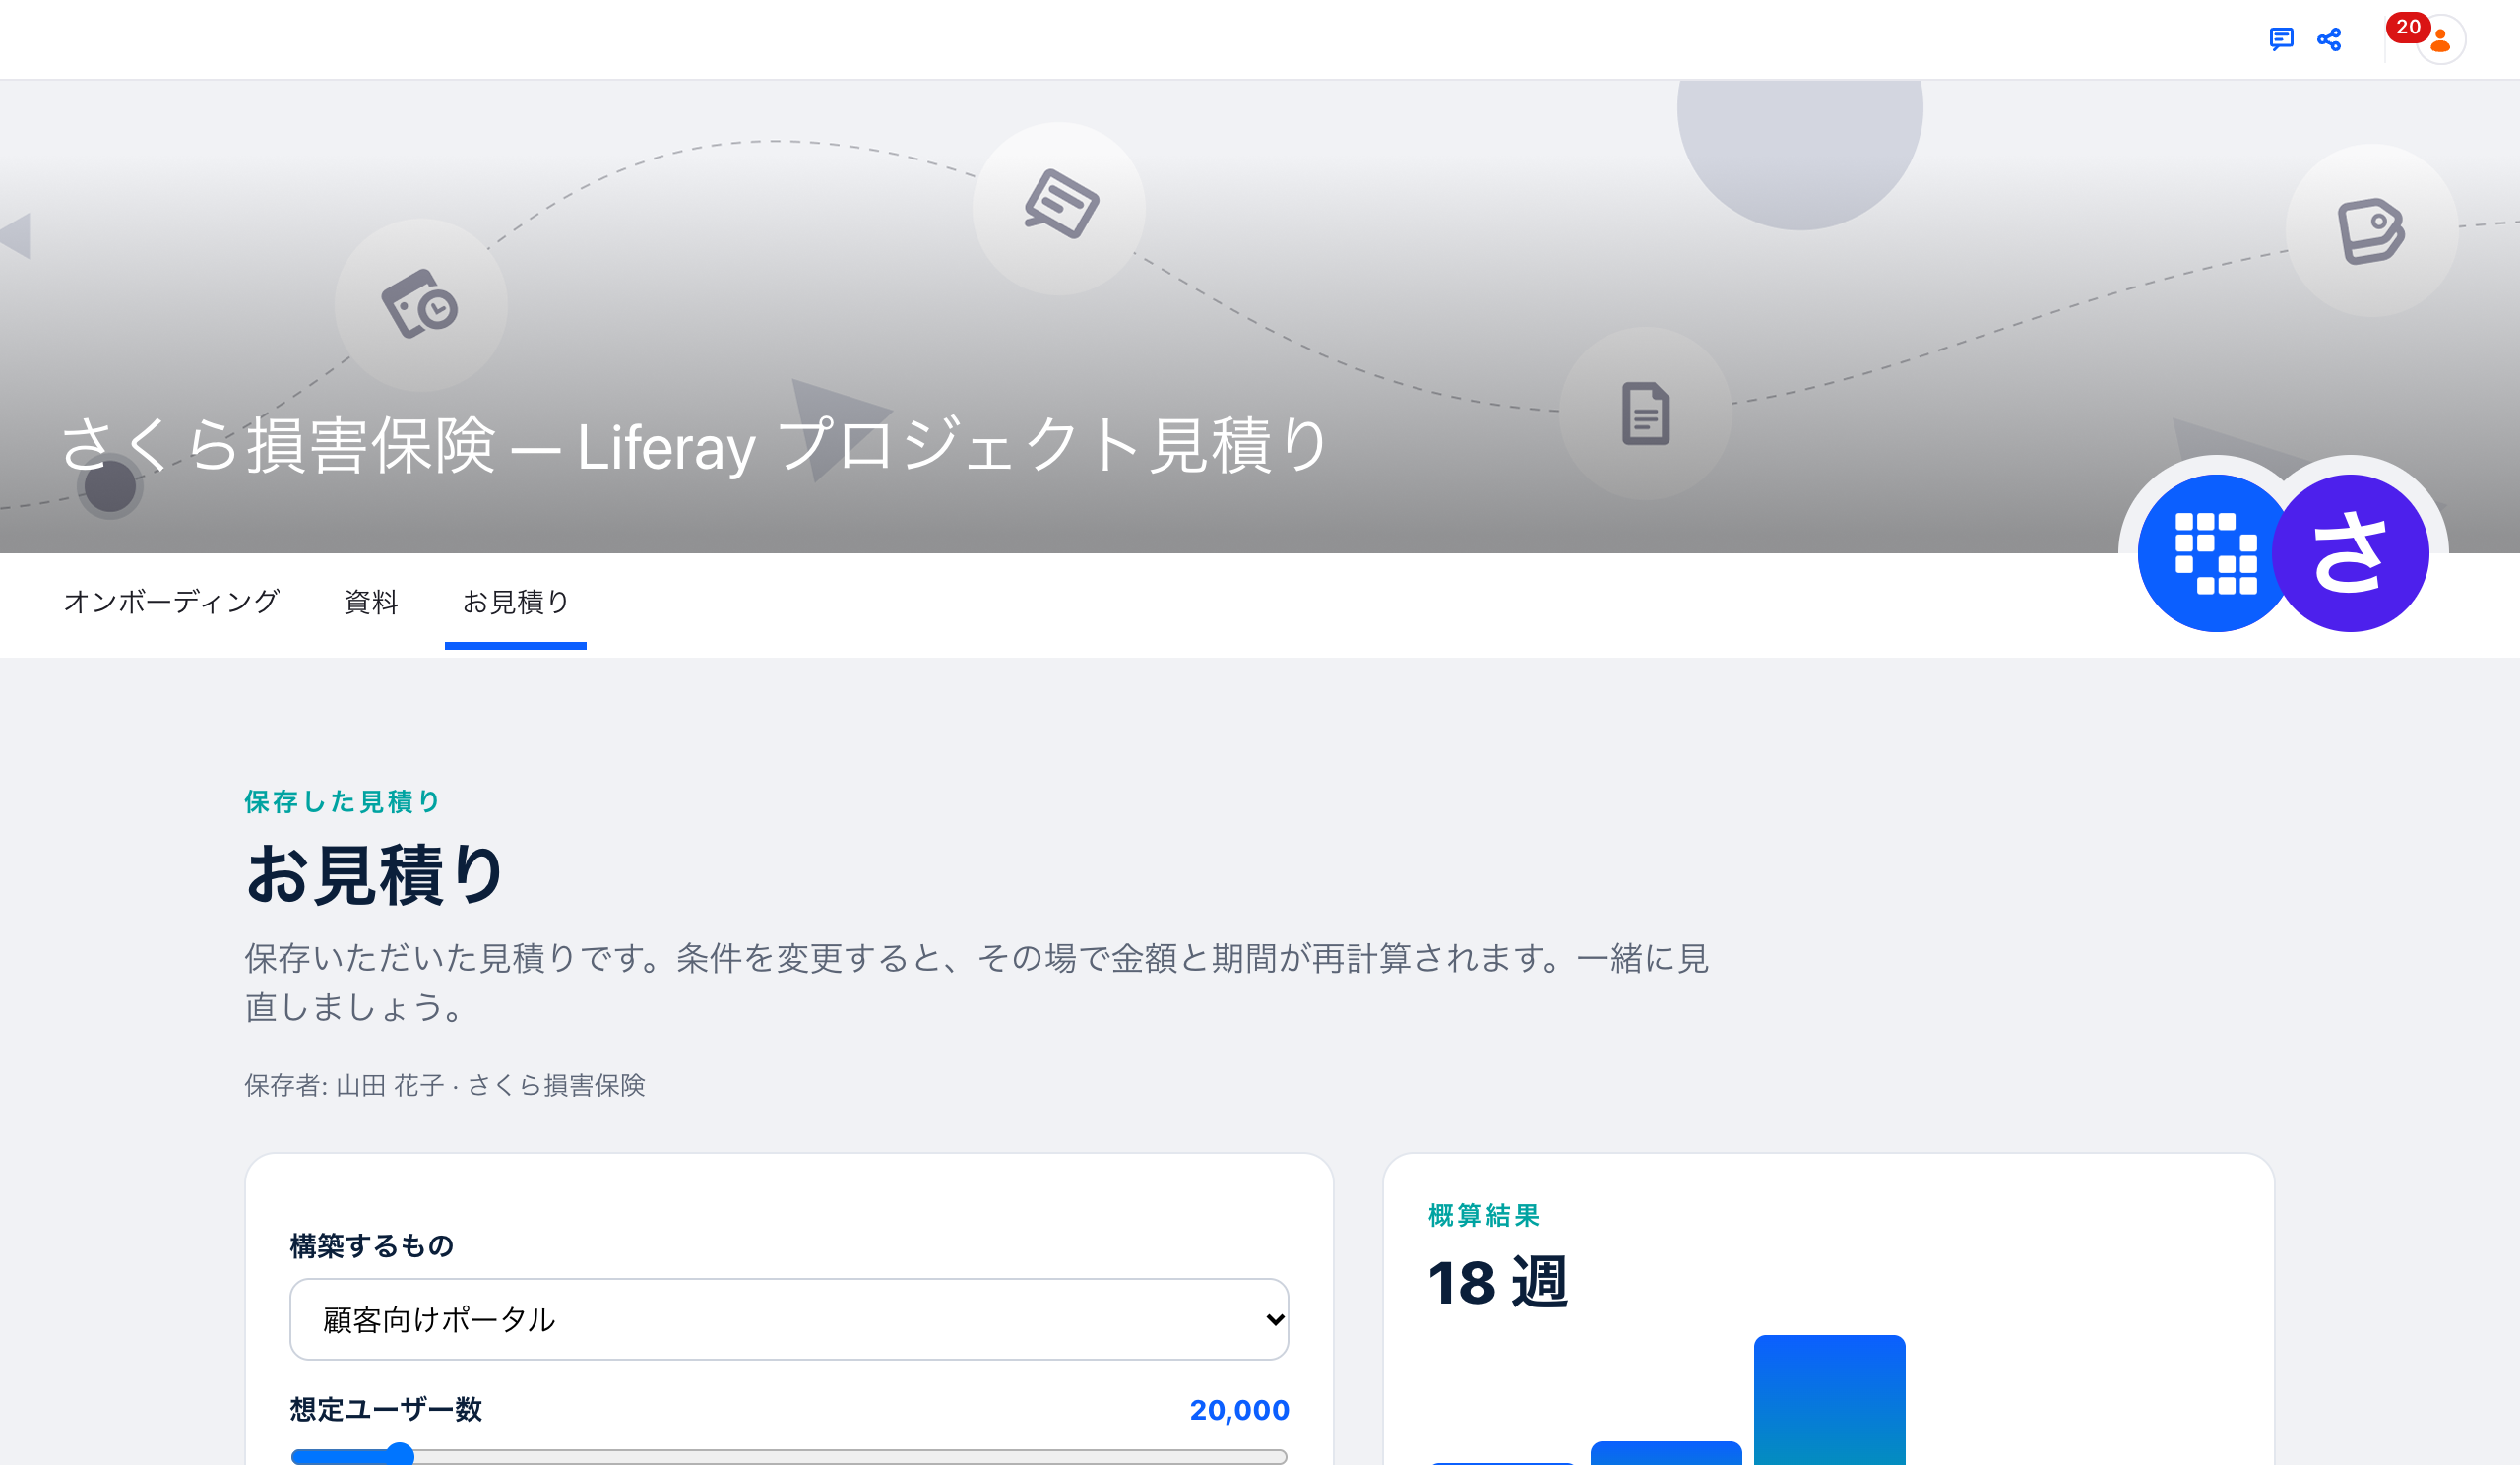
The Project Estimator page on the public site lets a prospect pick what they are building (customer portal, B2B commerce, and so on), the number of users, integrations, languages and hosting. They see the weeks, a services range and a recommended package at once.
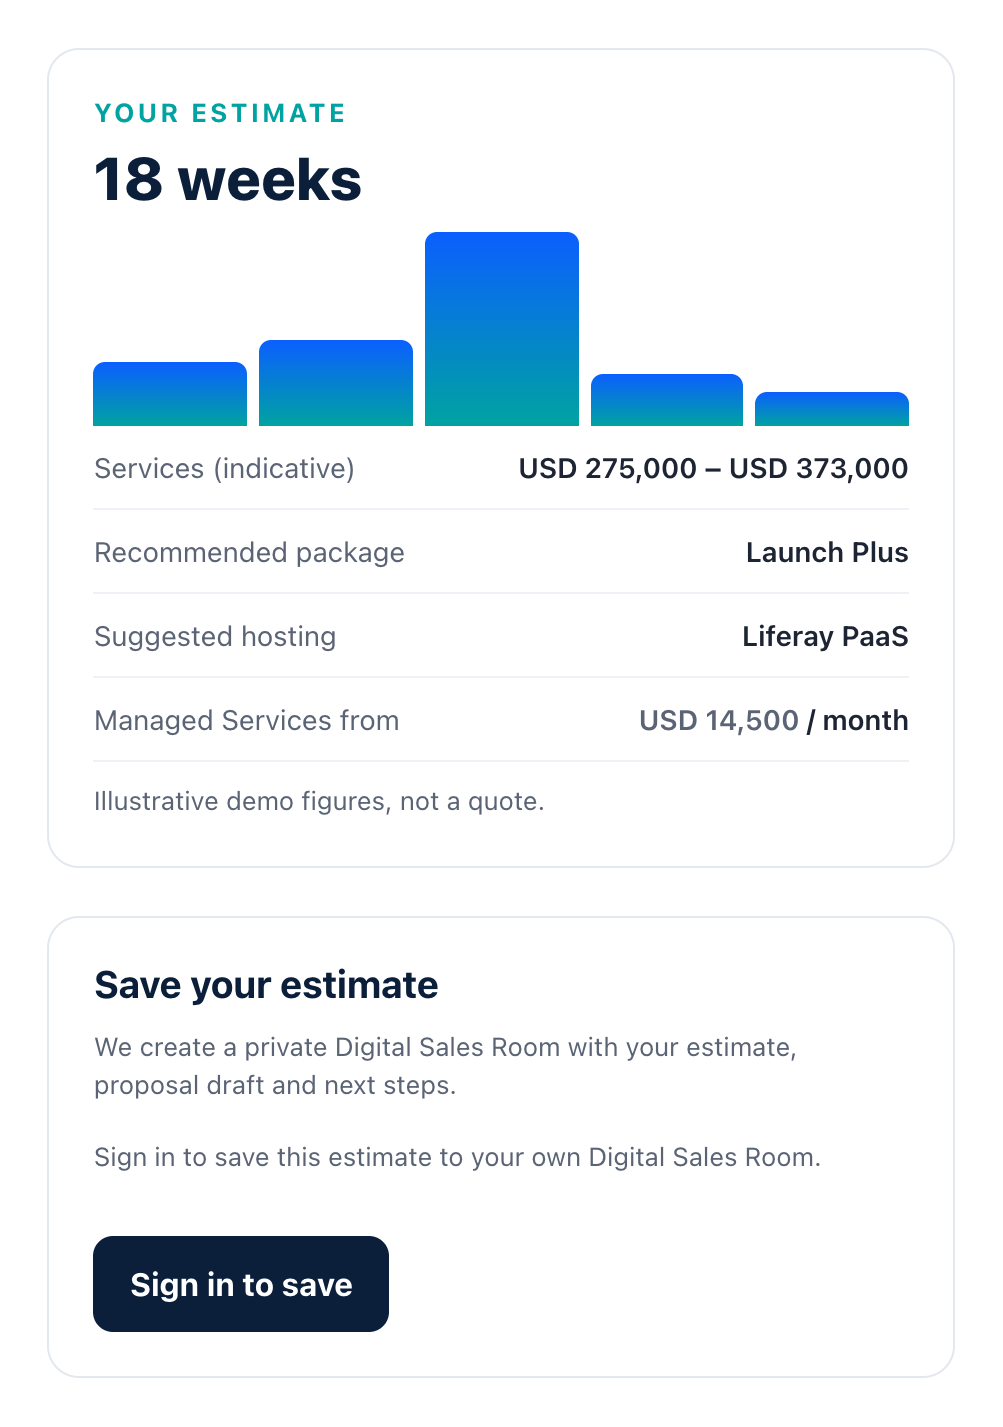
Saving is for signed-in users only. Guests see Sign in to save, which brings them back to the estimator after they sign in. Signed-in users see Save to my Digital Sales Room.
When the user clicks save, the page posts the estimate to the automation service with the user’s Liferay session cookie and Liferay.authToken. The service never trusts the browser. It asks Liferay who the caller is, and refuses guests, expired sessions and forged calls:
# Ask Liferay who the caller is, with the caller's own session.
data = urlencode({"cmd": json.dumps({"/user/get-current-user": {}}),
                  "p_auth": csrf_token}).encode()
req = Request(LIFERAY + "/api/jsonws/invoke", data=data,
              headers={"Cookie": cookie, "X-CSRF-Token": csrf_token})
user = json.load(urlopen(req))
if not user.get("emailAddress") or user.get("defaultUser") or user.get("guestUser"):
    return 401
Then it does the following:
- It creates or reuses the prospect’s account and adds the signed-in user as the buyer.
- It creates a room from the Self-service estimate template (
POST /o/digital-sales-room/rooms, with a friendly URL). - It writes the saved estimate into the room’s Estimate page, where buyer and seller can rework it together.
- It uploads an estimate PDF and invites the buyer and the account executive as Room Collaborators.
In 2026.Q4.0, posting room comments through REST throws UnsupportedOperationException, because room comments go through the DSR portlet. The demo comments on the estimate PDF instead.
Step 10: Make it work in Japanese
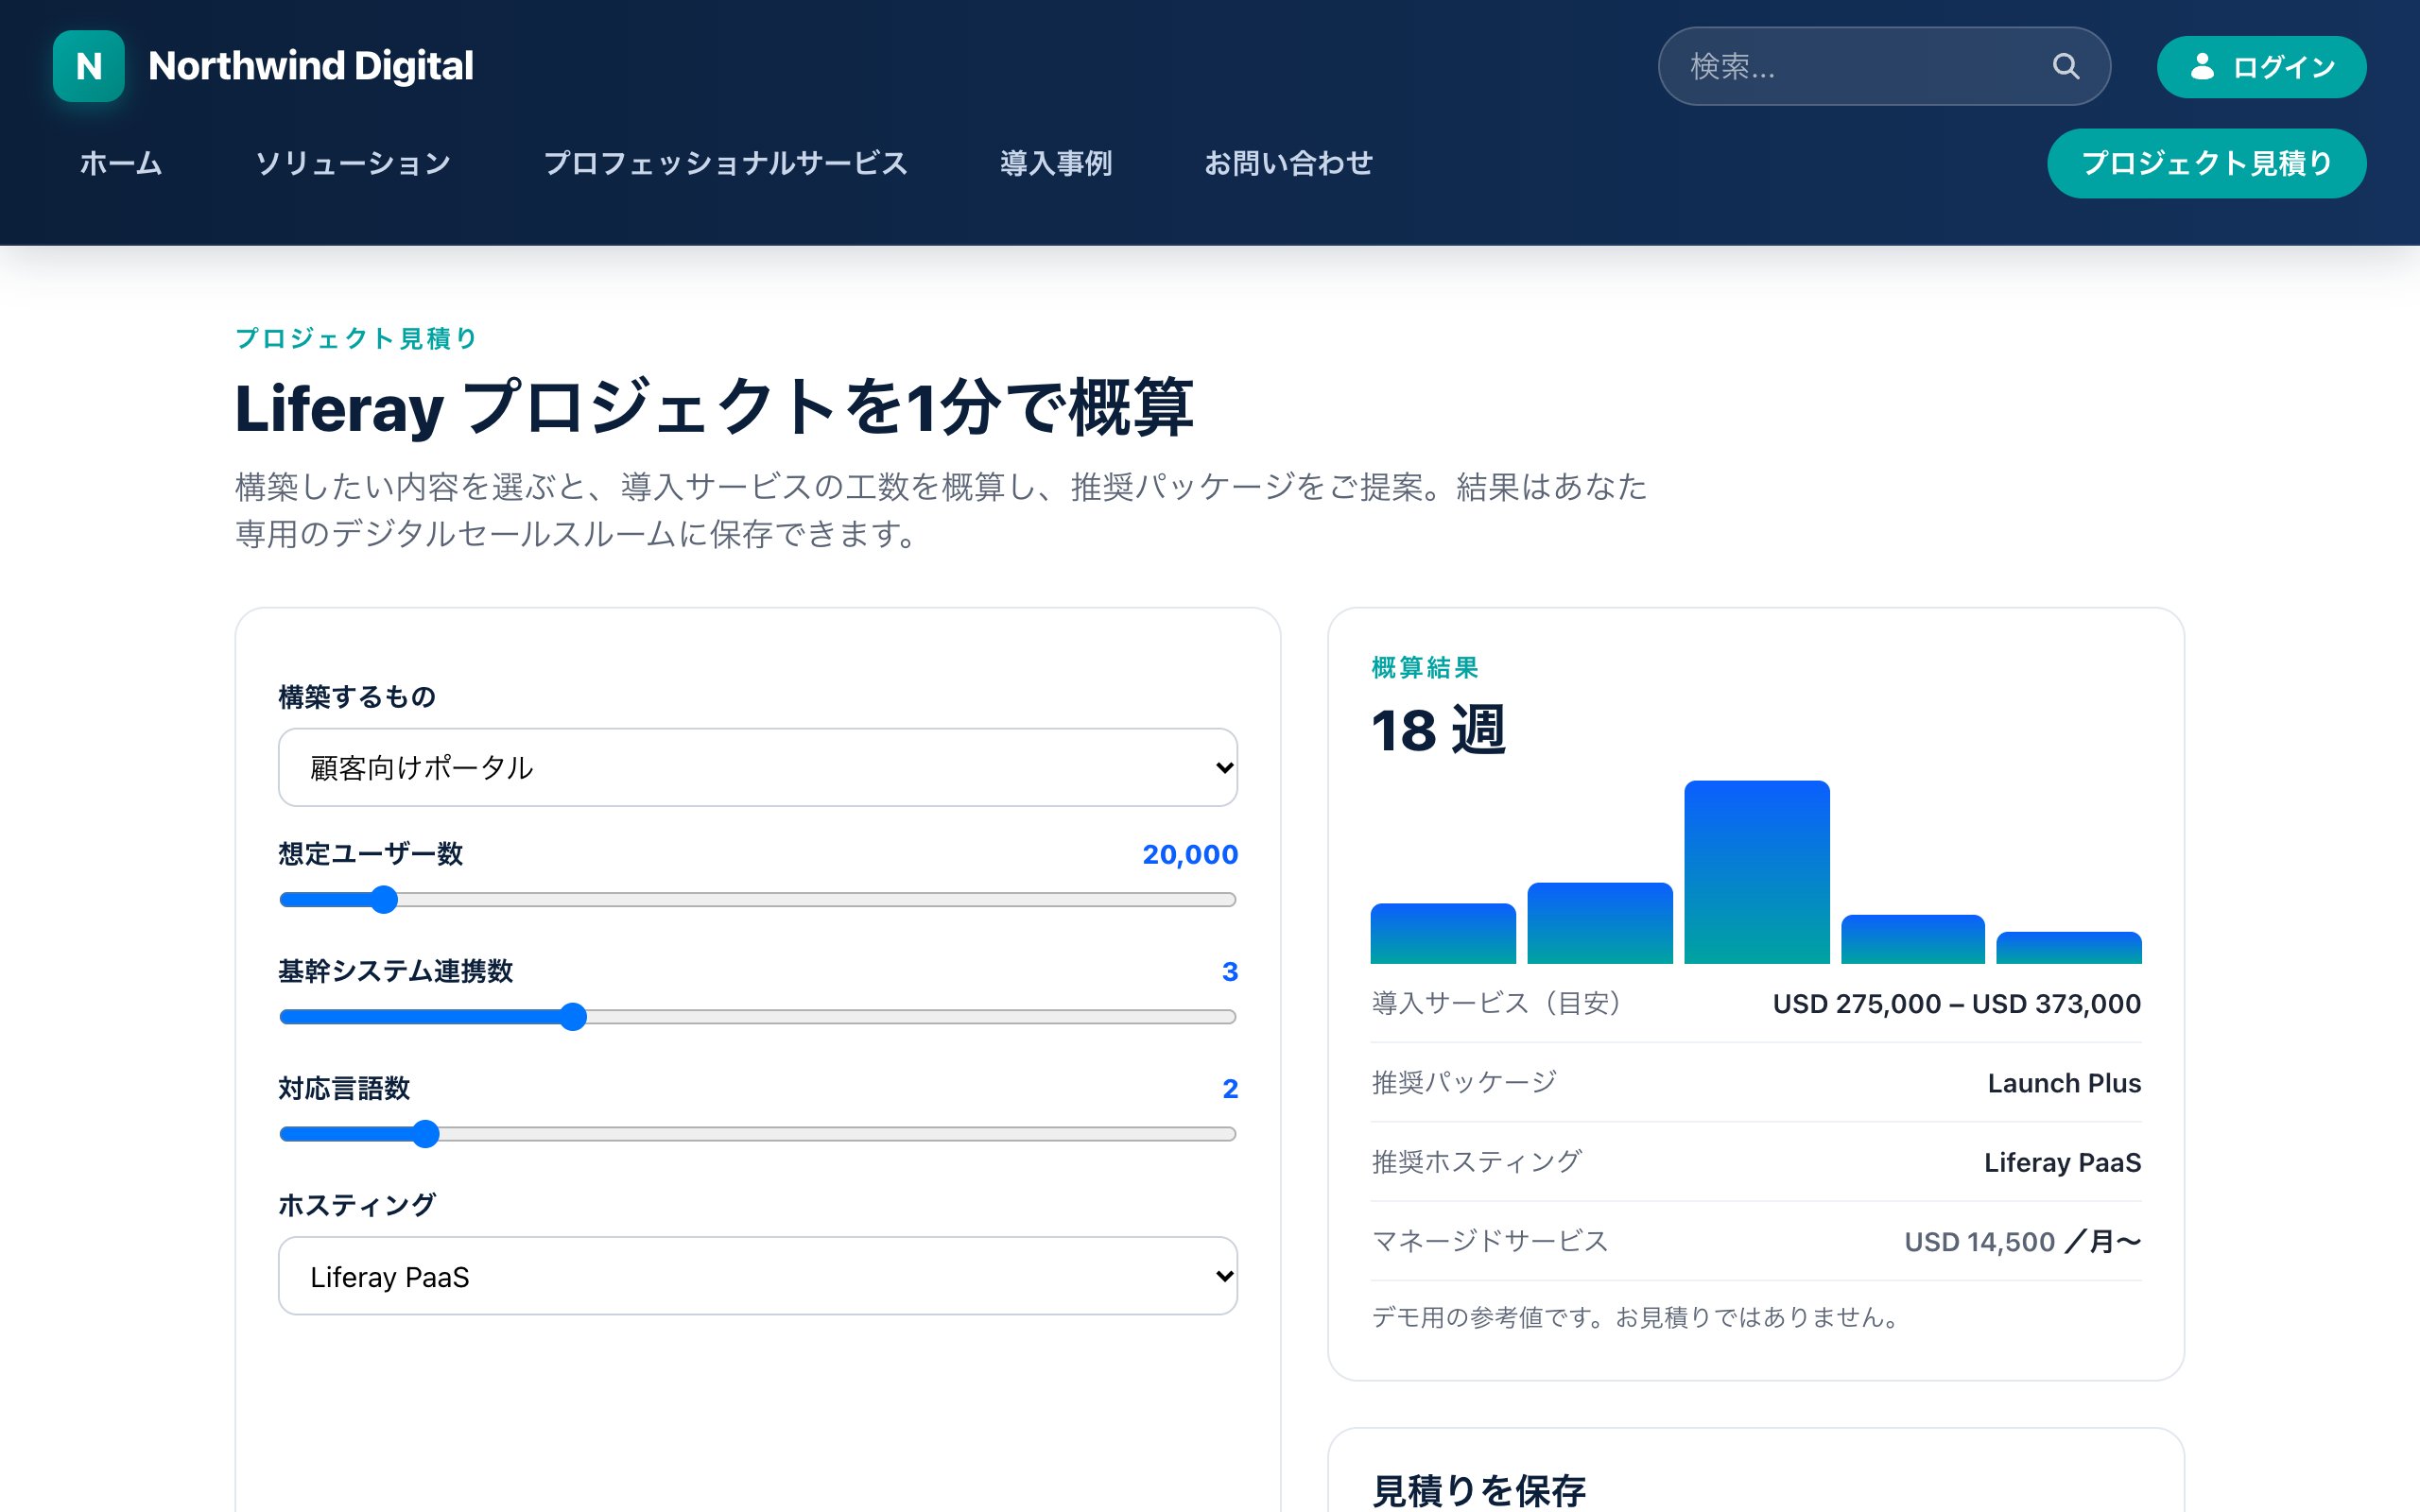
- With
locales.enabled=en_US,ja_JPset (step 1), add/ja/to any URL to see the Japanese version. - Give pages, fragments, CMS content and template pages Japanese values. Object fields take
ja_JP, and fragments takevalue_i18n. - Generate estimate PDFs in the language the user saved from. Japanese PDFs need a CJK font. The demo uses an Adobe-Japan1 CID font.
- For a Japanese-speaking buyer or seller, set the user’s Language to Japanese. They then sign in to a Japanese UI, DSR launchpad included.
Step 11: Show the Salesforce opportunity in every room, and write back
Sellers live in their CRM, so every room shows the linked Salesforce opportunity: stage, amount, close date, owner, probability and next step. It is a custom element client extension (<nw-salesforce-panel>) that the template places on the Onboarding page:
salesforce-connector:
    name: Salesforce Opportunity (demo)
    type: customElement
    htmlElementName: nw-salesforce-panel
    friendlyURLMapping: salesforce-connector
    instanceable: false
    portletCategoryName: category.client-extensions
    urls:
        - salesforce-panel.js
    useESM: false
Deploy it from a Liferay Workspace with blade gw deploy. Alternatively, register it with a CETConfiguration OSGi config in osgi/configs/ that points baseURL at wherever the JavaScript is hosted. The element reads the room’s site ID and calls the service, which answers from the CRM.
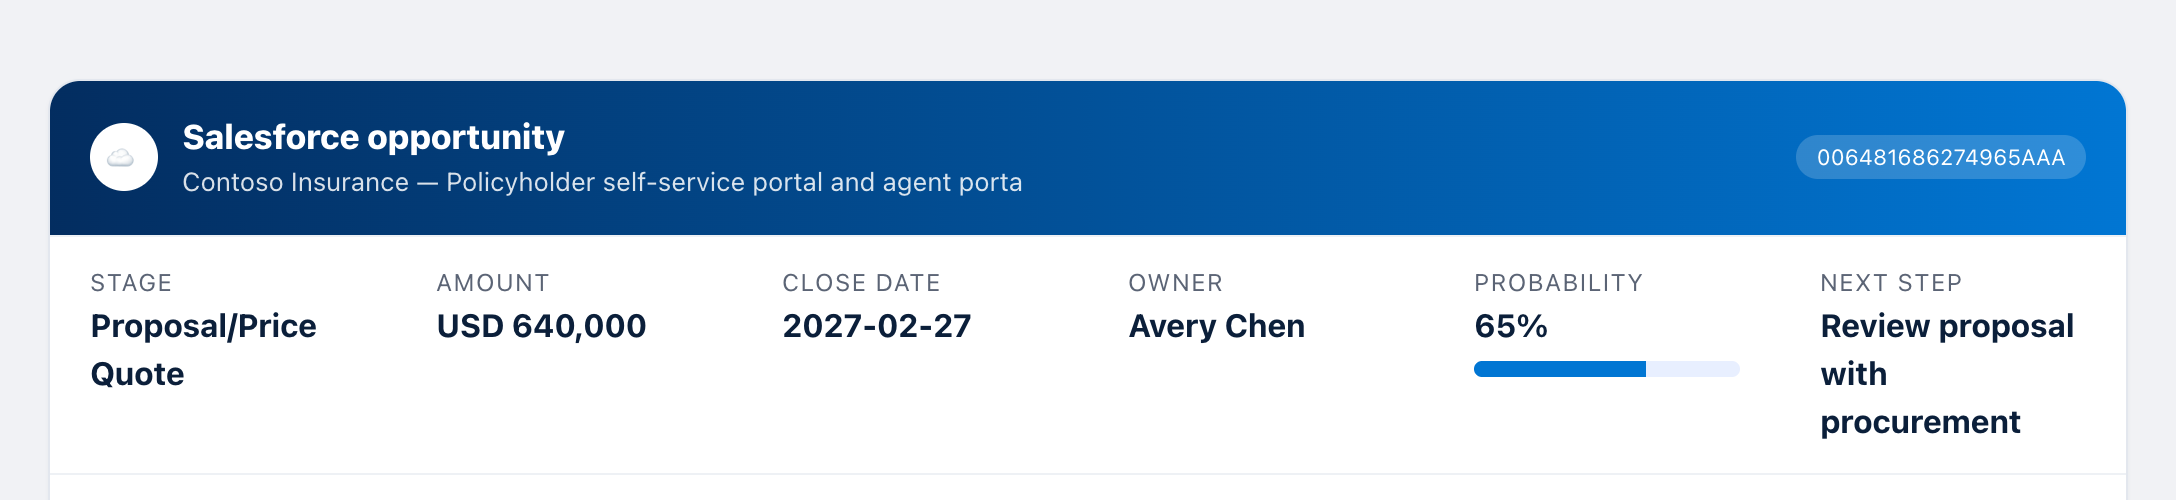
Write-back. Add a second object action on the Room object: On After Update → Webhook to the same service. When a seller changes the Room Trend (step 8), the service maps it to an opportunity stage and updates the opportunity:
| Room Trend | Opportunity stage |
|---|---|
| Cold / Warming Up / Heating Up | Prospecting / Qualification / Needs Analysis |
| Engaged / Hot | Value Proposition / Proposal/Price Quote |
| Ready to Close | Negotiation/Review |
| Closed Won / Closed Lost | Closed Won / Closed Lost |
| Room archived | Closed Lost |
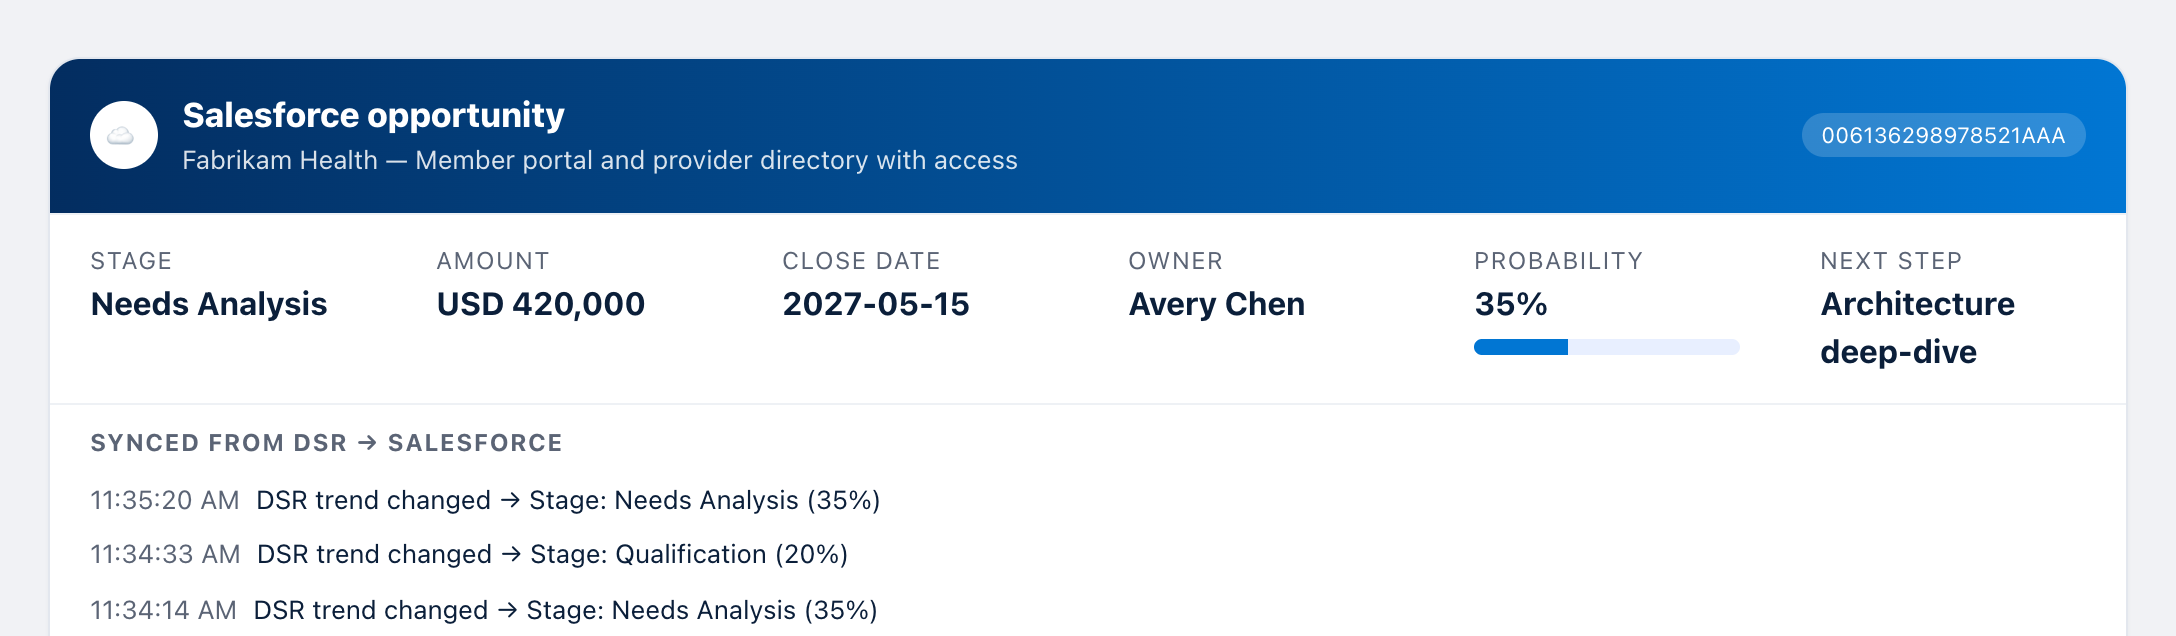
The connector in the screenshots is fictitious: a mock API stands in for Salesforce. For a real connection, point the service at Salesforce’s REST API with OAuth (for example as an OAuth-protected client-extension microservice), and keep the credentials in the service, never in the browser.
Step 12 (optional): Let AI assistants work with the deal through MCP
2026.Q4 includes an MCP server. The LPD-63311 flag (step 1) only shows its admin UI. To switch the endpoint on, also add an OSGi config, com.liferay.mcp.server.rest.internal.configuration.MCPServerConfiguration.config:
enabled=B"true"
Connect an AI assistant to https://<your-host>/o/mcp. Then ask it, for example, “What’s open in the Contoso deal?” or “Draft a solution brief for B2B portals in the Sales Enablement Space.” Control what it can see with MCP profiles and data masks under Control Panel → MCP Server. It works with the permissions of the user it signs in as.
Result
From a plain DXP 2026.Q4, you have a partner sales platform where:
- the public site and the new CMS give buyers and sellers the same collateral,
- every deal has a Digital Sales Room built from a template for its deal type, set up automatically with its own pages and a personal welcome,
- buyers are invited by role, with access that ends when you say, and talk to the seller in room comments,
- a prospect can size a project on the website and save it into their own room, in English or Japanese, once signed in,
- each room shows its Salesforce opportunity, and trend changes flow back to the CRM,
- analytics show which buyers engage with which documents, and when a deal goes cold or comes back.
A 10-minute talk track:
- Public site → Project Estimator.
- Sign in and save the estimate to a room.
- The Rooms pipeline and trends.
- Inside Contoso: documents, Share, comments and the Salesforce panel.
- Analytics: switch to Tailwind (hot) and Lucerne (cold).
- Repeat the estimate at
/ja/. - Ask an AI assistant about the deal through MCP.
Learn more: Digital Sales Room documentation · Managing Rooms · DSR Launchpad · Engagement Metrics Dashboard